The sewerage layout in a private house is designed without fail in the process of preparing general construction documentation. If you need to organize the collection of wastewater in a building that is already in use, you will have to order a separate project or do it yourself.
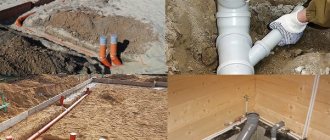
Laying out sewer pipes at the foundation stage
Water supply and sewerage systems in private construction
Water drainage and sewerage in a private house can be done in two ways:
- by connecting to centralized systems;
- by building autonomous systems.
The preferred option is the first, since in this case the external water supply and sewerage system will consist of a pipeline laid from the house to the connection point.
To implement this project, you need to have permission from the relevant organizations to connect to centralized systems (read: “Sewage project in a private house - what needs to be taken into account”). In addition, technical conditions for carrying out work will be required. But not all suburban settlements have central water supply networks and sewage disposal lines. Therefore, many homeowners are forced to build LOS (local treatment facilities) on their property and install equipment for water intake from wells or wells.
Based on the method of transporting liquid, wastewater disposal systems can be either free-flow or pressure. The first of them allow water to move through the pipes by gravity, for which the pipeline is installed at an optimal angle of inclination. In cases where it is not possible to mount the network at the required angle, the design of external water supply and sewerage networks involves the installation of pumps for pumping liquid.
Depending on the location where the equipment will be located, water supply and sewer networks can be internal (inside the building) or external (outside the house).
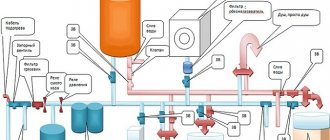
Water supply scheme for a private house
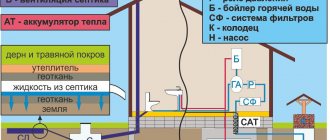
If there is a source of input on the site of a private house, then you can equip it with the help of a pump. The submersible device will pump water into a special storage tank in the house with a capacity of up to 500 liters. The storage tank is separated by a membrane or relay, which allows you to adjust the fluid pressure in it. When the tank is filled to capacity, the water supply pump is turned off, and if the water is used, the pump pumps water into the tank again. According to the presented diagram, the water supply system consists of the following parts:
- Well or well.
- A pumping station allows you to draw water from a water supply source.
- Hydraulic accumulator - creates a certain pressure in the system.
- Special filters that purify and prepare water for use.
- Equipment for heating water.
- Collector system.
Experts advise installing water supply systems at home in spring or summer, when groundwater is not so high, the soil itself is easy to process, and digging is faster. Installing a hydraulic accumulator, which allows you to control the pump on and off, is optional. In this case, other pump control methods are used. The layout of the water supply can be varied - it all depends on the wishes of the owners who decided to make their home more comfortable.
Features of arrangement of intra-house networks
Internal water supply and sewerage networks are pipelines and equipment installed inside the house.
The end point of the in-house sewer line is the place where the pipe exits the building. In turn, for the water supply system, the place where the pipeline enters the house becomes the starting point of the network. The internal plumbing system consists of:
- introducing a pipe into the house;
- starting water metering and dispensing installation;
- source of hot water (this can be a boiler or boiler);
- double pipeline for separate supply of cold and hot water;
- supplies to water intake points;
- water consumers are a kitchen sink, washbasins, toilet, bowl, washing machine and dishwasher.
In-house sewer networks include:
- pipes coming from water intake points;
- sewer riser to which pipes are connected;
- the place where the sewer line is removed from the house.
Plumbing
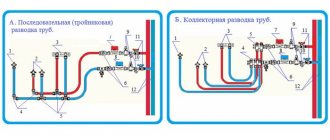
There are two standard wiring diagrams for cold water/hot water supply systems in an apartment and a country house:
- sequential - one cold water pipe, one hot water pipe is stretched from the riser to the farthest consumer, all plumbing fixtures are connected to it with tees, the latter with a tap;
Sequential circuit. - collector (parallel) - installation of cold water and hot water pipes from the riser to each plumbing fixture separately.
Connecting consumers to the water supply through the collector.
The first option is more economical due to lower pipe consumption. Hiding the water supply in the wall is much easier, and the labor intensity of rough finishing is reduced. The disadvantage is that the entire line is disconnected when repairing any plumbing fixture inside it, since the shut-off valves are located immediately after the riser. And also great sensitivity to peak consumption, for example, you are taking a shower, and someone decided to wash the dishes in the kitchen, before going to the toilet, the pressure in the shower will drop significantly.
In the second option, immediately after the meter, a collector is mounted on the cold water line, similar to a “comb” fitting on the hot water line. The two lower pipes go to the farthest mixer or device, the next two pipes are mounted on the walls above the previous ones, and so on until the consumer closest to the riser. This will avoid crossing communication routes with each other.
The advantage of the scheme is to turn off one device as needed while maintaining water supply to the others. Less sensitive to peak demand. The disadvantages are the increased consumption of materials, increased labor intensity of hidden wiring, and the cumbersome nature of the collector water supply system.
In apartments with gas instantaneous water heaters (“boiler” in popular parlance), a sequential wiring diagram is usually used. There is no particular point here in the DHW collector, since in this case it will not be possible to get rid of sensitivity to peak water consumption, because all the hot water will pass through a narrow pipe (usually 15 mm) inside the column or double-circuit boiler.
Each water supply line uses the following number of plumbing fixtures, starting from the riser:
- non-return valve – prevents self-priming from the adjacent line in the event of an emergency shutdown of water supply;
Check Valve. - shut-off valves - usually a lever-type ball valve with a long service life;
Ball valve - leakage protection valve – automatically shuts off the line in emergency situations;
Such a valve requires water leakage sensors, a controller, and a network connection. - coarse filter (GO) – filters out mechanical impurities;
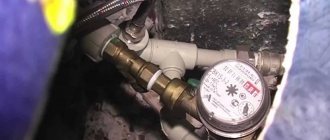
Coarse water filter. - water flow meter - installed according to the requirements of the cold water/hot water supply supplier;
Water meter. - fine filter – increases the service life of mixers;
Fine filter. - pressure reducer – relevant for apartments with pressure above 4 bar;
Pressure reducer. - collector - the number of pipes depends on the number of consumers in the apartment.
Collector.
From this list, 4 devices are considered mandatory - a tap, a meter, a GO filter and a check valve. All this equipment is mounted near the riser and takes up a lot of space. An inspection hatch is installed to provide access to metering devices, shut-off valves and other devices.
To reduce the dimensions of the circuit, some of these devices can be built into each other. For example, a reducer with a check valve, a GO filter with a reducer, and so on.
The technology for laying out cold/hot water supply lines for an apartment step by step looks like this:
- dismantling the existing wiring - pipes are removed up to the shut-off valves on the risers;
- marking - it is recommended to use laser plane builders and levels;
Marking cavities for laying pipes. - gating – angle grinder channels are cut in the enclosing structures, structural material is knocked out to form cavities, taking into account the laid routes;
Grooves on the walls for laying pipes. - installation of water sockets - fittings are attached to special strips, which are, in turn, installed on dowel nails;
Installation of water sockets. - assembly of water supply loops - in the above sequence, the meter, filters, manifold, reducer, check valve are twisted together (which thread seal to use);
Counter assembly. - system assembly - the circuits twisted at the previous stage are mounted at the place of operation;
- pipe preparation - pieces of the designed length are cut from the coil, thermal insulation is put on them;
- installation of pipes - one edge is connected to the collector, every 0.5 m is fixed to the wall with special holders, the second edge is connected to the water outlets.
Pipe installation.
Attention: The standard connection of water pipes to the outlet is considered to be cold water on the right, hot water on the left.
Before sealing the pipeline inside wall cavities and partitions, it is necessary to perform pressure testing of cold water/hot water supply systems. To do this, plugs are screwed onto the sockets and pressure is applied to the pipes for 15 - 30 minutes.
Temporary plug for water sockets.
Pipes can only leak if there is mechanical damage to the structural material. Therefore, during crimping, only the connection points with the fittings are checked - at the point of connection to the manifold and socket, plus all the threads in the upper loop between plumbing fixtures.
Design of sewer and water supply networks in the house
Designing water supply and sewerage systems during the construction or modernization of a private household is a complex and responsible process, so this work should be entrusted to professionals. When it is necessary to design a water supply and sewerage system at a summer cottage using simple diagrams, then you can draw up the project yourself. But when building a house with a complex layout for permanent residence, it is still better not to take risks.
When designing internal water supply and sewerage systems in a private house, the location of water intake points should be taken into account. The simplest option is when the bathroom and kitchen are located next to each other. In this case, you can use the simplest scheme with drainage into a common riser. It is much more difficult to design a house with several floors, each of which has a bathroom.
It is most difficult to develop a project if the water intake points are located in rooms in different parts of the household.
In this case, it is necessary to design a complex system, since the installation of water supply and sewerage will require the installation of several risers and septic tanks. Before you start drawing up a project, you need to do the preparatory work:
- First of all, determine the source from which water will flow into the house. If there is no central water supply in the locality, you need to choose one of the options: deep well, well, springs, etc.
- Geological research is carried out to draw up an engineering-topographic plan of the site in order to determine the type of soil in the area and the depth of groundwater. Therefore, sewage systems with high groundwater levels will be designed according to a completely different scheme.
- Determine how much water needs to be supplied to the house and removed from it during the day. This parameter is directly related to the choice of equipment to purchase.
- A decision is made regarding the type of treatment plant that will be installed on the site. In this case, the distance between the water supply and sewerage is taken into account in accordance with sanitary standards. Most home owners prefer installing factory-made septic tanks. But in some cases, for example, when the groundwater level is high, installing a septic tank may not be possible. In this case, a VOC is installed or a storage tank is installed.
Based on the collected information, appropriate calculations are made, equipment is selected and a design for the future water supply and sewerage system is developed.
Types of water supply systems
- Central water supply - in this case, the owner does not need to arrange a source of water supply to the home. It is enough for him to crash into the central water supply line, according to the accepted rules. However, this method has a number of disadvantages: dependence on central supplies, not very good water quality, high cost per cubic meter of liquid.
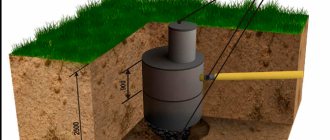
- Well - it can be constructed at a depth of 5-15 meters. A pumping station is installed in the well, which supplies water to the house.
- A sand well is an intermediate option between an artesian well and a well. In this case, when drilling, only the “sand horizon” is affected, that is, the top layer of soil.
- An artesian well is considered one of the most reliable and desirable sources of water for homes. If drilling and installation work is carried out using all technologies, then the well can last several decades. Moreover, it must be at least 135 meters deep
Installation of internal networks
Construction of the water supply and sewer system begins after the walls and roof of the building are erected.
At the same time, maintain the distance from the sewer to the water supply. Basic rules for installing an internal network:
- The water pipe is inserted into the house no closer than one and a half meters from the sewer main, as well as from the gas pipeline.
- A water metering unit is installed at the entry point behind the outer wall. It can also be made with a bypass line, providing increased water consumption in the event of, for example, a fire or without it.
- Before the water meter, you need to install a departmental valve that shuts off the water, and then a house valve.
- The diameter of the water supply pipes depends on the number of water intake points.
- When installing internal water supply and sewerage in a building, pipelines are usually laid in the basement.
- When there is insufficient water pressure at the inlet, it is necessary to plan the installation of three pumps: two of them will provide water supply in case of minimum or maximum consumption levels, and the third will be a backup.
- When laying internal pipelines, you need to remember the need to observe the slope of the pipes - its size depends on the diameter of the products specified in the design documentation.
How everything works
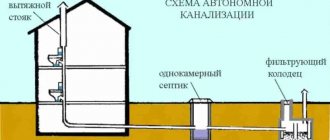
Let's stipulate that in the future we will discuss the water supply and sewage system of a country house in relation to a very specific configuration - with water supply from a well and wastewater disposal through a single-chamber septic tank. Simply because these are the most universal and popular solutions. Let's get started.
Autonomous water supply system
So, the well is drilled and cleaned after installing the casing. What is needed to organize uninterrupted water supply to a private home?
| Image | Water supply system element |
| Submersible well pump. It must create a pressure equal to the sum of the depth of the well, the height of the highest point of the water supply system above ground level and 3-5 meters of excess pressure to ensure the operation of plumbing fixtures. The pump performance should ideally be slightly less than the well flow rate. The pump is lowered into it to such a depth that there is at least a meter between its water intake grid and the bottom: then it will not lift silt and sand from the bottom. |
| Check valve. It is installed in front of the pump and prevents water from the water supply from flowing back into the well when it is turned off. |
| Water supply input. Typically, a pressure polyethylene pipe with connections made by compression fittings is used in this capacity (see Fittings for water supply to a private house). The inlet is laid in the ground below the freezing level; where this requirement cannot be met, the pipe is insulated and supplied with cable heating. |
| Hydraulic accumulator. It ensures stable pressure in the water supply when the pump is turned off and increases the downtime of the latter. The larger the volume of the hydraulic accumulator, the less often the pump turns on and the greater the supply of water the home owner has during power outages. |
| Automatic pump control. A pressure sensor is responsible for controlling its switching on and off: when the pressure in the water supply drops to a critical level, the pump turns on and supplies water to the accumulator; When the upper preset level is reached, the power is turned off. |
In houses with a high, warm attic, the hydraulic accumulator is often replaced with a storage tank with a volume of 500 liters or more. Water flows from it into the water supply system by gravity.
A regular fill valve is responsible for the dosed supply of water into the container - the same as those found in the toilet flush cistern; the pump is controlled by a level sensor.
Scheme for connecting a storage tank to an autonomous water supply system
To prepare hot water use:
- Storage and instantaneous electric water heaters;
Please note: the disadvantage of ducts is their high power consumption and, accordingly, a large load on the wiring. Outside the city, where modest power limits are often set for a single house, in most cases it is better to use storage heaters.
- Indirect heating boilers that use the heat of the heating system to heat water. They work with any type of boiler. In the summer, when the heating is turned off, the coolant circulates through a small circuit - between the boiler and the boiler;
Connection diagram for an indirect heating boiler
- Gas water heaters and double-circuit boilers (gas and diesel).
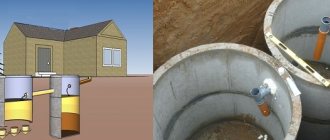
Septic tank
A single-chamber septic tank is a settling tank in which wastewater is separated into water itself, light and heavy fractions. Water creates 98-99% of the volume of domestic wastewater, so the amount of solid waste accumulating in the sump is small.
For the disposal of treated wastewater, the following are used:
- On soils with high absorbency (sand, sandy loam) - a filter (drainage) well with a soil bottom and leaky walls;
Brick filter well: soil bottom and masonry walls with gaps
Useful: it is better to backfill the well not with previously removed soil, but with pebbles, crushed stone or boulders. Drainage will increase the absorption area of the pit walls. The bottom of the well is covered with a layer of boulders or large pebbles: in this case, the settling silt will remain on the surface of the stones and will not reduce the absorbency of the soil.
Filling the filter well with crushed stone
- A filtration field is constructed on loam and clayey soils: drainage pipes are laid in trenches or a pit on top of a layer of crushed stone and successively covered with 20 - 30 centimeters of crushed stone, a layer of geotextile and soil. The location of the pipes below the freezing level will ensure year-round operation of the filtration field. The soil surface above the drainage pipes can be used as a flower bed.
Septic tank with purified water discharge to the filtration field
How to calculate the size of a septic tank?
Instructions for calculating the volume of a sump are contained in SNiP 2.04.09-85 “Sewerage and water supply of a residential building.” With a daily wastewater volume of less than 5 cubic meters, the settling tank should exceed this daily volume three times, with a higher wastewater flow rate - 2.5 times.
Design and dimensions of a septic tank for different volumes of daily wastewater
How to estimate the daily volume of wastewater in your home? If you have a water meter, everything is very simple: wastewater flow with a minimum error is equal to the change in its readings. 98% of household waste is water, remember?
If there is no meter, or if a significant part of the water does not end up in the sewer (for example, when washing a car or watering a garden), focus on sanitary standards - 200 liters per family member per day. So, a family of three uses an average of 600 liters of water per day, so the minimum volume of a septic tank for it is 1800 liters (1.8 m3).
Water consumption rates for different water supply systems
In the case of a filter well or filtration field, the absorbent surface area and the absorbency of the soil are important to us.
Here are the values of the last parameter for different types of soil:
| Soil type | Absorption, liters per day per square meter |
| Sand | 90-100 |
| Sandy loam | 40-60 |
| Loam | 20-30 |
| Clay | 10 or less |
For example, on sandy loam soil with an absorption capacity of 50 liters per square meter per day, with a daily wastewater flow of 600 liters, the minimum wetted area of the walls of the filter well should be equal to 12 square meters. Such a wetting area will be provided, for example, by a filled cubic pit with a wall size of 1.55 meters.
Sandy loam soil: water absorption - up to 60 liters per day per square meter
When installing a septic tank, you will encounter two technical problems:
- Mixing settling wastewater with an influx of water. To minimize it, install a sewer straight tee on the supply pipe;
- Difficulty can also be caused by drawing water from the settling tank below the crust on the surface. And in this case, the problem is solved by installing a sewer tee on the overflow: its lower outlet is used to actually draw water, and the upper one is used to clear the overflow in case of blockages.
The supply pipe and overflow are equipped with tees
By the way: the diameter of the septic tank supply pipe is always made equal to 100-110 mm, but the overflow diameter can be reduced to 50 millimeters. According to the author’s experience, this size is quite sufficient for transporting settled water that has been purified from large contaminants.
To install the overflow, you can use a 50 mm pipe
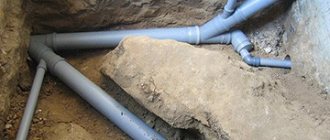
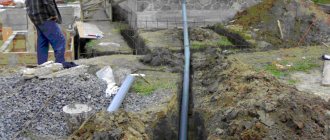
Installation of external networks
Outside the home, installation of external networks is carried out based on the following rules:
- Pipes are laid at a depth exceeding the freezing depth of the soil.
- If the intersection of water supply and sewerage pipes is designed, the water supply pipeline is located 40 centimeters above the sewer line. When using steel pipes, steel casings are installed at their intersection.
- Pipelines must intersect at right angles.
- When water and sewer pipes are laid in parallel, a distance of at least one and a half meters must be maintained between the walls of pipes with a diameter of less than 200 millimeters.
From all of the above, we can conclude that water supply and sewerage in a private household are a rather complex system (this can be seen in the photo) and their arrangement requires a well-designed project. But they will work effectively provided that all the requirements and rules of technical operation prescribed in SNiP are met.
Engineering systems design
Professional design of engineering systems is a difficult job, especially when it comes to developing an autonomous sewerage project. Such an engineering system is divided into two separate sections: external and internal. The external section of the sewer system is all materials and elements of the system located outside the owner’s home. Internal sewerage includes equipment and pipelines of the drainage system installed inside the house.
has been designing various engineering systems for facilities for a long time. We can carry out for your home not only an autonomous or central sewerage project, but also an electrical supply system project, a water supply project, a heating project, a ventilation project and a sewerage project.
As for the cost of project development, the price of sewerage design will depend on the size and characteristics of the building. Our craftsmen will be able to tell you the exact cost of the design after studying all the initial data, technical specifications and conditions. If you are interested in a preliminary cost, you can contact us by phone or find out the design price using the calculator below.
Disadvantages and advantages of connecting to a central sewer system
Before making a final decision on choosing the type of sewer system, you should know all the advantages and disadvantages of connecting to the central network.
Advantages of this solution:
- the connection price is lower than the cost of installing an autonomous septic tank;
- perhaps save on materials;
- the problem of drainage of storm and domestic waters can be simultaneously solved;
- owners of a private house do not need to monitor the quality and volume of wastewater;
- there is no need to regularly clean and pump out liquid from special collection tanks used in autonomous sewer systems, so maintaining such a system is simpler and cheaper.
The main disadvantages include:
- the need to collect many documents and permits from various authorities;
- long waits to obtain permission;
- You will need to pay monthly fees for sewer use.
Cost of sewerage
In recent years, sewerage systems have been installed to improve suburban settlements. If it is necessary to carry out sewerage, you can solve the problem in several ways:
- resort to the services of a specialized company;
- hire a self-employed plumber;
- self-installation.
The cost of installing a sewer system consists of a number of components:
- Design documentation is being developed.
- The number of floors is taken into account (if there are several floors, the amount increases significantly);
- They look at how many points are connected to the sewer. They connect bathtubs, sinks, swimming pools, Jacuzzis, toilets, etc.
The minimum price of sewerage equipment for a one-story house with one toilet, two sinks and a shower will be no less than 60-65 thousand rubles .
conclusions
To improve your site and home, it is necessary to install sewerage and communication systems. It is better to start the installation process after completing documentation and agreements with various organizations.
Advice: If you have not yet bought a plot without communications, before doing so, calculate and weigh all the pros and cons. How much more money might you need? Will you really be able to save money? It may make sense to consider another purchase option.