The problem of oversaturation of soil with moisture often depends on the region. If you encounter this problem, you can solve it by installing drainage. In this article we will consider in detail, using examples, all aspects of this issue.
During the period of snow melting or the rainy season, the soil is always saturated with moisture, and if the site is located in a low part of the terrain, water will also flow to it from neighboring areas. At the same time, the water level in the underground horizon usually rises, so the resulting problem can be quite large. City dwellers usually do not encounter such situations, but if they have treasured suburban acres in their possession: six or a little more - depending on your luck, such an issue as drainage on a summer cottage may well become relevant. You will learn how to resolve it most optimally from the material offered here.
Drainage of the site can be arranged as follows
Drainage of a site is a costly and labor-intensive undertaking that requires a large amount of excavation work. The best time for construction is the process of planning and arrangement of the site. Late deadlines lead to a lot of chaos, which doesn't make everyone happy. However, if there is water on the site, you have to do this too.
There are several types of water on the site that bother us and that need to be drained. They are of different nature and require different measures.
Surface water
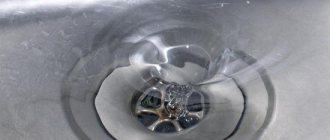
They are formed during snowmelt and heavy rainfall, during work on the site (watering, washing paths), discharge of water from a reservoir, etc. What all phenomena have in common is their one-time nature: surface water appears after certain events. A more reasonable way to drain them is to install a storm drain. She copes with the task “excellently”, and the costs of arrangement are much lower.
Storm sewers are responsible for the removal of surface water.
To drain surface water, mostly open channels are installed; water intake is point-wise under storm pipes or linear along the entire roof overhang. From these receivers, water is carried through solid plastic (asbestos-cement) pipes into a drainage ditch or discharged into a river or lake into a ravine. Sometimes we allow output to the ground.
Groundwater
Those groundwaters that have a seasonal level (higher in the spring after a flood, lower in the winter), have a recharge zone (where they come from) and an outflow zone (where they go) are called groundwater. Typically, groundwater is present on sandy, sandy loam soils, less often in loams with a small amount of clay.
The presence of groundwater can be determined using self-dug pits or several wells drilled with a hand drill. When drilling, a dynamic level is noted (when water appeared during drilling) and a steady one (some time after its appearance, its level stabilizes).
When the groundwater level is high, strip foundations are also made, but the waterproofing must be high
If we talk about draining water from a building, then a drainage system is installed if the groundwater level (GWL) is only 0.5 m below the foundation. If the groundwater level is high - above the freezing depth - then a monolithic slab foundation with measures taken to drain water is recommended. At a lower level, other options are possible, but careful and multi-layer waterproofing is required. The need for foundation drainage should be assessed by specialists.
If high groundwater (groundwater level above 2.5 meters) prevents plants from growing, drainage of the area is required. This is a system of channels or special drainage pipes laid in the ground at a certain level (20-30 cm below the GW level). The depth of laying pipes or ditches is below the ground level so that water flows to lower places. In this way, the adjacent areas of the soil are drained.
Verkhovodka
This groundwater occurs on soils in highly located impermeable layers, but its appearance is often a consequence of construction errors. Usually this is water that, being absorbed into the soil, encounters on its way layers with a low ability to absorb moisture. Most often this is clay.
If after a rain there are puddles in the area and do not go away for a long time, this is perched water. If water accumulates in dug ditches, this is also perched water. If, a few years after building a house on clay soils or loams, the walls in the basement begin to “cry”, this is also high water. Water has accumulated in crushed stone pockets under the foundation, in blind areas, etc.
To avoid this situation, site drainage is required.
The easiest way to drain high water is with the help of ditches, but it is better to prevent its occurrence - backfill the foundation not with crushed stone and sand, but with clay or native soil, carefully compacting it in layers. The main task is to eliminate the presence of pockets in which water will accumulate. After such backfilling, it is necessary to make a blind area that is wider in width than the backfill and an obligatory touch is the drainage of storm water.
If the site has a slope, consider installing terraces and retaining walls, with the obligatory installation of drainage ditches along the retaining wall. It is most difficult to deal with perched water in low areas, which are located at a level lower than neighboring ones. A reasonable solution here is to add soil, since there is usually nowhere to dump water. Another possible option is to drain the drain through neighboring areas or along the road to the point of possible discharge. You have to decide on the spot, based on the existing conditions.
When is it necessary to drain the area?
Large puddles appear in a suburban area when water does not seep into the ground during rains or floods. This happens if the soil is clayey or the groundwater level is high. And if the area is in a lowland, water flows onto it from above. The presence of large bodies of water or swamps nearby also affects the humidity level.
In all these cases, for normal living and harvesting, it is necessary to drain the area from groundwater. The problem can be detected in spring or autumn. Flooding usually occurs in the off-season, when the snow melts or there is a lot of rain. You can see places where moisture accumulates.
If a plot of land is purchased in the summer, you can also understand that it is flooded. This is detected by the following signs:
- doors and frames are warped, cracks are visible on the walls;
- smell of dampness, mold visible in the corners;
- there is water in the basement;
- a lot of mosquitoes, snakes, frogs;
- Weeds are dominated by nettle, wormwood, hemlock, and also a lot of reeds.
Prolonged accumulation of moisture near the house will lead to the appearance of mold, unpleasant odor, and deformation Source stroyfora.ru
Linear
The linear system has been known for a very long time. It was used in Ancient Egypt and Babylon. Today, only the materials used have changed, but the operating principle remains the same.
Linear type drainage
Plastic or reinforced concrete trays are used for drainage. They are equipped with a grille on top that covers the gutter. The system has garbage collectors that make cleaning the trays easier.
Installation of such systems is necessary in cases where:
- it is necessary to protect the foundation from rainwater;
- there is a risk of soil erosion;
- there is a need to remove moisture from sheds, garages and other structures located in lowlands;
- to protect paths in garden and suburban areas.
Installing a water drain will not be a difficult procedure even for a beginner. Its structure is extremely clear.
Selecting a drying method
Often, a moisture problem is discovered after purchasing a property. It needs to be resolved as soon as possible, before the water damages buildings and destroys plants. It is not difficult to drain a swampy area of water, but choosing a method for this, you need to take into account several factors:
- cause of flooding;
- soil features;
- the depth of groundwater and the direction of its movement;
- presence of bodies of water nearby;
- size of the flooded area;
- presence of buildings and vegetation.
Each case may require different methods. For example, if the site is in a swampy area, raising it or installing an open drainage system will help. And when the groundwater level is high, closed drainage systems are used, possibly even with a well and a pump for their forced removal. This method is also used in areas that are located in lowlands.
Important ! After draining the area, it is recommended to enrich the soil with fertilizers, since all nutrients are washed out of it with water.
Before choosing a method for draining a site, you need to study the characteristics of the soil and the reasons for moisture accumulation Source aquakomfort-spb.ru
Kinds
Drainage system for the home
First, you need to analyze its types and find out the operating features of each.
Drainage happens:
- superficial;
- deep.
Surface drainage can be done without the involvement of craftsmen. This is a relatively easy job.
It is best to carry out deep drainage at the stage of building a house.
The building also needs protection. It often happens that the flow of groundwater penetrates into underground premises. Water can flood a cellar, garage, underground parking lot or recreation room. It all depends on what is below the surface of the earth.
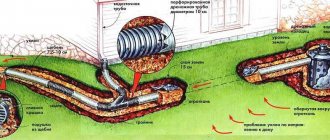
How to arrange drainage
A drainage system is the most common and effective method of permanently draining a swamp in a summer cottage or near a country house. Drainage ensures the outflow of water outside the land. Typically, open or closed drainage systems are installed. There are also deep and point drainage, but they are used less frequently. The point of such drainage is that the water is discharged through a pipeline outside the site.
Open drainage
Open drainage is a system of ditches located on a slope. Through them, water flows into drainage wells or beyond the boundaries of the site. The distance between them is at least 6 m. It is better not to do them around buildings, this can lead to deformation of the foundation. Such ditches are made with sloping walls, the depth is at least 40-50 cm.
A variant of such a system is backfill drainage. The bottom of the ditch is laid out with geotextiles, then filled with gravel or stones to 2/3 of the depth. Fine gravel is poured on top, and then a layer of sand and soil.
The easiest way to drain the area is with trenches filled with gravel Source strojdvor.ru
This method is most often used if the soil is clayey. It helps drain water during floods and heavy rains, preventing the soil from becoming saturated with moisture. For soil with a lot of sand, this system is not used. This method is also not suitable for high groundwater levels.
The disadvantages of such a system include a reduction in the usable area of the site. This can be avoided by breaking a ditch near the fence. In addition, such trenches quickly become clogged with debris and leaves, and they have to be cleaned regularly.
See also: Catalog of companies that specialize in landscape design and gardening.
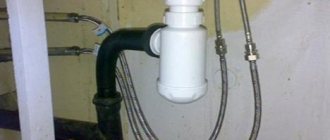
Closed drainage
A closed drainage system is a more complex but effective way to remove excess moisture. It will quickly help remove water and prevent its further accumulation. This method is also used to lower the groundwater level.
Closed drainage is installed using special PVC pipes buried in the ground. There are holes on their walls through which water from the soil enters them. To prevent clogging, the pipes are wrapped in geotextile. They need to be buried below the soil freezing level. The ditches are located at a slope, directed towards drainage wells.
Necessary materials
To make a drainage ditch yourself, you will need special materials:
- drainage perforated fiberglass pipes, 50-150 mm in diameter, for collecting and draining water from the site. Pipes must have perforations in the form of holes with a diameter of 1.5-5 mm located around the entire circumference of the pipe. May be encased in filter materials;
- bends, fittings and couplings for connecting pipes;
- geotextile fabric that protects the drainage system from silting;
- inspection wells for system maintenance;
- filtering or storage tanks for collecting wastewater from the site;
- river sand and crushed stone, for the construction of underlying and drainage layers.
In addition, you will need shovels for excavating soil, power tools for installing pipes and wells, and various tampers for compacting the bottom of the trench.
To protect drainage pipes when laid under the road, steel pipe sleeves will be required.
Video description
You can see how to properly arrange drainage on a site in this video:
Step-by-step work on arranging a closed drainage system looks like this:
- First you need to plan on paper the optimal passage of the ditches. They should be located no closer than 2.5 m from trees.
- Then mark the area according to the plan.
- Dig trenches.
- Pour a layer of 10-15 cm of coarse sand.
- Lay geotextiles and pour gravel on it.
- Lay pipes wrapped in geotextile.
- Fill the space around the pipes with medium gravel until there is 20 cm left to the ground level.
- Cover with the edges of geotextile, fill the trench with small pebbles and soil.
To install a closed drainage system, special pipes are laid in trenches Source landscapevkazan.rf
Spot
With spot planning, trays are installed, first of all, under the sewer pipes of the house. Otherwise, water will constantly fall on the foundation and on the site.
Improper planning will lead to moisture penetration into the underground rooms.
The trays must be installed so that they are underground. They will have to run pipes to the sewer system. The top of the tray is covered with a grill. This is both a protective and decorative element at the same time. To clean the tray, you only need to lift the grill and remove debris from the container.
Construction of ponds, sewage pits or ditches
Owners of country houses are often interested in how to dry a plot of water with their own hands without drainage. This is also possible, but it is best to use such methods in the country, and not in a country house. This is digging ditches, sewage pits or decorative ponds. They can become not only a means of draining water, but also an element of landscape design. The choice of method depends on the characteristics of the site and the reason for the accumulation of moisture.
Note ! The disadvantage of this method is the need to regularly clean the resulting reservoirs. Without this, they will bloom, mosquitoes will appear, and there will be an unpleasant smell.
Wells
The easiest way is to dig holes in the lowest flooded areas. They should be cone-shaped, tapering downwards. The diameter at the surface is 2 m, the depth is at least 80-100 cm. Such pits can be decorated by turning them into decorative ponds. To avoid shedding and silting, their bottom is covered with gravel.
Ditches
Ditches are more difficult to dig, but such a system will drain excess water more efficiently. They are organized around the perimeter of the site. To prevent the walls from crumbling, they are reinforced with boards or concrete slabs. You can put a metal box on the bottom.
Drainage ditch beautifully designed to look like an artificial stream Source kndlandscaping.com
A variant of this drainage method is the installation of decorative streams. This is appropriate if the site is located on a slope. The bottom of the artificial stream is laid out with pebbles, pebbles or geotextiles. It is recommended to arrange streams under trees, as in a sunny place the water will bloom.
Inexpensive do-it-yourself storm drain
The first thing that comes to mind in order to equip a budget option for storm drainage on a site is to lay special trays.
Trays can be made of concrete or plastic, but they are expensive. This forces users of our portal to look for cheaper options for installing storm drainage and drainage systems from the site.
Denis1235FORUMHOUSE Member
I need to make an inexpensive storm drain, about 48 m long, along the edge of the fence, to drain the melt water that comes from the neighbor. The water must be drained into a ditch. I was wondering how to drain the water. At first it occurred to me to buy and install special trays, but then they would be left with “extra” grates, and I don’t need any special aesthetics for the storm drain. I decided to buy asbestos-cement pipes and saw them lengthwise with a grinder, thereby getting a homemade tray.
Despite the budgetary nature of this idea, the user was not attracted to the need to cut asbestos-cement pipes on his own. The second option is the opportunity to buy gutters (plastic or metal) and lay them on a prepared base in a concrete layer of about 100 mm.
Users of the portal dissuaded Denis1235 from this idea in favor of the first option, which is more durable.
Having latched on to the idea of an inexpensive storm drain, but not wanting to deal with cutting pipes on his own, Denis1235 found a factory that produces asbestos-cement pipes, where they will immediately be sawed into pieces 2 m long (so that the 4-meter one does not crack during transportation) and ready-made trays will be delivered to the site . All that remains is to develop a scheme for laying the trays.
The result is the following “pie”:
- Soil base in the form of a bed.
- A layer of sand or ASG about 5 cm thick.
- Concrete about 7 cm.
- Tray made of asbestos-cement pipe.
When installing such a storm drain, do not forget to lay a metal mesh (for reinforcement) at the joints and leave a deformation gap (3-5 mm) between the trays.
Denis1235
As a result, I made a budget rain shower at the dacha. It took 2 days to dig the trench, another two days to pour concreting and install the route. I spent 10 thousand rubles on trays.
If we calculate at 2021 prices, then for 1 linear meter of a tray cut from an asbestos-cement pipe it cost about 200 rubles.
Practice has shown that the route “overwintered” well, did not crack and intercepts water from its neighbor, leaving the area dry. Also interesting is the option of a rainwater drainage system for a portal user with the nickname yury_by.
yury_byFORUMHOUSE Member
Because The crisis doesn’t seem to be ending, then I started thinking about how to install a storm drain to drain rainwater away from the house. I want to solve the problem, save money, and do everything efficiently.
After some thought, the user decided to make a storm drain for water drainage based on flexible double-walled corrugated pipes (they cost 2 times less than “red” sewer pipes), which are used for laying power cables underground. But, because The depth of the drainage route is planned to be only 200-300 mm with a pipe diameter of 110 mm, yury_by was afraid that the corrugated pipe might break in the winter if water gets between the two layers.
As a result, yury_by decided to take a budget “gray” pipe, which is used when installing internal sewerage. Although he had concerns that the pipes, which were not as rigid as the “red” ones, would break in the ground, practice has shown that nothing happened to them.
yury_by
If you step on the “gray” pipe, it turns into an oval, but there are no significant loads in the place where I buried it. The lawn has just been laid and there is foot traffic. Having laid the pipe in the trench and sprinkled it with soil, I made sure that they kept their shape and the storm drain was working.
The user liked the option of installing an inexpensive storm drain based on “gray” sewer pipes so much that he decided to repeat it. All the nuances of the process are clearly demonstrated by the following photographs.
We dig a hole for a drainage well to collect water.
Level the base.
We install a concrete ring.
The next stage is to fill the bottom of the well with gravel of fraction 5-20.
We cast a homemade well cover from concrete.
We paint the manhole cover.
We insert a drainage plastic “gray” sewer pipe into the well, maintaining a slope of 1 cm per 1 linear meter.
We spill the pipe with a mixture of sand and water so that there are no voids left between the walls of the trench and the pipe.
To prevent the pipe from floating, it can be pressed down with a brick or board.
We put the lid on, install the hatch and fill everything with soil.
This completes the production of the budget rain shower.
Moisture-loving plants
If you are wondering how to drain a site with your own hands at no cost, you can consider the option of planting moisture-loving plants. This method will be effective only in small swamps and if there is no urgent need to remove water.
By using plants that require a lot of water, you can lower the groundwater level and speed up the drying out of the area after rains and floods. This will also help decorate the area. Willow, maple, poplar, alder and birch are used.
If you need plants that grow faster, you can plant shrubs: hawthorn, viburnum, serviceberry, rose hips. This is an ideal way not only to reduce the amount of water on the site, but also to create a hedge. There are also moisture-loving herbaceous plants. These are perennial flowers: iris, aster, aquilegia. You can plant cranberries and blueberries.
To remove excess moisture, moisture-loving plants are planted on the site Source yandex.net
Scheme
These diagrams will help you plan site drainage according to the requirements:
Basic mistakes
Storm drain
Raising the area
If the groundwater level is high or if the area is very swampy, only raising the site can help. It is backfilled with soil. This is a complex and expensive method, but effective. It consists of several stages.
- Drawing up a detailed plan indicating aquifers, clayey areas, voids.
- Demolition of all buildings, clearing of debris.
- Laying a drainage system, preferably a closed type.
- Before backfilling begins, a strip foundation is laid around the perimeter of the site.
- Then the soil is covered in layers of 10-15 cm. Sand and crushed stone are usually used. Each layer is laid with geotextiles, compacted, and compacted. After this, you need to wait 2-3 weeks for the soil to shrink.
- Fertile soil is poured on top.
- Then you need to sow the soil with cereal crops. They have an extensive root system that will secure the fill.
To get rid of excess moisture, you may need to raise the level of the area Source marc2000.ru
On clay soils
Not all types of soil drain water well. These include clayey ones. Clay soil is characterized by an excess of moisture. Because of this, the required amount of oxygen does not reach the roots. As a result, the plants die. Dense turf also leads to oxygen starvation of plants.
When arranging a drainage system for a small area, it is not necessary to make calculations during the design process. In this case, it is necessary to take into account the parameters regarding drains:
- slope;
- location according to plan;
- depth;
- distance between rows;
- arrangement of wellhead and inspection wells.
It is better to use the natural terrain of the site with a slope when constructing a drainage system.
Using terrain
Laying in clay soil
It is easier to work with a sloping area than with a flat one. This is due at least to a reduction in labor costs. All you need is to correctly combine open and closed drainage.
Clay soil is dense and heavy, so to improve drainage properties the soil should be thoroughly loosened. In the process of laying drains, it is necessary to bypass places intended for vehicle passage.
Briefly about the main thing
If the site is located on clay soils or in a lowland, it may need to be drained.
This procedure is complex, but quite feasible. If you choose the right drainage method, taking into account the characteristics of the soil and the depth of groundwater, you can get rid of the problem.
For this purpose, open or closed drainage is most often used, ensuring the outflow of water into drainage wells.
If the area is very waterlogged, it may need to be raised. And to get rid of moisture during rains, it is enough to plant moisture-loving plants on the site.
Ratings 0
Surface
Surface drainage of the site is carried out using various rainwater inlets and trays. This type of drainage got its name because the entire system is located on the surface. Trays can successfully cope with flows of rainwater, as well as moisture that forms as a result of melting snow.
There are two types of surface drainage: point and linear.
- Spot. Such a system consists of water collectors, which, in turn, are connected to the sewerage system. Water collection devices are usually installed under drains, in low spots and under taps.
- Linear. The system resembles a canal that slopes towards a well. This is where moisture from rainfall comes in.
It cannot be said that one type of drainage is better than another. Often both varieties are used together for greater effectiveness. All devices in the system require regular cleaning, otherwise they will no longer function properly. A well-organized drain serves well and does its job.
Useful tips
Here are answers to the most popular questions from readers regarding land reclamation and drainage structures.
- What material is best to cover the area?
For a rise of 20-30 cm in a small area, fertile soil can be used. If a meter-long layer of bedding is required, the base is made of compacted sand, secondary crushed stone or broken brick is placed in the middle (for drainage), and soil is laid on top. On beds and lawns you can do without crushed stone; instead of soil, paths and platforms are sprinkled with excavated soil. Experts believe that it is better to place soil from the site down. This prevents the heavy crushed stone from sinking into the light sand or the light sand from sliding off the loam.
- Are asbestos or used steel pipes suitable for closed deep drainage?