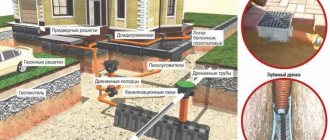
An integral part of a private house or your “Beautiful Dacha” is a storm drain, which provides an aesthetic appearance to the residential building and the area adjacent to it. It also prevents premature destruction of the foundations of buildings and the roots of plants growing on the site. To an inexperienced person in the field of drainage, this moment may seem like a dark forest. In this article we will analyze systems for draining surface water , surface water, storm water and melt water from buildings and the site.
Detailed diagram of the water drainage system.
In what cases is a drainage system necessary?
Drainage is a technology for collecting and discharging groundwater, melt and storm water from a site, technical and residential buildings.
The drainage system prevents leaching, heaving and waterlogging of the soil, which occurs due to oversaturation with moisture. Arrangement of a drainage system is not necessary at every site. In order to determine how much your area needs drainage, you will need to conduct a visual inspection.
Pay attention to whether the area is flooded after the snow melts, how quickly water is absorbed after watering the plants, whether there are puddles after heavy rain and downpour. If you have observed these signs more than once, then drainage is required.
The drainage system helps remove stagnant water from the site
If visual confirmation is not enough, then you can conduct a simple experiment - using a hand drill or an ordinary shovel, you should dig a hole 70–100 cm deep. It is better to do this in several places on the site. If after 24–36 hours water accumulates at the bottom of the hole and does not leave, then this is direct evidence of oversaturation of the soil with moisture.
Soil drainage is carried out under the following conditions:
- high groundwater table;
- the site is located in an area with clay soil;
- the site is located in a lowland or vice versa - on a slope;
- The location of the site receives a large amount of precipitation.
The presence of drainage helps preserve the finishing and facing materials used for laying garden paths, finishing the basement and façade of the building.
Maintenance of drainage systems
Maintenance of the above drainage systems is not difficult if they are properly designed and constructed. Main points in service:
- Once every ten years, use a pump to thoroughly flush the pipes to prevent deposits on their walls.
- Regular visual inspection of wells, collectors and cleaning if necessary.
The shelf life of a properly designed, installed, and maintained drainage system is on average fifty years, or even much more.
Tips from the professionals:
- Be sure to check that the pipes are laid on a slope. The slope should be away from the house.
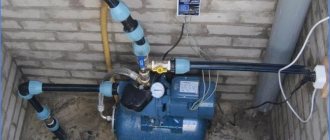
- If it is impossible to install a gravity drainage system, a pressure outlet equipped with a pump is installed.
- Do not forget about optimal design and price = quality. Very often you want more, better, but the budget does not always allow you to realize your plans. Therefore, it is recommended to design, compare the project with prices, make purchases and install in accordance with the recommendations given here.
Surface
Surface drainage of the site is carried out using various rainwater inlets and trays. This type of drainage got its name because the entire system is located on the surface. Trays can successfully cope with flows of rainwater, as well as moisture that forms as a result of melting snow.
There are two types of surface drainage: point and linear.
- Spot. Such a system consists of water collectors, which, in turn, are connected to the sewerage system. Water collection devices are usually installed under drains, in low spots and under taps.
- Linear. The system resembles a canal that slopes towards a well. This is where moisture from rainfall comes in.
It cannot be said that one type of drainage is better than another. Often both varieties are used together for greater effectiveness. All devices in the system require regular cleaning, otherwise they will no longer function properly. A well-organized drain serves well and does its job.
How to determine the need for a drainage system
The surest sign of increased soil moisture is the massive growth of plants, typical of swampy areas. These include weeping willow, sedge, and reed.
In addition to plants, evidence of the close occurrence of groundwater will be puddles that remain after rain or spring melting of snow. If they do not go away for a long time, then there is enough other moisture in the ground.
It doesn’t always rain, so it’s much easier to use a long-proven method of checking the soil moisture level. To do this, you need to dig a hole about half a meter deep at the highest point of the site. If water collects at the bottom within 24 hours, it means that the area needs drainage.
Step-by-step arrangement of a drainage pit for a bathhouse
Now let's look at a question that interests many - how to make a drainage pit for a bathhouse with your own hands. The easiest option for beginners is a drainage hole made from a barrel. A metal barrel with a volume of up to 250 liters is used as a drainage tank.
First you need to choose a suitable location for the pit. The distance from the foundation of the bathhouse to the treatment device should be from 3 to 7 meters. When determining the depth of the sewer pit, it is important to take into account the total volume of wastewater and groundwater. The optimal value is no more than 7 meters.
The process of arranging a pit for drainage involves stage-by-stage execution of work.
Pit preparation and pipe laying
- Preparing the construction site for the pit. An earthen ditch must be dug from the base of the bathhouse, having the necessary slope for convenient drainage of wastewater. The average slope is 4 degrees per linear meter. The bottom is insulated and covered with drainage made of gravel and sand. A drainage pipe connecting the steam room and the waste pit is laid on the pillow.
- Next, they dig a pit and also insulate it. A drainage cushion made of gravel and crushed stone (thickness up to 25 cm) is installed at the bottom.
On clay soils
Not all types of soil drain water well. These include clayey ones. Clay soil is characterized by an excess of moisture. Because of this, the required amount of oxygen does not reach the roots. As a result, the plants die. Dense turf also leads to oxygen starvation of plants.
When arranging a drainage system for a small area, it is not necessary to make calculations during the design process. In this case, it is necessary to take into account the parameters regarding drains:
- slope;
- location according to plan;
- depth;
- distance between rows;
- arrangement of wellhead and inspection wells.
It is better to use the natural terrain of the site with a slope when constructing a drainage system.
Using terrain
Laying in clay soil
It is easier to work with a sloping area than with a flat one. This is due at least to a reduction in labor costs. All you need is to correctly combine open and closed drainage.
Features of laying a sewer pipe
Laying a drainage pipe is an important step in arranging a sewer system for a bathhouse. According to building codes, the pipe is laid at the stage of foundation construction. It is located at the bottom of the base with a slope towards the drainage hole. When pipe laying is required for a finished building, installation is carried out under the floor of the steam room.
To properly install the pipe, you must follow the following rules:
- Bends, turns and joints are not allowed when installing the product. This can lead to blockages in any part of the pipe.
- After completing the installation of the drainage system, a concrete screed of the bath floors is carried out, maintaining a slope towards the drainage hole. After the screed has completely dried, the floor is covered with tiles or porcelain stoneware, on top of which removable wooden gratings are installed. They will provide protection against burns in direct contact with a heated floor covering. In addition, the gratings can be easily dismantled for drying and treatment with antiseptic compounds.
- The drain is closed with a protective grille to prevent possible clogging of the sewer pipe.
Important! Bath floors do not require additional insulation. With high-quality concreting and cladding, such a base warms up during the combustion process and prevents the penetration of cold from outside.
How to make a drainage hole for a bathhouse is a question that will not take the owners of such buildings by surprise. After all, it is not difficult to organize a reliable wastewater drainage system from scrap materials and without involving a construction team, the main thing is the attitude and a serious approach to the matter.
What water is removed by drainage?
Drainage of a site is a costly and labor-intensive undertaking that requires a large amount of excavation work. The best time for construction is the process of planning and arrangement of the site. Late deadlines lead to a lot of chaos, which doesn't make everyone happy. However, if there is water on the site, you have to do this too.
There are several types of water on the site that bother us and that need to be drained. They are of different nature and require different measures.
Surface water
They are formed during snowmelt and heavy rainfall, during work on the site (watering, washing paths), discharge of water from a reservoir, etc. What all phenomena have in common is their one-time nature: surface water appears after certain events. A more reasonable way to drain them is to install a storm drain. She copes with the task “excellently”, and the costs of arrangement are much lower.
Storm sewers are responsible for the removal of surface water.
To drain surface water, mostly open channels are installed; water intake is point-wise under storm pipes or linear along the entire roof overhang. From these receivers, water is carried through solid plastic (asbestos-cement) pipes into a drainage ditch or discharged into a river or lake into a ravine. Sometimes we allow output to the ground.
Groundwater
Those groundwaters that have a seasonal level (higher in the spring after a flood, lower in the winter), have a recharge zone (where they come from) and an outflow zone (where they go) are called groundwater. Typically, groundwater is present on sandy, sandy loam soils, less often in loams with a small amount of clay.
The presence of groundwater can be determined using self-dug pits or several wells drilled with a hand drill. When drilling, a dynamic level is noted (when water appeared during drilling) and a steady one (some time after its appearance, its level stabilizes).
When the groundwater level is high, strip foundations are also made, but the waterproofing must be high
If we talk about draining water from a building, then a drainage system is installed if the groundwater level (GWL) is only 0.5 m below the foundation. If the groundwater level is high - above the freezing depth - then a monolithic slab foundation with measures taken to drain water is recommended. At a lower level, other options are possible, but careful and multi-layer waterproofing is required. The need for foundation drainage should be assessed by specialists.
If high groundwater (groundwater level above 2.5 meters) prevents plants from growing, drainage of the area is required. This is a system of channels or special drainage pipes laid in the ground at a certain level (20-30 cm below the GW level). The depth of laying pipes or ditches is below the ground level so that water flows to lower places. In this way, the adjacent areas of the soil are drained.
Verkhovodka
This groundwater occurs on soils in highly located impermeable layers, but its appearance is often a consequence of construction errors. Usually this is water that, being absorbed into the soil, encounters on its way layers with a low ability to absorb moisture. Most often this is clay.
If after a rain there are puddles in the area and do not go away for a long time, this is perched water. If water accumulates in dug ditches, this is also perched water. If, a few years after building a house on clay soils or loams, the walls in the basement begin to “cry”, this is also high water. Water has accumulated in crushed stone pockets under the foundation, in blind areas, etc.
To avoid this situation, site drainage is required.
The easiest way to drain high water is with the help of ditches, but it is better to prevent its occurrence - backfill the foundation not with crushed stone and sand, but with clay or native soil, carefully compacting it in layers. The main task is to eliminate the presence of pockets in which water will accumulate. After such backfilling, it is necessary to make a blind area that is wider in width than the backfill and an obligatory touch is the drainage of storm water.
If the site has a slope, consider installing terraces and retaining walls, with the obligatory installation of drainage ditches along the retaining wall. It is most difficult to deal with perched water in low areas, which are located at a level lower than neighboring ones. A reasonable solution here is to add soil, since there is usually nowhere to dump water. Another possible option is to drain the drain through neighboring areas or along the road to the point of possible discharge. You have to decide on the spot, based on the existing conditions.
Groundwater drainage system
Groundwater drainage differs from the systems described above in that it is installed at a greater depth and in the case of groundwater close to the surface of the earth, which can flood a basement or underground garage. Drainage is combined with storm water, and storm water pipes are laid higher than the drainage. It is necessary to understand the difference between stormwater and drainage. Storm drainage for drainage of rain, melt water and floods, and deep drainage for drainage of groundwater and possible flooding. Surface and deep drainage are connected using special node connections to accumulate excess water in one place and its subsequent release, recycling or reuse. Drains are installed parallel to each other.
Open type storm drain with concrete gutters.
Note! During heavy rainfall, large quantities of water pass through the storm drain in a short time. When such a flow of water enters the groundwater drainage system, this water flows from the pipes into the ground, thereby not draining it but flooding it, that is, it begins to perform the opposite function. Therefore, the surface water drainage system should be connected to the groundwater drainage system no earlier than the places where the water drainage and not drainage pipes pass, if you look at the direction of water movement into the systems. Soil drainage is carried out in places where perforated pipes are laid. Water is drained through sealed pipes.
Scheme of a closed type drainage system.
According to the method of groundwater extraction, they are divided into: vertical, horizontal and combined drainage. Vertical drainage consists of vertical ribbed wells lowered into the groundwater layer. They are equipped with pumps and filters, respectively, for cleaning and pumping groundwater outside the territory. This scheme is quite complicated both in installation and in operation.
Horizontal drainage consists of perforated pipes laid at the optimal pumping outlet depth in dug ditches lined with crushed stone. Ditches are dug throughout the site in a herringbone pattern.
The installation of drainage, regardless of the type of site, begins with the construction of a drainage well in the farthest part of the site, away from the house. You can use ready-made plastic wells.
Inspection wells are installed at corner connections to facilitate communication maintenance.
The depth of drainage is selected based on its objectives: if the goal is to collect groundwater to protect the basement, then the depth should correspond to the level of the basement floor; if the goal is to drain abundant water that sinks into the ground, the depth corresponds to the depth of the foundation.
The pipes are wrapped with a special material (geotextile) to prevent sand and gravel from getting into the pipes, with which the pipe is covered with a layer of 20-30 cm. After this, the pipe can be covered with ordinary soil. Unlike vertical drainage, water collected through holes in pipes is discharged by gravity and not by pumps.
Horizontal drainage is more popular than vertical or even combined drainage due to its cost-effectiveness and ease of installation.
Why is drainage needed in a garden plot?
Any builder or landscape designer should know where to start arranging a suburban area. There is only one answer - from drainage, if required. And, as practice shows, such a need is almost always present.
And we need to start with it only because creating a drainage system involves a huge amount of excavation work. Almost the entire dacha plot will have to be dug up with ditches. And if some buildings have already been erected on the site, they will simply interfere with the drainage construction.
It must be added that the construction of a drainage system is an expensive process. Therefore, many private developers refuse it, citing the fact that just recently everyone somehow managed without it. The argument, to put it bluntly, is weak. After all, life has gotten better in recent years. Small dachas made from boards have long gone into oblivion. They were replaced by houses built of stone or wood, in extreme cases using frame technology, but sheathed with modern materials.
That is, everyone wants to live comfortably and beautifully. Why do some people refuse to improve their garden plots and create a beautiful landscape design in which drainage plays an important role? But its absence can lead to serious problems, where puddles after rain, dirt on garden paths, poorly growing plants are just “flowers”. The consequences can be much more serious, for example, a sagging foundation, hence cracks in the walls.
Drainage installation - step-by-step technology
First, it is important to realize how watered the area is to us. Ideally, even a house project should be developed after receiving a geological conclusion on the qualities of the site. Moreover, nodding at your neighbor will not work: as a rule, even neighboring plots are sometimes strikingly different from each other. Therefore, you need to obtain quite a lot of documents.
- Topographic plan with cadastral boundaries.
An example of a professional topographic survey of a private land plot: it is too difficult to do on your own
- Description of the soil and the depth of its different types (data from drilled wells).
- Its physical and chemical qualities are depth of freezing, ease of wetting. What kind of connections will the soil make with water, and how will they affect buildings and plants.
- Mechanical qualities of the soil: heaving, tendency to sliding and subsidence. Will it support the foundation?
- The depth of soil water and seasonal changes in this depth.
The groundwater diagram for the site shows which type of drainage is most needed in this area
If the site is already inhabited, then you can chat with your neighbors and look at their buildings. This is great information.
The neighbors' damp basement will show the drama of the situation
The level of wells and boreholes will also report on the level of soil water. In addition, if nettles, sedges, and even more so reeds grow on the site, this is a sign that the moisture reaches the surface up to two and a half meters. If wormwood grows, then everything is safe.
The presence of horse sorrel also indicates the proximity of groundwater
The accumulation of fog in the evenings and bright grass in the dry summer confirm the proximity of moisture. If puddles do not dry out for a long time after rains, it means that the soil is clayey, and therefore drainage is also necessary.
Construction of artificial reservoirs
If the size and geological features of the site allow, then one of the ways to drain the site can be considered the creation of an artificial pond. This can be done when the lowest and wettest place is located on the periphery of the site. And although this method is called drainage without drainage, surface drains here can be present in the form of ditches designed as decorative or “dry” streams.
The advantage is the construction of an artificial reservoir as an element of landscape design. The disadvantage of this type of drainage is the need to regularly clean the reservoir and pump out water - the water is not flowing, accumulates, and can itself serve as a source of waterlogging. In addition, over time it begins to bloom.
Why do you need to drain soil and storm water from the site?
The close occurrence of soil water leads to wet foundations, basements and basements. Water may accumulate in the basement or ground floor when the snow melts or after a long period of heavy rainfall, which must be removed and the room dried; the rest of the year it will be damp, moisture will settle on the structures, fungus and mold will grow, and the air will smell of mold and rot.
In winter frosts, soil saturated with moisture will freeze, compress the foundation, swell and push the building upward. In this case, cracks appear in the foundation and structures of the building; in severe cases, the structure of the house will begin to collapse.
If the area is swampy or groundwater is located very close, then plants grow very poorly on it, mosquitoes hatch, and an unpleasant odor appears. You can forget about beautiful well-groomed flower beds, beds and berry gardens.
If the soil is clayey, then after rain or snow melts, water stagnates on the surface, saturates the ground near buildings, and damages green spaces.
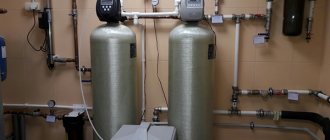
Selection of materials and components
Table of components for surface modification drainage
| Name | Description and purpose |
| Drainage tray made of concrete with a galvanized stamped grid. | Removes moisture from the soil. Suitable for installation on sites and along paths. Depending on its dimensions, it has different throughput. Transfers weight up to one and a half tons. |
| Drainage tray with cast iron grate. | Designed for the same thing as in the above case. Load capacity up to twenty-five tons. Can be installed on roads. |
| A rainwater inlet made of plastic, including siphon partitions and a trash can. | Collects water. They are located in the place where water drains from the roofs of houses, garages, bathhouses, and sheds. Transfers weight up to one and a half tons. |
| Sand trap made of plastic and steel grate. | Included in the linear modification drainage system, it is used to collect sand and small mechanical particles. Sand traps are required for installation at the junction of drainage systems if the surface system is connected to the deep one. Carry loads up to one and a half tons. |
Trays and storm water inlets are the most important parts of the drainage system. They are made of steel, plastic, concrete, polymer concrete and reinforced concrete. They carry a load of up to twenty-five tons, depending on the dimensions they have different throughput. To carry out, for example, drainage of a site on clay soils with your own hands, you need to correctly calculate how much water flow will be per unit area of the site.
Table of components for deep drainage
| Name | Purpose and description |
| Corrugated pipe in a geotextile filter made of HDPE. Diameter value – up to 200 mm. | Designed for deep collection and drainage of water from the site and from under the foundation of the building. It is laid to a depth of up to four meters. The filter material prevents clogging and filling of the drainage pipe from the inside. |
| Corrugated HDPE drainage pipes coated with coconut coir. Diameter value – up to 200 mm. | Installed at a depth of up to four meters. Unlike geotextiles, coir has better durability and reclamation properties. |
| Shafts for wells made of HDPE. The diameter is up to 923 mm. | For creating all types of drainage wells. Maximum depth six meters. |
| Geotextiles. Polyester based filter fabric. | Used for all types of drainage. Filters out sand, silt, and small fractions of soil. Not affected by fungi, mold, microbes, insects and rodents. |
In addition to the main components (presented in the table), various couplings, rings, cuffs, bends, plugs and other consumables are used in drainage. The complete set depends on the individual characteristics of the drainage system for a particular location and is selected based on the characteristics of the topography, volume and depth of water in the ground.
Available materials for building a drainage pit
The choice of suitable material for the construction of a drainage pit under a bathhouse depends on the design features of the structure, the volume of wastewater and the financial capabilities of the owner of the site.
Barrel pits
Tanks can be constructed from barrels, metal and plastic, of various sizes. Such a system involves the use of one or two drainage containers:
- One container. The bottom of the prepared pit is covered with a drainage mixture of crushed stone and gravel, then a plastic container without a bottom and with a perforated surface is lowered into it. The distance between the barrel and the pit is filled with drainage. A waste pipe is connected to the barrel at an angle. Some of the liquid will flow through the drainage holes into the soil for further cleaning.
- Two containers. Such a system involves the use of two barrels, with the first being installed 25 cm above the second. The containers are connected to each other by an overflow pipe. The wastewater enters the first container, in which foreign impurities and solid waste settle. Next, the purified liquid is poured into a second tank, to which perforated pipes are connected for drainage. Drainage elements are installed in trenches filled with drainage material and a dense layer of soil.
Brick pits
To construct drainage pits, ceramic bricks are used, the masonry of which is carried out with small gaps - they ensure the drainage of wastewater into the drainage pad and soil. The operating principle of such a drainage system is no different from the previous one, the difference lies in the material used. The distance between the brick reservoir and the earthen base is filled with drainage material designed to clean the wastewater and distribute it around the perimeter of the pit.
A brick pit is considered more durable and practical compared to a structure made from plastic barrels.
Concrete pits
Given the technical equipment and financial capabilities, it is possible to build a drainage pit from concrete rings with a perforated surface, which are mounted in a prepared pit. After the installation of the rings is completed, the bottom of the structure is covered with a drainage cushion of gravel and crushed stone.
In the case when the depth of the pit is at least 2 meters and the bottom of the tank is concreted, such a structure can be used both for drainage of wastewater from a bathhouse and for sewerage of a residential building.
Tire pits
Cesspools made from used tires are designed to drain liquid waste, so they are well suited for the needs of a bathhouse.
The arrangement of a drainage system when installing tires can be carried out in various ways, including lateral perforation of the walls, maintaining a technological gap between the installed slopes, cutting off the outer walls while maintaining the internal structure of the tires.
This is the simplest and most popular option for organizing drainage under a bathhouse, according to which the work can be done with your own hands.
How to properly make deep drainage?
To correctly install deep drainage on a personal plot of land, first of all, a clear project of all work is formed, establishing the types of soil available on the territory, the features of the relief and the level of groundwater.
This type of research is entrusted to engineering and geological organizations. They will conduct a full study of the area, and then provide the customer with a topographic survey that describes in detail the relief, hydrogeological features and geological structure of the site. With this information at hand, installing an effective drainage system is easy.
The construction of the system is carried out in the following order:
The main elements of a deep drainage system are drains (pipes of a specific design). They are located below the foundation pad of the building that they plan to protect, or along the entire perimeter of the land at a depth of 80 centimeters to one and a half meters.
The required slope of the pipe is made towards the collector, drain well or any other natural or artificial reservoir located outside the site.
In this way, moisture collected as a result of precipitation is collected and the general level of nearby groundwater is reduced to a non-critical state. In the center of the site and along the edges, drains are located at a distance of 10-20 meters from each other. The structures are given a herringbone shape, where the outermost channels redirect all the water into the main trench leading to the main water intake.
To enhance the efficiency of the deep drainage system, it is worth using pipes equipped with a two-layer geotextile filter and a circular perforated layer. This communication option is suitable for all types of soils and has the ability to drain larger amounts of water.
On absolutely flat areas, the required slope is achieved by lowering it when digging the bottom of the trench. For loamy and clayey soils, the optimal slope level is 2 centimeters per meter of pipe, for sandy soils – 3 centimeters. If the site has a large area, several inspection wells are installed to avoid too extensive excavation work.
Communication pipes are equipped with rotary and water intake wells. If necessary and if it is impossible to remove excess water outside the site, an absorption (filter) well is added to the remaining elements, designed to drain the main volume of water.
Under the base of the absorption well, a bulk layer of crushed stone or broken brick must be made. This is necessary so that the collected liquid goes evenly into the soil and does not erode the lower layers, causing subsidence.
Immediately before laying the pipes, a 10-centimeter layer of coarse sand and the same layer of crushed stone are poured into the trenches.
The resulting shock-absorbing cushion prevents communications from breaking under the weight of the soil. To avoid silting of pipes, the channels are lined with geotextiles.
It is advisable to carry out the laying of deep drainage on the site after all heavy construction work, so that the communications do not sag or crack as a result of intense operational load
On top of the laid out pipes, another layer of sand and crushed stone is made, and the remaining voids are filled with earth, making mounds on the surface. When the system finally “sits” in the trenches, the poured earth itself will drop to its natural level.
A correctly and clearly installed system ensures timely and rapid removal of moisture from the site and reliably protects buildings from flooding and subsequent destruction.
Arrangement of the drainage system
To reduce the risk of site flooding, you need to know the installation rules. Materials you will need:
- for the pillow - gravel or crushed stone;
- for filtration elements – geotextiles;
- for assembling the structure - fittings;
- work equipment (shovels, wheelbarrows).
According to technology, the installation of a drainage system begins with the preparation of channels. The route is marked using a cord and pegs during periods of minimal rainfall. Trenches are dug manually or using special equipment. The slope in the direction of the catchment should not be less than 20 mm per 1 m. Geotextiles are attached to the vertical walls.
Broadenings are created under the collectors, and the bottom of the trench is covered with a layer of sand of about 200 mm. Geotextiles are installed and the panels are fixed to the walls of the pit.
The following stages of work:
- The route is filled with crushed stone 300 mm thick and a recess is made along the axis.
- Install pipes, clamps, tees, bends. It is allowed to use sewer fittings that are suitable in diameter.
- Check the drain deviation using a stretched cord and a building level.
- Cover the drainage system with crushed stone.
- Lay geotextiles overlapping on top of the backfill.
- Inspection wells are installed and connected to the system using couplings and adapters.
- To avoid freezing, fill the gaps between the wall and the collector.
The outlet of the drainage pipe is made into a drainage trench, pond or well. The ditch is buried, polypropylene profiles are welded, PVC is glued with a special compound.
General information
The principle of operation of drainage on the site
The presence of a drainage system on the land plot of a country house increases the level of comfort while living in the house. Drainage protects the basement floors from dampness, the formation of cracks on the building, and paved paths, which guarantees the preservation of the landscape design on the site unchanged. It is possible not to lay drainage in rare situations.
What determines the need for drainage:
1. drainage is laid to drain water from the base of buildings. If water comes very close to the foundation, then the soil can shift and the house can “float.” This phenomenon can be found in clayey areas. If you add soil freezing to this, frost heaving may occur, as a result the house may be squeezed out of the ground.
2.drainage protects basements from flooding. With better installation of waterproofing layers, moisture will still penetrate into the house if there is a lot of it. Mold and mildew grow quickly in damp basements. Rain and snow, combining with salt solutions from the soil, are aggressive substances that corrode the structure of the foundation and walls.
3. If there is drainage and high groundwater levels, the septic tank is not in danger of being squeezed out of the soil.
4. Drainage and storm sewer together will quickly remove water from the building, preventing it from seeping underground to the foundation.
5.Drainage maintains the soil at optimal moisture; puddles will not form on the ground.
6.Abundance of water in the soil will lead to rotting of tree roots.
7. If the site is inclined, then with heavy rainfall and floods the upper fertile soil can be washed away. The water will go deep through the drainage and the soil will not be washed away.
In what situations does drainage require construction?
There are cases when the need for drainage construction is not questioned. Under what circumstances is the drainage structure shown:
1. When the site is located without a slope, drainage is required. If there is a lot of precipitation or a lot of snow melts, the water will not flow down the slope, it will stagnate in the form of puddles.
2. When the site is located in a lowland, drainage is required, because all the water will accumulate on the site, running down the slopes.
3. If the site has a strong slope, drainage is required, because water, quickly flowing down, will take with it the upper black soil layer. This flow of water should be directed deep into the drainage system.
4.If there is a clay type of soil, drainage is required because soils have low drainage capacity. Water will stagnate on the surface without penetrating into the deeper layers.
5. When water occurs underground above one meter, drainage is needed.
6. If the foundation is located too deep, close to the flow of groundwater, then with a seasonal rise in water, the base may flood.
Attention! The drainage system should be planned at the design stage. 7. When covering a large part of the area with concrete, tiles, or a lawn that has an irrigation system, drainage is required
7. When covering a large part of the area with concrete, tiles, or a lawn that has an irrigation system, drainage is required.
In most cases, a drainage system is vital. Before its construction, you should study the properties of the soil on the site.
Types of drainage pits
There are three types of sewage pits: a sealed tank, a drainage type pit and a multi-chamber septic tank.
A sealed cesspool is the simplest and safest construction option, which prevents the penetration of polluting wastewater and household chemicals into the soil and aquifer. It is being constructed on land with a high level of groundwater.
The design is represented by a simple sealed tank dug into the ground to the required depth. A special feature of a cesspool is the need to regularly pump out accumulated water waste. Significant disadvantages of a sealed tank include the complexity and high cost of maintenance.
A drainage pit for drainage is the most popular option for private baths that do not have bathrooms. In this case, an open container is installed that does not have a sealed base. A gravel-crushed stone mixture is used as a bottom filter. The design of the drainage pit provides for the presence of special holes necessary for the removal of purified liquid into the soil.
A septic tank is a technically complex version of the sewer system for baths equipped with sanitary facilities. Structurally, it is represented by several cameras connected to each other and performing various functions.
The primary sealed chamber ensures the collection and initial filtration of wastewater: solid waste sinks to the bottom, and the liquid undergoes additional purification by aerobic microorganisms. The reservoir is connected to the second compartment by an overflow pipe, which provides the supply of purified liquid. The second chamber serves as a drainage pit, where water undergoes secondary purification and is discharged into the soil.
If the septic tank consists of three compartments, then the drainage chamber is installed last. In this case, a deeper cleaning of impurities and pollutants occurs in the second chamber, after which the purified liquid enters the drainage tank.
Storm drainage elements
The surface drainage scheme for the site includes:
- water intake trays covered with gratings on top. Depending on the location, they can be made of steel, cast iron, ceramics, plastic, concrete, polymer cement. They are usually installed along paths, roads, houses, blind areas, sidewalks, etc.;
- fittings and connecting elements;
- point water inlets with a connected pipe or tray are usually installed at the point where water drains from the building’s drainage system. The water intakes are covered with gratings on top;
- rainwater is collected in wells and discharged to drainage points in the same way as water from deep drainage.
In large wetlands, drainage is found using ditches filled with crushed stone and diverting water towards a natural drainage area. In compact summer cottages, such a scheme is not applicable - it requires a lot of space.
A photo of the drainage systems on the site will help you understand all the structural elements.
Construction of a cesspool
How to make a drainage hole? Before you directly start building a drainage pit, you need to accurately calculate the location and volume for it.
First of all, it must be said that following sanitary standards, the cesspool should be located like this:
- at a distance from the home of 5-20 meters;
- retreat at least a meter from the fence, that is, from the edge of the site;
- location 20-50 meters further than drinking water sources or wells.
The layout of the drainage pit is shown in the figure below, where 1 is the cesspool itself.
Cesspool location
The volume of the pit is calculated depending on how many people live in the house and how often the drain is used.
For example, a family of three uses about 12 cubic meters of water per month.
You also need to consider the type of soil if you are making a hole without a bottom. Not every type has the ability to absorb the amount of water you use. For example, clay soil allows a very small volume to pass through, and in this case it is more advisable to make a hole with a bottom or constantly pump out water.
When calculating the volume, you need to take into account that initially the hole should be filled, not reaching the surface by a meter. Thus, a sewer pipe is supplied.
After laying it, the pipe is filled up, and the volume of the pit increases by this meter.
What problems does a drainage system solve?
Correct drainage of excess water from the base of the foundation of residential buildings and outbuildings protects buildings from settlement, the appearance of unsightly damp spots, darkening of corners and the formation of mold, and basements from annual seasonal flooding.
The soil does not “float”, and at low temperatures the consequences of frost heaving do not occur, “squeezing” buildings out of the ground. Layers, paths and sidewalks placed on the territory do not crack and are kept in perfect condition.
In well-drained areas, treatment communications and structures operate for a long time and reliably. Even with an increase in the seasonal level, groundwater receives a path to outflow and does not provoke the release of septic tanks and sewage from cesspools to the outside.
Moisture from precipitation, which leaves in a timely manner through drainage channels, does not react with salts contained in the soil and does not form aggressive compounds that decompose building materials.
High-quality drainage does not allow puddles that form after rain to stagnate and waterlog the soil in the garden, thereby causing water erosion.
In areas with a pronounced slope, the drainage system redirects water flows into drainage channels during heavy rainfall, thereby preventing soil erosion and maintaining the attractive appearance of the overall soil surface.
In combination with roof storm drainage communications, the drainage system quickly removes excess water from the perimeter of the land, prevents it from seeping into the basement and basement rooms and prevents flooding of both buildings and the entire site.
Water erosion negatively affects the condition of land cover and significantly reduces the yield of garden and vegetable crops
Construction of a cesspool
If you are building a cesspool for a summer house or a house where you rarely visit, then it is cheaper and easier to build a cesspool without a bottom, that is, an absorption pit.
The construction process will go like this:
- At the first stage, a pit is dug. To the required depth, you must add space for a filter pad, which will help the drain water to be absorbed into the soil;
- At the same time, walls and sewer pipes are installed, which are laid at an angle;
- laying the pipe inside the pit. This pipe must also enter the hole at an angle so that the liquid flows there freely;
- if the walls are made of brick, then a ceiling is made at the top and a hatch is installed.
Such a pit can be constructed in the simplest way, and with rare use it will serve for a long time and reliably.
If you live on the site permanently, then you should make the same hole, but cover its bottom with tied reinforcement and fill it with concrete. Then it will be airtight and safe. On the outside of the walls, you can also make waterproofing from roofing felt or other materials. This will give strength to the cesspool.
You can also install it in a pit and a sealed container of the required volume, as shown in the image below.
Sealed cesspool
The most inexpensive options would be construction from a Eurocube or using a plastic container.
What are drains and what are they for?
Complex of pipes and wells
Drains or drainage pipes are used to drain the area from excess moisture, groundwater or soil water. The drainage system forms drainage - a set of pipes that help maintain soil quality and the stability of technical and residential buildings.
Water in the surface layers of the soil or under the foundation of a building on a summer cottage must be drained in order to:
- The garden building did not “lean”, its foundation did not sag
- There were no puddles left on the playgrounds and paths due to stagnant water
- There was no flooding of basements and ground floors
- Avoid the appearance of fungi on the walls of buildings due to excessive dampness
- Prevent destruction of load-bearing parts of the building or individual structural elements under the influence of salts and aggressive chemical compounds contained in water
- Prevent waterlogging and freezing of the soil in winter, which will negatively affect the germination, flowering and fruiting of garden crops
- Avoid washing away the fertile soil layer in garden plots with a slope
Veranda attached to the house - expanding the living space: projects, tips on how to create it yourself (200 original photo ideas)
Planting moisture-loving plants
Another option for drying without drainage is to plant moisture-loving plants that “work” as a natural pump with an evaporator function. The root system of such plants actively absorbs water, and the abundant leaf cover evaporates moisture. Of course, the productivity of this drainage method is not high, but in combination with traditional drainage systems it has a positive effect.
As an independent method, this approach is justified only under conditions of slight swampiness or as a preventive measure. For example, in summer cottages with non-permanent residence, when there is no urgent need to remove melt or sediment water. By using trees, shrubs and grasses that absorb a lot of water, you can reduce flooding due to high water and speed up the drying of the top layer of soil after spring floods or autumn rains. Moisture-loving trees include all species that grow in nature near rivers, lakes and wetlands: willow, alder, birch. Along the perimeter, as a hedge, you can plant shrubs: rose hips, hawthorn, viburnum.