A do-it-yourself well drilling rig is made according to the free drawings presented below. Taking into account the purchase of all components, the cost of a homemade mini water drilling rig will be 15-20% of a similar finished unit.
This diagram shows the main working units of the MGBU, which you can manufacture according to our drawings.
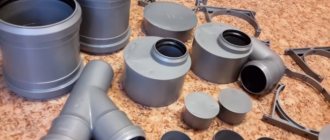
§ Drilling swivel, rods and locks
At first, it is recommended to purchase a ready-made drill swivel and drill rods. In the manufacture of these parts, processing accuracy is very important, since the loads on these units are large. We do not recommend making a swivel from improvised means. One slightest inaccuracy and it will fail.
If you decide to order a swivel from a turner, you will need to find a qualified specialist, and preferably with modern CNC machines. The swivel and locks will require strictly defined types of steel. For locks – 45 steel. For the swivel – 40X. Download a drawing of a homemade drill swivel:
Attention! Private traders will not do high-quality hardening! After hardening, grinding will be required. Use HDTV hardening, but this is an expensive procedure.
You can save money by purchasing ready-made units, but finding a suitable specialist will take a lot of time. But it's worth it - homemade parts are much cheaper than purchased ones. To get started, purchase parts for samples. Turners work better when they have drawings and templates on hand.
If you have factory samples, it will be much easier to check the quality of work. For example, if a turner made drill rods (locks), then you take factory-made and home-made parts and screw them to each other - check the quality of the thread. The match must be 100%!
Do not buy spare parts by delivery. This is necessary so as not to buy a marriage - this, unfortunately, happens. And most importantly, if you order delivery from afar, you can wait more than one month.
We recommend making the threads on drill rods trapezoidal - it is no worse than a conical thread, but if you then order turners, it is more difficult to make a conical thread.
If you make or buy locks for drill rods separately, then take simple suture pipes for the rods if you are drilling no deeper than 30 meters (3.5 mm thick and an internal diameter of at least 40 mm). But a professional welder must weld the locks to the pipes! In vertical drilling, the loads are high.
To drill deeper than 30 meters, you need to take only thick-walled pipes (with a wall of 5-6 mm). Thin rods are not suitable for great depths - they will tear. Download the drawing of locks for drill rods:
“Horizon-1”
Advantages of the drilling rig:
1. Minimum investment (about 5 thousand rubles for basic turning work, about 5 thousand for metal, from 1 to 2 thousand for welding work, a motor from 5 thousand rubles)
2. The drilling rig and all necessary drilling tools can be transported in a station wagon.
3. Absolutely anyone, in any city, can find spare parts and manufacture a drilling rig under our guidance.
4. To make any of our Horizon series drills with your own hands, you don’t even need a garage! The small size of these drilling rigs allows you to make them even on an ordinary balcony of a city apartment! If you have an inverter welding machine, you can even cook on the balcony if you wish!
5. Very high production speed (about 2 weeks).
6. Very light - 2 people are enough to operate this drilling rig.
7. To work with this drill, a pit measuring 190 x 80 cm is sufficient (depth as desired). For more comfortable work, the desired pit dimensions are 190 x 90 cm.
8. Cheap, but really functional installation, tested by different people in several regions!
Disadvantages: less convenient to use than more powerful and expensive analogues, drilling speed is lower.
Complete set of drawings:
1. A manual for making a drilling rig with photographs of the assembly process and photographs of all parts.
2. Drawings of locks for drill rods.
3. Drawing of a drill blank, instructions for making a homemade drill.
4. Guide to making a special homemade ladder (for more convenient work).
§ Homemade winch and gear motor
When manufacturing a mini drilling rig, a “RA-1000” winch is used. You can take another one, but preferably one with a carrying capacity of at least 1 ton (or better yet, more). Some drillers install two winches, one electric and the other mechanical. In the case of a drill string wedge, it is very helpful.
To make the work easier, it is advisable to buy and connect two remote controls: one for reverse and engine speed, the other for the winch. This will save a lot of effort.
A gear motor for a homemade mini drilling rig will need 60-70 rpm, with a power of 2.2 kW. Weaker will not do. If you use a more powerful one, you will need a generator, since it will not be possible to connect to a voltage of 220 Volts. Recommended gear motor models for hydraulic drilling: 3MP 31.5/3MP 40/3MP 50.
"EAST"
A modernized version of a small-sized drilling rig based on the classic design used on “Minskaya”, “Vologodskaya” and similar economy-class drilling rigs.
The characteristics of a self-built drilling rig are, in practice, absolutely identical to any small-sized drilling rig offered by drilling equipment sellers. The power of the drilling rig and the drilling depth depend only on the power of the motor. All manufacturers of electric small-sized drilling rigs equip their drills with low-speed motors with a power of 2.2 kW. Some “inventors” install more powerful electric motors, but such drilling rigs inevitably have problems with connection, since commercially available frequency converters allow powering a three-phase motor with a power of no more than 2.2 kW from a household network (220 Volts).
Advantages of the drilling rig:
1. Very low cost due to significant savings when making a drilling rig with your own hands.
2. The quality of a homemade drilling rig is almost never lower than the factory ones, and often significantly exceeds the factory ones!
3. Absolute similarity of technical characteristics of a homemade drilling rig and factory drills (motor power, rig speed and drilling depth).
4. Light weight of the machine (total weight about 300 kg) and compactness (can be drilled indoors).
5. Mobility. Drilling in hard-to-reach places (the unit is disassembled and can be easily carried by hand).
6. Assembly and disassembly of the installation takes no more than 30 minutes.
7. Easy to transport (the machine can be transported in a light trailer).
8. 2 people can work with a small-sized drilling rig.
Complete set of drawings:
1. Detailed instructions for making the drilling rig frame and carriage.
2. Diagram of a homemade drill.
3. Guide to making a drill yourself.
4. Drawings of locks for drill rods with trapezoidal and tapered threads.
5. Drawing of a swivel.
Mini drilling rig for horizontal drilling
This is interesting: BKM-317: technical characteristics and device
§ How to make a drilling rig with your own hands
1. Purchase of drill rods and swivel (note that the parts have the same thread, or use an adapter). To begin with, you don’t need to buy a lot, focus on a depth of 30 meters.
2. Purchase of a motor-gearbox. These purchases take a long time and there are often delays beyond your control, so it's best to buy in advance.
3. Manufacturing of frame and drill. When making a frame, it is advisable to have a motor, a swivel and a winch on hand, since all this needs to be attached to the frame. Making a carriage without a motor yourself is also problematic, since the mounts for different motors may differ.
4. We purchase the remaining components of the mini drilling rig after installing the main components on the frame.
Video of a similar DIY installation in operation:
Making a petal bailer
If desired, such a working tool can be made for a small-sized impact drilling rig. A petal bailer is made using approximately the following technology:
- they also cut off a piece of about 1 m long from a thick-walled pipe for the body;
- a piece approximately 15 cm long is cut from a pipe of smaller diameter;
- a circle is cut out of sheet steel, the diameter of which should be equal to the diameter of the insert cut out at the previous stage;
- the valve is welded onto spring hinges;
- grind off the lower part of the insert.
At the final stage, the structure made from a 15 cm piece is tightly inserted into the bailer body and secured with a bolt.
Making a petal impactor for a drilling rig is therefore easier than making a ball impactor. However, such designs are still considered less reliable. Ball bailers usually last much longer than petal bailers.
§ Mistakes when drilling for water yourself
It is recommended to start drilling for water from shallow depths in order to gain at least a little experience. Experience in vertical drilling is the most important! You can only learn how to drill water wells through practice. Learn to avoid the drill string wedge. Due to inexperience, beginners often “catch a wedge” and lose drill rods. Sometimes the drill jams so much that it is impossible to pull it out even with a crane; the structure simply comes off (usually at the welding points).
Mistakes are not cheap—an expensive tool is lost. Therefore, in hydrodrilling you cannot force things and immediately make deep wells. Approach this matter responsibly and carefully. Read literature, books and textbooks about drilling water wells. This work requires a lot of knowledge that cannot be conveyed in a nutshell, so self-education is mandatory.
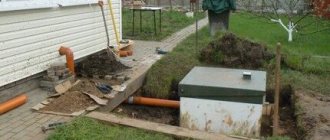
First stage of assembly work
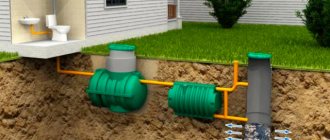
At the very beginning, we need to prepare sections of the drilling rig pipe, which are its main part. Their connection is realized through slopes and crosses. To avoid any problems, a 2-centimeter external thread is provided at the ends of each pipe section. A metal plate is welded to two sections; it will be the tip. Such an installation will be effective only if water is constantly supplied to the drilling site. This will allow you to remove soil, and thereby gradually deepen the hole. To supply water, you can use a regular hose, which is connected to the hole in the cross blank. As a priority, the connection should be made using a suitable adapter. Well, now let's move on.
§ Do-it-yourself drilling
To make a water well manually, auger or shock-rope technology is used. The hydraulic method will require a drilling rig. A collapsible model of a small-sized model can be made according to drawings from our website. And perhaps drilling water wells with your own hands will become your business.
Screw method
Working with an auger is the easiest manual method. It is used only to obtain shallow sources, the water from which will be used for technical purposes.
To perform independent drilling, you need a drill, which, when screwed into the ground, destroys the rock and grabs the soil with its blades. Periodic removal of the auger is necessary to clean it of sludge. This work is done without assistants.
In addition to the drill, you will need a tripod to which the auger is attached, and a lifting mechanism (manual with a winch or mechanized). Without these devices it is impossible to drill. Even several people will not be able to lift the drill with soil from a sufficient depth.
The greatest difficulty is drilling strictly vertically. Only a fixed drill will provide the necessary verticality, without which the pipes will be deformed. To ensure proper verticality, after passing 2 meters, you need to install a temporary metal pipe - a conductor, which will set the correct direction of movement.
A downhole conductor is an additional pipe with a larger diameter than the casing. The conductor in the upper part of the wellbore protects against wall collapse during drilling and does not allow surface water to pass through.
The auger method can be used in soft soils. If the auger hits a moraine, you will have to repeat the process in another place. Quicksand are also more difficult. Softened soil is difficult to pull to the surface. Only an auger with blades curved towards the top helps.
Shock-rope method
To make a source in clayey and loamy soils, it is better to use the shock-rope method. This method is more labor-intensive, but reliable and simple. For work, a drill glass is used - it is a cylinder with sharpened edges.
The essence of the method is to raise the glass (in other words, the cartridge) to the height from which it is dropped. Upon impact, the cylinder becomes clogged with soil. Raising the glass to the surface, remove excess soil.
The shock-rope method is good for almost all soils. But it takes a lot of effort, so hydraulic systems are often used to lift the cartridge.
Impact-rope technology is also good because it shows when water-bearing sand will appear. When reached, a bailer with a valve is used, capable of lifting liquefied soil.
A bailer is a hollow metal cylinder used to lift liquefied rock and mud from a well to the surface.
The simplest design of a screw MGBU
Screw mechanisms are a more complex device than impact devices. The most important working unit of such a machine is a rotating spiral screw. To make it you will need to take a piece of steel pipe d 100mm. The petals of the auger are welded in the form of a spiral at the bottom of the pipe, and two sharp knives are welded at the very bottom end. The petals and spiral are made of sheet steel, 3-4mm thick.
A thread is cut on top of the pipe so that a fastening coupling and a special tee can be attached to it. A tee is a special device for turning a drill in the form of a metal coupling, to which pipe-levers are welded horizontally on both sides. It is screwed onto the upper end of the pipe with a screw at the end.
As the auger rotates, it will go deeper into the ground. And when it protrudes above ground level, the tee with levers is screwed together, and a fastening coupling and the next pipe are installed instead. The drill is placed on top of it again, and the whole procedure is repeated from the beginning.
Types of devices
A small-sized drilling rig (MSDU) can have a different design, which directly affects the principle of its operation. It is customary to distinguish several types of devices.
Screw type
An auger drilling rig has a working tool in the form of a rod with blades (auger). To make shallow holes under the pile foundation, the equipment is operated manually. If the well has a significant depth during drilling, it is necessary to use a powerful motor with significant torque.
Using auger equipment, rock particles are extracted from the depths without washing. This reduces the efficiency of the unit, so it is suitable for drilling in low-density soils.
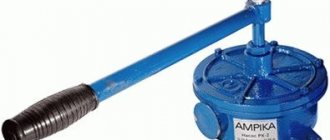
Shock-rope installation
It consists of a durable frame (most often in the form of a tripod), and a chisel or bailer is used as the main working tool. The impact mechanism is lowered down using a cable manually or using a gear motor.
Rotary installation
It involves rotary drilling with water supply, which washes rock particles out. Equipment of this type can be operated manually, for example, to install a screw pile. An electric drive is used to drill wells with significant depth.
Complex option
This method of manufacturing a screw will allow you to assemble a high-quality and accurate device that will serve for a long time. First, calculations and drawings are made, then measurements are made. It is also worth preparing tools and suitable material in advance, and only then start assembling a homemade drill.
Step-by-step instructions for installing a screw mixer are as follows:
- Take the prepared pipe, and it should be smooth, without any bends or deformations. Drill a perpendicular hole with a diameter of 8 mm at one end. This is where the top part will connect to the handle.
- Install the tip from below - this part will set the direction of movement of the earth. You can make it from an old car spring. You can cut the required square using a grinder.
- Make a longitudinal cut in the pipe, which should have a thickness equal to the tip. Next you should insert it with its sharp tip inside the pipe. The result should be a device that resembles a spear.
- Connect the parts using a welding machine, not forgetting about safety measures.
- Cut a cutter from the spring equal to ½ the diameter of the drill being made, and cut the teeth on it. It is these elements that will bite into the soil, loosen it, and only after that the soil will fall onto the spiral of a homemade auger.
- Position the cutters so that they are at an acute angle to the main surface. After this, the parts should be welded to the steel pipe.
- Cut a circle from a metal sheet, the same in diameter as the auger spiral. Make a hole in its center into which the pipe will be inserted. Attach the manufactured disk to the cutter welded to the tube. Mark their contact using a pencil or a special marker.
- Using the marks obtained, cut the circle from the edge to the center; it is best to do this with a grinder. Place the cut disk in a vice and twist the elements into a spiral with a hammer. Place the self-made auger onto the pipe and weld it. Finally, brush the surface with a wire brush and paint.
Actually, this is where the work is finished. All that remains is to make a handle and an extension cord. The first one can be made of plastic, it will be more convenient, but the last part can be made from any suitable pipe.
Spoon drill assembly
It is necessary to prepare a pipe whose wall thickness is at least 5 mm. An incision is made on the side wall. Its width depends on the type of soil: the looser it is, the smaller the gap. The lower edge of the pipe is rounded using a hammer. This edge is bent to form a spiral coil. A large drill is fixed on the same side. On the other side, a handle is attached.
A spoon drill includes a long metal rod with a cylinder at the end. The cylinder has 2 components, which are located along or in the form of a spiral. There is a sharp cutting edge along the bottom of the cylinder.
Peculiarities
The drill is designed for digging vertical holes of great depth and small diameter. In this case, human efforts are reduced to a minimum. The beginning of the well on the surface layer of soil is called the mouth, the walls of the well along the entire length form the trunk, and the end of the well is called the bottom.
The main components of any drill are:
- lower support pipe;
- tip;
- incisor or incisal part;
- handle;
- drill bits;
- auger (auger part of the drill).
The screw part of the drill destroys the layer of soil in which drilling occurs and brings the soil upward. The tip shape is sharp, but slightly rounded for quick penetration and reinforcement of the tool's stable position. If necessary, the handle can be easily removed, and an extension pipe is attached to the drill, which allows you to dig a well to great depth. The use of drills is extensive: from making wells and strengthening fence posts to planting shrubs and trees.
Increasing power
The power of an automatic electric drilling rig does not exceed one horsepower. But this value can be increased. It is enough to install a gearbox, on the shaft of which a flange is attached with another flange already fixed on it with bolts. A rubber washer of the required thickness is placed between the flanges and takes on part of the shock loads, smoothing them out.
This helps to avoid problems that arise during drilling. An electric drilling rig cannot fully operate without water. It must be supplied to the place where the soil is in contact with the elements of the device. Supply can be carried out using a special device, which is placed just below the level of the gasket between the flanges.
A drilling device is really necessary in a country house or country house. In addition, the presence of such a device is justified by its relatively easy assembly when studying the entire technology, as well as the possibility of reusable use even outside the site, that is, for your own business. The main thing is that the drilling mechanism copes well with the task of drilling wells, so your site is guaranteed a constant and high-quality water supply.