A well at the dacha will provide the owners with water. However, ordering production from a drilling organization, frankly speaking, is not affordable for everyone. Owners of country plots who want to minimize the costs of developing their own source have a choice - hydrodrilling. Not everyone is familiar with this technology, do you agree? Those who are interested in it should first understand the methodology.
We will tell interested home craftsmen in detail how to do hydraulic drilling of wells with your own hands. We thoroughly outline the technological subtleties and list the nuances of preparing and carrying out work. Using the information we have carefully checked and presented, you will cope with the difficult drilling process without the slightest difficulty.
In addition to a scrupulous presentation of hydraulic drilling technology, the author of the article describes the specifics of arranging a site for carrying out independent drilling operations. Provides data on the required drilling rig, tools and accessories. Informative photos and video tutorials will provide significant assistance in mastering a complex issue.
How to make hydroponics from pipes?
Homemade hydroponic installations can come in completely different modifications. It can be:
- multi-stage structures designed for several dozen pots;
- looped, allowing you to grow plants around the perimeter of the greenhouse or create small flower beds for 4-6 sprouts;
- straight-line installations, the easiest to assemble and operate. The length of such beds depends solely on the capabilities of the room.
Depending on the goals set and the selected modification of the hydroponic installation, the set of parts will vary. For example, when assembling a looped structure, you cannot do without tees and corners. Whereas for a linear installation, the necessary parts are limited to a straight sewer pipe of suitable diameter and a pair of plugs.
Preparation of materials
After choosing a model, you can begin searching for materials. Let's consider the assembly of the second and most universal option. If desired, this type of hydroponic installation can be converted into a multi-tiered one or simplified to a linear one by removing the corner joints. For this modification you will need the following elements:
- PVC corners 900 – 4 pcs;
- PVC tees – 4 pcs;
- Plastic sewer pipes:
- Gaskets (seals);
- Stub;
- Plastic pots for indoor flowers;
- Aquarium compressor;
- Tubes for an aquarium compressor;
- Air spray nozzles;
- Tees for oxygen tubes.
The seals do their job well, but in some situations you may need a sealant (silicone) to seal the joints. It is also useful for attaching tubes. In addition, for assembly you need a drill (if you don’t have one, you can make holes in the plastic with a hardened nail), and a hacksaw.
Assembly of the structure
If you have all the necessary materials, assembling the structure will take no more than an hour. Let's look at it step by step:
- First you need to saw off the middle drain from 3 of the 4 tees. These are future holes for pots of seedlings. In our version there will be three of them. If it is necessary to increase the number of plants, straight sections are inserted between the tees, in which round holes of the appropriate diameter are cut out.
- Seals are inserted into individual parts of the structure. Then all the parts are closed using corners.
- The side of the flower pots is perforated and inserted into the prepared holes. The pots should be the same size as the holes in the pipe and fit snugly into place.
The basis of the hydroponic installation is now ready. To prevent water from stagnating and the root system from rotting, the assembled installation must be equipped with a pump, which will drive water through the pipes, saturating it with oxygen. Or design a special aeration. The second option is no less effective, and at the same time more accessible for home use. Let's start installation:
- We cover the remaining 4 tees with a plug and make two holes in it: one for the air tube, the second for the float.
- We pass a transparent tube into the hole and stretch it along the entire length of the structure.
- Near the holes for the pots in the tube we make a small cut and attach the tee.
- We put a small piece of tube on the tee, at the other end of which a foam sprayer is installed.
- We fix the sprayer with silicone as close to the pots as possible.
- We put the free end of the tube on the outlet of the compressor.
All that remains is to make a float that will indicate the water level. It is made from improvised materials. To do this you will need a piece of foam and a long thin rod. Marks are applied to the rod and it is brought out into the second hole of the plug.
Site preparation
Preparing a site for a future well begins with leveling it. Then a supply of water is provided. This will require large volume containers (up to 20 m³) or a specially dug pit. To strengthen its walls, a clay solution or a moisture-resistant membrane is used, which must be carefully spread and secured. The amount of water required is determined by the composition of the soil, the required drilling depth and other indicators.
Small-sized installations must be installed strictly vertically. Its installation is not particularly difficult. In this case, be sure to follow the instructions. This will ensure trouble-free operation of the entire structure.
At a distance of 150 cm from the location of the future well, it is necessary to equip 2 pits - the main and filter. The first is located at a short distance from the MDR, the second is in close proximity to the drilling device. The pits are connected by a tray, groove or trench to move water. The main pit should have a volume of about 1 m³. The filter pit is slightly smaller.
The inlet hose from the hydraulic pump should be placed in the main pit. Another hose connects its outlet and the swivel. This will ensure the supply of drilling fluid to the well.
Drilling fluid is a solution for drilling made from water and clay with additional impurities. The specific composition of the liquid and its other properties are determined by the composition of the soil at the drilling site. Since the composition of the soil changes as the well gets deeper, the consistency and other technological characteristics of the drilling fluid must be periodically adjusted.
Where does hydro drilling begin?
Preparation for drilling operations begins with determining the approximate depth at which the aquifer lies. The complexity and labor intensity of the work, as well as the amount of material for rods and casing pipes, depends on this.
One option is to contact government agencies that have geodetic maps. To be sure of the quality of the water, it is worth obtaining a conclusion from the SES. It is necessary to prepare a water source for drilling fluid in advance. The volume of solution depends on the composition of the soil. One well may require from 5 to 20 m3 of flushing fluid. Next, it is worth preparing the area (site) and equipment. You should start by installing containers to store water. Another option is to create an improvised “reservoir”. To do this, prepare a pit, the walls of which are treated with clay mortar or covered with a hydromembrane, after which they are filled with water. The next stage is installation of the drilling rig. This procedure is simple, but responsible. The device must be installed strictly plumb; the slightest slope will complicate the installation of the casing. Pits (2 pieces) are installed approximately one and a half meters from the proposed well.
The first acts as a filter in which the soil washed out by the solution settles. It is located closer to the drilling rig itself. The minimum dimensions of the filter pit are 0.7 x 0.7 x 0.7 m. The main pit is made larger and located a little further from the well. The pits are connected by trays (trenches) for the flow of liquid. The pump inlet hose is placed in the main pit, and a hose is laid from its outlet to the swivel. The solution flows through the latter into the well.
Do-it-yourself caisson for a well
As already mentioned, it is better to place pumping equipment for wells in a special pit rather than on the surface of the earth. To do this, the pit is concreted and insulated, or a caisson is installed in it.
This name refers to a special container made of metal or plastic in which the upper part of the well and the pipe that drains water to buildings are connected. At the same time, pumping equipment, a pressure tank (not always), electrical equipment and control devices are also located there.
Access to the caisson is provided by a hatch. Insulation of the structure is not necessary, but to prevent freezing in winter, the upper part (lid and “ceiling”) is provided with a layer of thermal insulation 50...100 mm thick. Additionally, the walls of the caisson can be insulated.
You can independently build a structure from concrete, brick, blocks (with careful waterproofing), or weld it from sheet metal. Plastic products are produced industrially.
A little about well repair
Or why can’t you carry out repairs yourself, but entrust them to professionals?
So:
- The main reason for well failure is most often a clogged filter or compaction of sand in the pipeline due to irregular use of water.
- You can get a dirty filter yourself and clean it, but if the reason is in the pipe, then effective methods from specialists are needed.
- They flush the well under water pressure. Why water is pumped into the pipe under high pressure, and the dirt is carried out. An uncontrolled splash of dirty liquid may occur, which does not please the people doused with it, and this is considered a disadvantage of this method.
- The pipe is cleaned with an air flow, using the same principle of operation, but this method can lead to damage to the filter, which is also undesirable.
- The most acceptable and safest method remains - pumping out dirty liquid with a pump. The filter is not damaged, there is no dirt around.
- You can pour special food acids into the well, which have the ability to quickly restore the well. The process is simple: acid is poured in, the well remains with it for some time, then the dirty liquid is pumped out.
- High cleaning efficiency - explosion in the wellbore. But it can happen, like the pharmacist in “The Elusive Avengers”, when he transferred the explosives, and here, you can damage not only the filter, but also the pipe.
How to do hydraulic drilling of wells with a submersible pump can be clearly seen in the video. This article suggests that you familiarize yourself with the general provisions on hydraulic drilling.
Necessary equipment for work
The standard type of hydraulic drilling work is carried out using small-sized installations. For your own plot, this is a great solution and the best way to get water on your own.
It is necessary to supply working fluid into the wellbore with significant pressure, and for this a pump or motor pump for contaminated liquids is needed.
Sometimes, to increase the breakdown force, shot or coarse sand is added to the working solution. To crush large pebbles that may be found in sandy layers, roller-cone and cutter bits are useful.
If, when drilling wells or constructing wells, boulders or large pebbles were encountered in neighboring areas, the starting rod must be equipped with a reinforced drill bit. The tool must be secured to the rod so that it does not interfere with the supply of water to the barrel
Special small-sized MDU installations are most in demand among consumers for hydraulic drilling purposes. This is a unit with a height of 3 m and a diameter of 1 m.
This prefabricated structure includes:
- collapsible metal frame;
- drilling tool;
- winch;
- a motor that transmits force to the drill;
- swivel, part of the circuit for sliding fastening of parts;
- water motor pump to ensure pressure in the system;
- exploration or flap drill;
- drill rods for forming a column;
- hoses for supplying water to the swivel from the motor pump;
- Control block.
Among the necessary equipment, it is also desirable to have a current converter. It is needed to ensure that the energy supply to the process is stable. You also definitely need a winch for raising/lowering casing and set-up pipes.
When choosing a motor pump, it is better to choose a more powerful device, since heavy loads are expected. For hydraulic drilling, you will also need such plumbing tools as a pipe wrench, a hand clamp, and a transfer fork.
From the very beginning to the end of the work, the hydraulic drilling process involves a constant circulation of the working fluid. With the help of a pump, an aqueous suspension with eroded soil comes out of the well, enters directly into the pit and, after sedimentation of the suspension, is again supplied to the well.
In addition to this procedure, it is possible to carry out hydraulic drilling of shallow wells for water without using a pit. This method does not require a recess to settle the working solution, saves time and makes it possible to drill a well even in garages and basements.
If there is an abandoned pond near the site, then you can also do without installing sumps - pits. There are no special requirements for the quality of water supplied to the well.
For hydraulic drilling, a motor pump is selected that is capable of pumping heavily contaminated water. It is advisable to buy a unit with a head of 26 m, a pressure of 2.6 atm and a productivity of 20 m3/h.
A more powerful pump guarantees fast, trouble-free drilling and better well flushing
For quality drilling, it is important that there is always a good flow of water from the well.
Well inside the house
Drilling indoors
Of considerable interest is the well, which is located directly in the house:
- The indoor water supply system involves a water lifting installation with a pressure tank and a periodic pump; it will satisfy the most ambitious demands. In addition, installation located in the center of the house (in the basement) is economical and does not require large expenditures of materials.
- A water tank can be installed in the attic
- Installation in the basement or a pressure tank in the attic (in an insulated extension) will ensure complete automation of the water supply to your country house
- A well in the basement of a house is drilled during the laying of the foundation, at the construction stage, when there is no ceiling yet
- It is also possible to make a well in the basement if the first floor is covered and a temporary opening is left above the well
- Nowadays, hand piston pumps are sometimes still used. In this case, there should be a tank in the attic from which water under pressure will flow into the washbasin or shower
What and how to do, work order
Now let's look at how to properly prepare everything for work. The first thing to do is to determine the place where the work will be carried out, calculate the approximate depth of the work, and then prepare the appropriate tool.
To create an Abyssinian well, you will have to go 15-20 m deep, and this is only possible in the absence of hard rocks and stones. You can carry out reconnaissance work and drill a place next to the future well with a special nozzle to make sure that the work can be carried out.
After the stage of choosing a location and preparing the equipment, the MDU is installed. A solution for flushing is made, and the casing pipe is prepared. Drilling is carried out, during which the casing is introduced. The technology allows this to be done without stopping work to extract waste soil.
As soon as the water layer has been detected, work stops and you can begin installing the well and disassembling the installation.
Types of water intake workings and soils
Before starting drilling work, you should study the composition of the soil on the site in order to at least roughly imagine your future well.
Depending on the characteristics of the aquifer, three types of wells are distinguished:
- Abyssinian well;
- filter well;
- artesian well.
The Abyssinian well (or needle well) can be installed almost everywhere. They break it where the aquifer lies relatively close to the surface and is confined to sand.
To drill it, they use driving technology, which is not suitable for constructing other types of wells. All work can usually be completed within one business day.
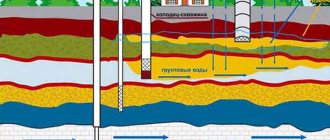
This diagram allows you to study the design features of various wells in order to better understand their drilling technology and choose the appropriate method (click to enlarge)
But the flow rate of such wells is small. To provide the house and site with enough water, sometimes it makes sense to make two such wells on the site. The compact dimensions of the equipment make it possible to install such a well directly in the basement without any problems.
Filter wells, which are also called “sand” wells, are created on soils where the aquifer lies relatively shallow - up to 35 meters.
These are usually sandy soils that lend themselves well to drilling. The depth of the filter well usually varies between 20-30 meters.
This diagram clearly shows the structure of a filter well. A filter must be installed at the bottom of the water to prevent sand and silt from entering the water.
In a good situation, the work will take two to three days. The filter well needs good maintenance, since the constant presence of sand and silt particles in the water can cause siltation or sandiness.
The typical lifespan of such a well can be 10-20 years. The period may be longer or shorter depending on the quality of well drilling and its further maintenance.
Artesian wells, also known as limestone wells, are the most reliable, since the aquifer is confined to bedrock deposits. Numerous cracks in the rock contain water.
Such a well is usually not at risk of silting, and the flow rate can reach approximately 100 cubic meters per hour. But the depth to which drilling is to be carried out usually turns out to be more than respectable - from 20 to 120 meters.
Of course, drilling such wells is more difficult, and the work will take much more time and materials. A professional team can complete the work in 5-10 days. But if we drill a well on the site with our own hands, it may take several weeks, or even a month or two.
But the effort is worth it, because artesian wells can last for half a century, or even more, without problems. And the flow rate of such a well makes it possible to supply water not only to one house, but also to a small village. Only manual drilling methods are not suitable for constructing such a mine.
The physical and mechanical properties of soils are also of great importance when choosing a drilling method.
During the work, you may need to go through a variety of layers, for example:
- wet sand, which can be drilled relatively easily by almost any method;
- water-saturated sand, which can only be removed from the trunk using a bailer;
- coarse rocks (gravel and pebble deposits with sand and clay aggregates), which are drilled with a bailer or a glass, depending on the aggregate;
- quicksand, which is fine sand supersaturated with water; it can only be scooped out with a bailer;
- loam, i.e. sand with abundant inclusions of clay, plastic soil that can be easily drilled with an auger or core glass;
- clay, plastic rock, which can be drilled with an auger or glass.
How do you find out what soils lie beneath the surface and at what depth is the aquifer? Of course, you can order geological soil surveys, but this procedure is not free of charge.
Almost everyone chooses a simpler and cheaper option - asking neighbors who have already drilled a well or built a well. The water level in your future water source will be approximately the same depth.
Drilling a new well a short distance from an existing structure may not follow exactly the same scenario, but it will most likely be very similar.
Advantages of do-it-yourself manual drilling
Manual drilling with self-made devices has the following advantages over automatic drilling methods using special drilling equipment by individuals and organizations:
Cheapness. Making a drill with your own hands from scrap materials and drilling a well without the involvement of third-party assistants, specialists, or organizations is the most profitable option from a financial point of view if other methods of employment in your free time do not bring monetary income.
Versatility. Independent manual drilling work is universal due to the following features:
- Manual drilling in many situations is the only possible option for carrying out work, if entry into the site of special equipment is impossible or the well is located in a built room.
- Narrow borehole channels are laid manually without the use of casing columns of standard diameter, which significantly reduces the cost of organizing and equipping water supply on an individual site.
- Drilling is carried out manually to a depth of 5 to 35 m, which corresponds to the characteristics of an Abyssinian and sand well.
- The drill made can be used for other economic purposes, if it is necessary to make holes in the ground - when constructing fences, planting garden plants, installing pile foundations and other household work. If it is no longer needed, the structure can always be disassembled and used on the farm at your own discretion.
Complete set of hand-held twist drill, factory-made.
Flexibility of use . Depending on the depth of the water layer, the quality of the soil and the dimensional parameters of the borehole channel, various drilling technologies, designs of drilling devices or combinations thereof are used. With individual manufacturing, there is always the opportunity, through experimentation, to independently make a drill for a well, the most convenient and effective for specific conditions.
Work can be carried out at any time convenient for the owner, without reference to the season, time of day, weather, hired specialists or organizations. If electricity is not supplied to the area being developed, wells can be drilled manually and mechanically without its presence.
Of course, you will have to pay for the low cost of the manual method in the speed of work and intense physical labor, the latter being to some extent useful in terms of improving health.
Pipes and couplings for threaded connections
Advantages of hydrodrilling wells
The technology of hydraulic drilling for water has gained popularity among the people relatively recently, and therefore has many misinterpretations. Firstly, it is a misconception that the method is only suitable for small wells. This is wrong.
If desired and with appropriate technical support, hydraulic drilling can be used to drill wells longer than 250 meters. But the most common depth of domestic wells is 15-35 meters.
The opinion about the high cost of the method is also not confirmed by calculations. Good work speed reduces financial costs.
The obvious advantages of the method also include:
- compactness of equipment;
- the possibility of drilling in an extremely limited area;
- minimum technological operations;
- high speed of work, up to 10 m per day;
- safety for the landscape and ecological balance;
- possibility of manual drilling;
- minimum cost.
Perhaps the most significant advantage of hydraulic drilling is the ability to drill in landscaped areas without significant aesthetic troubles.
The technology of hydraulic drilling on an MBU machine makes it possible to carry out a cycle of work on a small site and does not disturb the landscaping of the site
The advantages of hydraulic drilling also become very clear if we compare it with dry drilling technology, where it is necessary to constantly remove the working tool from the shaft for cleaning and load it again.
This technology is best suited for working with fine-clastic sedimentary soils, which are most easily removed from the well using a bailer. And the drilling fluid allows you to do without gelling.
Of course, for a good result of the enterprise, it is necessary to purchase appropriate means of mechanization, because one homemade drill, even at shallow depths, is not enough.
Manufacturing of drilling tools
As mentioned earlier, drilling devices can be made independently, borrowed from friends, or purchased industrially produced products.
Sometimes a drilling rig can be rented. However, the goal of do-it-yourself drilling is usually to keep costs as low as possible. The easiest way to drill cheaply is to make tools from scrap materials.
The diagram shows the structure of various drilling tools. Using a chisel, particularly hard soil can be loosened, and then it is removed with a drill, bailer or other device
Option #1 - spiral and spoon drill
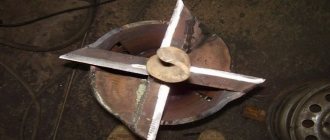
Hand drilling can be done with a twist or spoon drill. To make a spiral model, take a thick, pointed rod to which knives are welded. They can be made from a steel disk cut in half. The edge of the disk is sharpened, and then the knives are welded to the base at a distance of about 200 mm from its edge.
A self-made auger drill can be of different designs. Its mandatory elements are knives with pointed edges and a chisel installed at the bottom.
Knives should be positioned at an angle to the horizontal. An angle of about 20 degrees is considered optimal. Both knives are placed opposite each other. Of course, the diameter of the drill should not exceed the diameter of the casing pipe. Typically a disc with a diameter of about 100 mm is suitable. The knives of the finished drill should be sharpened sharply, this will make drilling easier and faster.
Another version of the twist drill can be made from a rod and a strip of tool steel. The width of the strip can vary between 100-150 mm.
The steel should be heated and coiled, hardened, and then welded to the base. In this case, the distance between the turns of the spiral should be equal to the width of the strip from which it is made. The edge of the spiral is carefully sharpened. It is worth noting that it is not easy to make such a drill at home.
A spiral auger for drilling can be made from a pipe and a steel strip, however, it is not always easy to correctly roll the tape into a spiral, weld and harden the tool at home
To make a spoon drill you will need a metal cylinder. In self-production conditions, the easiest way is to use a pipe of a suitable diameter, for example a 108 mm steel pipe.
The length of the product should be about 70 cm; a longer device will be difficult to work with. A long and narrow slot, vertical or spiral-shaped, should be made on this body.
The easiest way to make a homemade spoon drill is from a piece of pipe of a suitable diameter. The bottom edge is folded and sharpened, and a hole is made along the body for cleaning the drill
Two spoon-shaped knives are mounted in the lower part of the body, the cutting edge of which is sharpened. As a result, the soil is destroyed by both the horizontal and vertical edges of the drill.
The loosened rock enters the drill cavity. It is then removed and cleaned through the slot. In addition to the knives, a drill is welded at the bottom of the drill along the axis of the device. The diameter of the hole made by such a drill will be slightly larger than the device itself.
Option #2 - bailer and glass
To make a bailer, the easiest way is to also take a metal pipe of a suitable diameter. The thickness of the pipe walls can reach 10 mm, and the length is usually 2-3 meters. This makes the tool heavy enough to effectively loosen it when it hits the ground.
A shoe with a petal valve is attached to the bottom of the bailer. The valve looks like a round plate that tightly closes the lower section of the pipe and is pressed by a fairly powerful spring.
However, a spring that is too tight is not needed here, otherwise the soil simply will not get into the bailer. When pulling out the bailer, the valve will be pressed not only by the spring, but also by the soil collected inside.
The lower edge of the bailer is sharpened inward. Sometimes sharp pieces of reinforcement or sharpened pieces of triangular-shaped metal are welded at the edge.
A protective mesh is made from thick wire on top and a handle is welded to which a metal cable is attached. The glass is made in a similar way, only a valve is not needed here, and a slot should be made in the body to clean the device.
Advantages of the hydro drilling method
Most land owners prefer to have their own well to obtain technical or clean drinking water. There are several types of drilling: rotary-auger, percussion-rope, cable-rotary and hydraulic. And if a number of conditions are met, such as loose soil, the absence of rocks, shallow aquifers or the presence of similar wells in neighboring areas, then you can drill the soil to a water source yourself, without the help of specialists.
Of the listed methods, the most suitable for independent implementation is the hydraulic drilling method. The main advantages of the method are:
- small size of the drilling rig;
- no need to use heavy special equipment;
- preservation of the landscape of the adjacent territory;
- The drilling fluid serves as a natural coolant for the elements of the drill string, and also performs the function of grinding the walls of the well, further strengthening them.
Hydrodrilling - advantages and disadvantages
The hydraulic drilling process is based on the use of flushing fluid during drilling, which softens the soil in the drilling area. Environmental research works favorably evaluate this drilling method.
In addition, the flushing fluid, which is usually a clay solution, polishes the walls of the well, cools the drill and brings eroded soil particles to the surface.
The main advantages of this drilling method are as follows:
- the possibility of using a small-sized drilling rig (SDR);
- small installation area. This allows you to preserve the landscape on an already developed area;
- low price;
- high speed of work;
- closed cycle of flushing liquid.
Disadvantages of the hydrodrilling method:
- the impossibility of using the method for rocky soils. The hydrodrilling method is used only for sandy, loamy and clayey soils;
- drilling depth limitation (no more than 50 m);
- the need for a water source.
To use MDR for hydraulic drilling, a small working area of 4 square meters is sufficient. This allows you to drill a well without disturbing the ecology and landscape of the already developed area of the site. The installation height does not exceed 3.5 m. Therefore, hydrodrilling can be done under the roof. For example, in a garage or other outbuilding.
With the correct construction of the hydrodrilling technological process, the flushing fluid flowing from the well is cleared of soil particles in the filtration pit and re-enters the well.
Advantages of hydrodrilling a water well
The main advantage of the principle is the ability to carry out work on a landscaped site. As the video shows, the infield area will not resemble a battlefield with craters, but will remain aesthetically pleasing. The technology is best suited for clay or loam soils, but if necessary, it can also be used on sandy soils.
As for the features of the method, the advantages over all others are obvious:
- Availability in terms of price;
- Efficiency;
- Drilling does not destroy, but strengthens the body (barrel) of the well;
- Carrying out work independently;
- Compact installation and easy transportation of the structure.
Distinctive features of the method
The main feature of the method is that drilling includes 2 processes - destruction of rock with a special device and its extraction with water under pressure. That is, the destroyed rock is washed out by a pressure stream. Processes occur almost simultaneously, which reduces the time required to complete the work.
Immersion in the ground is ensured both by the weight of the drilling equipment and by the work of special equipment that pumps water into the body of the well being constructed. This is a rinsing solution because the water contains tiny clay particles. This is as it should be, since in order to carry out the work, the density of the solution must be higher than that of water. The motor pump takes the solution from the pit, and it enters the wellbore under high pressure.
Liquid is needed not only to wash away destroyed rock.
It performs several functions at once:
- It washes away destroyed soil, and the dump is brought directly to the surface.
- The solution cools the drilling tools.
- The movement of water ensures that the inner surface of the well is polished, which reduces the risk of its collapse.
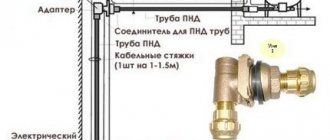
According to hydraulic drilling technology, gradually, as the mine deepens, the column has to be built up using rods - these are sections of VGP pipe, the diameter of which is 50-80 mm, and the length is about 1.2-1.5 m. Along the edges the rod must be threaded.