- Types of toilets
- What is a wall mounted toilet?
- Installation steps
- Advantages of wall-mounted toilets
If in Soviet times it was problematic to make repairs, because there was a shortage of building and finishing materials, now the huge assortment is confusing. It can be difficult to choose a certain model of plumbing fixtures, everything is so beautiful! When choosing a toilet for a toilet, you need to focus on the size of the room. Since most often this room is of modest size, installing an attached toilet will help free up extra centimeters.
It would seem that what could be easier than going to the store and buying a new toilet? But it was not there! Once you enter a plumbing store, your eyes are simply blown away by all the abundance of this equipment.
Wall-hung toilet in the bathroom
Which toilet to choose?
True, you won’t be able to install the toilet correctly if you don’t first understand what these devices actually are. And such plumbing has a very specific classification. Modern toilets can be:
- Wall-mounted/mounted. They do not come into contact with the floor, but are mounted on the installation - fairly strong holding wall structures. The installations also house equipment drain tanks. In this case, all pipes and communications are hidden. Externally, such toilets look absolutely flawless, but have a number of disadvantages:
- installing them requires a lot of effort and money;
- such models are not cheap;
- they are problematic to maintain and repair.
- Attached. Such models are installed on the floor, but the flush cisterns and toilet communications are still hidden in the wall. Thus, only the bowl of the plumbing fixture and the water drain button remain visible. Visually, everything is flawless, but the disadvantages of this solution come out in the event of equipment breakdown or leakage.
- In-floor. This toilet option is not suitable for bathrooms in city apartments and in most country houses. This solution is optimal only for public restrooms, since it involves installing the equipment directly deep into the floor - that is, you will need to make a hole in the floor. It is unlikely that many will be satisfied with such an “original device” in their own home.
- Floor-standing. These toilets (they are also called compacts due to the characteristic location of the cistern - right on the shelf of the toilet seat) are considered standard for modern residential premises. They are familiar to everyone, familiar to the eye. They are inexpensive and easy to install/dismantle. In addition, they are easy to maintain, repair and regularly maintain.
Advantages and disadvantages
An example of decorating an installation for an attached toilet and bidet
With the installation of attached plumbing equipment in the toilet you can:
- Save space as it is shorter than a traditional floor-standing compact.
- Make your toilet design flawless.
- Add visually the amount of free space.
However, the attached toilet, along with its positive characteristics, is also endowed with a number of disadvantages. They are expressed in:
- Increased price level;
- Difficulties in maintenance and repair, since its hidden communications are not accessible for these works;
- Inconvenient maintenance when replacing tank fittings;
- Lack of free space for cleaning, as there is in its hanging counterpart.
What is needed for work
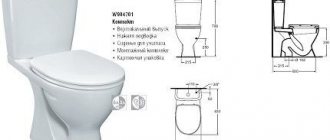
First of all, you need to know that floor structures have different forms of fecal water release:
- vertical;
- horizontal;
- I slant.
In new buildings, they began to install toilets with a horizontal discharge of fecal water long ago, while in old buildings such as “Khrushchev” there are devices with an oblique discharge form. Toilet bowls with a vertical outlet are used less and less often, found mainly in Stalinist buildings.
Therefore, before purchasing this device, you need to know how water enters the sewer pipe, so as not to redo the sewer system and quickly and efficiently install the plumbing device.
To connect plumbing fixtures to the sewer system, special pipeline fittings are used, among which the most commonly used are:
- fan pipes;
- eccentric cuffs;
- corrugated pipes.
The use of fan pipes gives a visual appearance of the unity of the toilet with the connecting material, since both are made from the same material, for example, earthenware, ceramics, porcelain and others. The only installation difficulty in this case is the need for an exact match to the installation location; it will not be possible to fit by cutting.
Eccentric cuffs are made of polymers, which are a structure of two bends with shifted axes. The cuffs can be of different lengths, so it will not be difficult to choose them to connect the toilet to the sewer system with different parameters for the outlet and socket of the sewer pipe.
Additional functions
The attached toilet, in addition to its main purpose, can perform a number of additional options.
Microlift
Photo of a toilet with a microlift - a device that smoothly lowers the toilet lid
This device is designed specifically to support the toilet lid from dropping suddenly. The principle of operation of this design is similar to that of a conventional door closer, only it is slightly smaller in size. This innovation protects the cover from the formation of unwanted chips or cracks upon impact and dampens unpleasant sounds. This allows a person to be in the bathroom area cozy and comfortable.
Today on the plumbing market you can buy not only a toilet with a micro-lift, but also buy a seat with a micro-lift separately. These products from America, Italy, Germany and other European countries are considered the most rated.
Bidet
The bidet option built into the toilet bowl was created specifically for the convenience of intimate hygiene procedures. Basically it is a small retractable fountain that is attached to the rim of the bowl.
In addition to such a built-in system, an attached plumbing fixture may additionally have a hygienic shower, a bidet lid, a built-in hairdryer or water heating. Such equipment is equipped with a manual or electronic control system.
Types and designs of toilets
Toilets sold in the retail chain differ from each other in a significant number of parameters; they are conventionally divided into the following groups according to:
- bowl shape: plate-shaped, funnel-shaped, and visor-shaped;
- type of flush: straight (horizontal, cascade), straight circular or swirling circular;
- placement: floor and suspended structures;
- location of the tank: together with the bowl or placed upward, behind the false wall (equipment with installation);
- water supply: right-handed or left-handed;
- materials of manufacture: porcelain, earthenware, stainless steel, glass, stone, plastic and exclusive options made of gold.
Rice. 2 Types of flush
Material of manufacture
Attached toilets are made from the same materials as regular ones, and these are:
- Porcelain;
- Faience;
- Composite;
- Stainless steel;
- A natural stone.
The most popular of them are porcelain and earthenware. Let's consider how materials affect the quality characteristics of plumbing equipment.
Porcelain
The most resistant material to mechanical and chemical influences. It does not absorb moisture and foreign unpleasant odors. It is easy to care for and easy to clean. If porcelain toilets are taken care of, they can last up to 50 years. In terms of price, they are more expensive than similar earthenware products.
Faience
Earthenware is the traditional and most popular material for making toilets. It is beautiful, durable and cheap, compared to porcelain. Its basis is the dense structure of ceramics, which is fired in special kilns at high temperatures. According to the technology, glaze is applied on top of this base, which reduces the porosity of the ceramic. This option makes sanitaryware practical, reducing contamination of the main product.
Other materials
The attached composite toilet is distinguished in its range by a variety of colors. This is possible due to the fact that special additives are added to the base polymer concrete to imitate the texture of natural stone.
Natural stone for making sanitary ware is a beautiful and expensive pleasure.
Stainless steel floor mounted toilets are very easy to clean. Bacteria do not multiply on their surface. They are very durable and can withstand severe mechanical loads. Recently, they can often be found in public toilets.
Choosing a toilet and options for its installation
The method of installing a toilet directly depends on its type and design features. On store shelves you can see two main types of this plumbing fixture, installation technology, which is fundamentally different from each other, namely:
- Wall-hung toilets, the installation of which is usually carried out before the start of repair and finishing work using special bolts at a height of approximately 45 cm from the floor level;
- Floor-standing toilets, which are installed after completion of all finishing work on the floor surface, are most in demand among consumers, and therefore consideration of the technology for their installation will be the most appropriate.
When choosing a floor-standing toilet, you should take into account not only the appearance and design of the device, but also the method of connection to the sewerage system. In this regard, they distinguish:
- toilets with vertical outlet, connected to the sewer system through the floor;
- toilets with horizontal outlet, connected to the sewer at an angle of 90 degrees into the wall;
- toilets with an oblique outlet, the connection of which is made at a certain angle.
It is also worth paying attention to the method of attaching the toilet to the floor, which can be external or internal, since the technology for installing this equipment depends on this. The external method of fastening is considered simpler, the internal one is more aesthetically pleasing. Before proceeding with the actual installation of the toilet, it is necessary to carry out certain preparatory work, which consists of dismantling the old toilet, if there is one, of course, as well as purchasing all the necessary tools and materials
Before proceeding with the actual installation of the toilet, it is necessary to carry out certain preparatory work, which consists of dismantling the old toilet, if there is one, of course, as well as purchasing all the necessary tools and materials.
Installation steps
Installing a toilet tank means installing it in a wall niche as provided in the design, fastening it using dowels with self-tapping screws or anchors.
Communications are connected to the device: water supply, spout pipe, and also a box-shaped extension for the button is attached with latches. The spout pipe is pre-adjusted to the length and height corresponding to the distance from the outlet of the plastic container to the entrance to the attached bowl.
Securely fixed pipelines and the tank are completely walled up with cement mortar or covered with sheet materials (plasterboard, magnesite, fiberglass, etc.), which, as a rule, are decorated with tiles, sometimes with cement plasters or other hydrophobic methods.
On the outside of the screen (in its holes) there remains a socket for connecting to the sewer (for straight and oblique outlets) and a flush pipe, to which the attached toilet is later connected, as well as a protruding box-shaped extension of the button.
Final assembly of the push-button mechanism is carried out after trimming the extension flush with the outer surface of the decorative trim and checking the operation of the shut-off valves.
Next, the bowl itself is installed, which is initially placed in the intended location for marking. Having identified the points of the fastening elements, the product is moved to the side and holes are prepared for anchoring.
After which you can connect the toilet to the water supply and sewerage pipes, installing it in place and tightening the fasteners. It is recommended to treat the back mating surface of the bowl with sealant.
How to install floor and hanging
The difficulty of installing a toilet with your own hands depends, first of all, on what type of structure is chosen - floor-mounted or wall-hung, and secondly, on whether the tank will be built into the wall, fixed to the wall, or placed on the toilet itself.
We connect and install the toilet as it will stand
In any case, the work will require:
- drill;
- perforator;
- screwdriver;
- roulette;
- screwdriver;
- level;
- hammer and mallet;
- set of adjustable wrenches;
- flexible underwater hoses and their fastenings;
- anchors and other hardware;
- “fan” pipe;
- sealants and related threads or tapes;
- cuff adapter.
Mark the holes for the mounting bolts and drill them
If we are talking about how to install a toilet installation, that is, to hide the tank in the wall, then the list of necessary parts, fasteners and tools will be longer, if we are talking about installing a standard inexpensive compact, it will be smaller.
There is also nothing complicated about how to install a wall-hung toilet, but before purchasing this type of toilet, you need to make sure that it is possible to ensure the outflow of feces, because in most apartments the drain hole comes out at an angle from the floor.
We install the toilet, secure it with bolts and connect the water
With this arrangement, it is better not to install a wall-hung toilet, since feces residues will accumulate in the additional sleeve connecting the drain and the toilet itself.
If the pipe comes out of the wall, above the floor level, there are no obstacles to installation. Work begins by connecting the toilet and pipe outlets and marking the fastening points on the wall. It takes two people to install a wall-hung toilet, as it is difficult to achieve evenness when fixing it alone.
Particular attention should be paid to the reliability of the fastenings and the material of the walls, that is, such a toilet cannot be installed on a flimsy wooden partition, because you will have to withstand the weight of the toilet itself and the person on it
Installation of a wall-hung toilet
The steps to install a toilet on a tile are no different from the steps to install a toilet without it, the only difference is that you will need a drill that can accurately drill through the tiles without cracks.
It is important that the mounting bolts for the wall-hung toilet are securely fastened to the wall
Regardless of the type of structure, the general procedure will be as follows:
- establish and fix the position of the knee using a level;
- make marks for holes for fasteners;
- drill holes, re-establish the position of the knee and secure the structure, just in case, once again checking the evenness with a level;
- seal the drain connection;
- supply water to the tank using flexible hoses;
- lay a layer of liquid sealant between the base of the toilet and the surface of the floor or wall;
- check the functionality and carry out all the final work - decoration, wall covering or any other.
Toilet installation with installation
Although there is nothing difficult in installing plumbing fixtures, in cases where the design of the purchased toilet requires specific manipulations, for example, a new insertion into the sewer riser of the house or stitching “behind the face”, that is, installation, it is better to resort to the services of professional plumbers, but only those whose work is “official” and accompanied by documentary evidence.
Additionally
In addition to its main purpose, an attached toilet can perform (be equipped with) the following additional functions:
- Microlift. A device that is specially created to ensure that the toilet lid does not fall down with a sharp, unpleasant sound, and cracks and chips do not form on the plumbing. Its operating principle is similar to that of a door closer, which allows you to close the door slowly and carefully. All together allows you to use the toilet, feeling comfortable and cosy. Today, you can not only buy a toilet complete with a microlift system, but also install it on an existing toilet in the form of an overhead seat with a microlift. Products from Germany, Italy, and other European countries, including America, are in great demand.
- Bidet. It is becoming increasingly widespread because it helps a person quickly clean up after using the toilet. In addition, the bidet system has a self-cleaning function, meaning you don’t have to worry about someone else using it. As a rule, it takes the form of a retractable fountain mounted on the rim of the bowl. In addition, the bidet includes a built-in hairdryer, water heating and a hygienic shower. You can control all these functions thanks to the panel located on the side of the toilet lid. Just like a microlift, you can purchase an attached toilet with a built-in bidet, or additionally install an overhead cover with bidet functions.
Attached toilet and bidet
Installation and adjustment of a wall-hung toilet
Concealed installation of a toilet is carried out using an installation - a special device for attaching sanitary ware and a flush cistern to the wall of the toilet room.
Installations can be of two types:
modular, that is, when you purchase the equipment, all the structural elements necessary for installation are already built into it. The installer just needs to attach the block installation to the wall and hang the toilet. Due to its heavy weight, block installation can be installed exclusively on the main walls of the house;
A single device for attaching a wall-hung toilet
frame The frame structure consists of a metal frame and a set of additional elements that are installed by the installer himself. The frame structure can be used to attach any type of toilet to any wall.
Assembly device for mounting a wall-hung toilet
After attaching the installation to the wall, the position of the toilet is adjusted using retractable rods.
The optimal height for the toilet is considered to be a distance of 40–48 cm from the level of the decorative flooring.
The toilet is attached to the installation using special studs, supplemented with gaskets and nuts.
Installing a toilet on installation
After installing the plumbing, you can begin connecting the sewer and water supply, as well as finishing the installation with selected decorative elements.
Whatever type of toilet is chosen by the consumer, guided by the attached diagrams, you can install the plumbing product yourself.
Types and organization of drainage
The wall-mounted toilet does not have a conventional flush cistern. Its functions are performed by a specially designed flat tank for concealed installation. It is located in the thickness of the wall and niches equipped there.
Water flows created by the drainage system for high-quality removal of contents are divided into three types:
- Shower. This drainage is provided by water flows distributed around the perimeter of the bowl. By washing it away, they form a whirlpool behind them, which carries away and collects all parts of the incoming contents along the way.
- Cascade. This drain is less efficient. It ensures uniform distribution of incoming water flows, which wash the internal volume of the bowl.
- Sucking. This is the most powerful drain. Its principle of operation is to directly fill the bowl, the contents of which then fall down along with the water when the drain valve is opened.
Getting ready for installation
The base for installing the toilet must be level. There are several options for the development of events, namely:
- if the floor is tiled and does not have differences in level, we do not carry out any preliminary measures to level the base;
- If the floor is tiled and is not level, we install the toilet using choppers. To do this, holes are drilled in the floor, the choppers are driven into them at a level, and then the toilet is attached to the choppers using screws;
- if it is planned to replace the tiles, dismantle the old cladding and fill in a new screed if the old one has differences in level;
- if the toilet is installed in a new house or apartment without any finishing, fill in the screed and lay the tiles.
We pay attention to the pipes. We clean the sewer from debris and various deposits, install a tap on the water supply (if it was missing before) to shut off the water supply to the tank
Removing the old toilet
Dismantling the toilet
First step. Turn off the water supply and drain all the liquid from the tank.
Shut off the water
Second step. We unscrew the hose through which the tank is connected to the water supply.
Disconnect the hose
Third step. Unscrew the tank fasteners. If they are rusty, we arm ourselves with a screwdriver or open-end wrench. We press the bolt head with the selected tool and unscrew the nut using an adjustable wrench. If that doesn’t work, pre-soak the nut with kerosene. We remove the tank.
Fourth step. We dismantle the toilet mountings.
Fifth step. Disconnect the toilet flush from the sewer.
Corrugation is easy to remove
In older buildings, drains are usually secured using cement coating. To destroy it we use a hammer and chisel. We need to crack the cement and carefully rock the toilet to the sides. The drain should turn and become loose. We tilt the product, allowing the remaining water to drain into the sewer.
Dismantling the toilet
We loosen the seal, if there is one.
If the toilet had an outlet to the floor, you need to clean off the wax ring
Sixth step. We close the sewer hole with a wooden or other suitable plug.
While working, plug the hole with a rag.
Important! Sewage gases do not have the most pleasant smell. However, they are poisonous and flammable. Be sure to take this point into account as you work.
Dismantling the toilet
Toilet: how to install the device. Installation methods
The toilet installation option, the video will clearly show the sequence of actions, depends on the type of device and its design features. Floor-standing devices are considered the most common type of equipment. They are installed on the flooring after completion of all facing work. The sequence of actions depends on the installation option for the floor-standing toilet.
The toilet can be attached to the floor using an open or closed method. The first option involves installing the product using special external fasteners that come with the device. The second method is more labor-intensive. The toilet is installed using internal fastening, which allows you to get a more aesthetic appearance of the device.
Attaching a toilet to the floor using an open method is not as aesthetically pleasing as an internal one, but installing it is much easier
Wall-hung toilets are installed at a certain height above the floor using special installation structures onto which the system itself is attached. Installation of the device is carried out before finishing work begins.
The choice of installation option also depends on the method of connecting the toilet to the sewer pipe. Toilets with horizontal outlet are connected to the sewerage system at a right angle. Devices with oblique outlets are connected at an angle of 45 degrees. The sewer socket for connecting a device with a vertical outlet is located in the floor.
Before you begin installing the toilet, you should prepare the base. For a floor-standing device, it must be level.
Installation
Installing a hidden tank involves securing it to the wall with screws or anchors. After this, it is laid with plasterboard or brick, in order to decorate it with ceramic tiles or panels. In this case, the water supply outlet and the sewer socket are left on the outside of the wall. It is to them that the toilet itself will be connected in the future.
When carrying out installation work, you will have to take into account some nuances (rules) for installing a hidden cistern for an attached toilet:
- You will have to do the installation of the tank and sewerage before finishing work in the bathroom. The height of the plumbing fixtures is installed taking into account the laying of ceramics on the floor plus 1-2 centimeters.
- When assembling the sewerage system, only rigid liner is used, and all connections are fixed with silicone sealant. But if you use corrugated or flexible hoses, you will soon have to change them to a new one, because they have a shorter service life compared to the fittings of the drain tank.
- To avoid leakage due to differences in level, the liner is attached taking into account the location of the pipes.
- If the drain button has mechanical rods, then the wall thickness should be at least 7 centimeters.
- It is preferable to start laying ceramic tiles from the place where the drain button will be located and which will be the center of the wall.
- The double button will allow you to save water consumption and will help reduce the formation of condensation in the toilet.
The final stage of toilet installation
Types of toilets
In this article, we will consider not the features of flushing or the shape of the bowl, but those design features that determine the list of installation work.
By installation method
The toilet itself consists of a plumbing bowl and a flush cistern. The bowl can be floor-mounted or suspended. If the bowl is suspended, then the tank is hidden - built into the wall. In the case of a floor-standing bowl, there are three options for mounting the tank: on a special shelf on the bowl (compact), separate, connected using a flexible hose, in an installation (hidden in the wall of the frame).
Typical sizes of toilets of different designs
The advantage of a floor-standing toilet with a regular flush cistern is its ease of installation. It can be installed without starting repairs. The disadvantage is that compared to a suspended one, it takes up more space and looks heavier. Accordingly, installation of wall-hung models is complicated—it is necessary to secure the supporting structure—the installation—in the wall. Perhaps this is only during renovation.
Release to sewer
The choice of toilet for discharge into the sewer depends on the location of the sewer pipe. They happen:
- with horizontal outlet;
- oblique release;
- vertical.
If the pipe is in the floor, a vertical outlet will be optimal. If the outlet is in the floor, but is close to the wall, it is most convenient to have an oblique toilet. The horizontal version is universal. Using a corrugated pipe, it can be connected to both the wall and the floor.
The nuances of toilet flush tanks
The advantage of a flush cistern for an attached toilet is its silent operation. Also, a big plus is the ergonomics of the design itself. The good news is that you can install the cistern anywhere in the bathroom. The cistern of this model is distinguished by its hygiene. After all, such a tank will never gather dust. This means you won’t waste extra time cleaning the bathroom. After all, the flushing tank is hidden in the wall. Thus, you are not in danger of having an extra dust collector in the bathroom. Most consumers who use an attached toilet note the positive aspects of this toilet model. They enjoy the compactness of the product itself.
Also, this toilet model is well suited for small spaces. Due to the fact that the cistern is built into the wall, the free space increases. Thus, you can get a rather stylish bathroom or bathroom. This point was noticed by all the interviewed owners of the attached toilet model. Another advantage is the ability to choose the material from which the toilet is made. This means that the range of plumbing fixtures is becoming wider, which cannot but please customers. Thus, people choose what they really like, and not what is available in the store. This means that people have the opportunity to make their bathroom quite original and unusual.
Articles about toilets:
- Toilet seat with microlift: advantages, disadvantages, design
- Toilets and their classification
- Floor-standing toilet: how to choose so as not to regret the purchase?
- All about the rimless toilet: pros and cons
Decorating Tips
Some nuances become obvious only after encountering their manifestations. We will give some general recommendations that will allow you to avoid unpleasant moments during installation, finishing and operation of a wall-hung toilet.
- If you are finishing the partition between the toilet and the installation with tiles, then the water drain button should be placed in the center of the tile. Or at least along the seam. To do this, you need to start laying tiles from the drain button;
- Wall-hung porcelain toilets are preferable to sanitary ware, as they retain less deposits;
- The flush button also serves as a technological hatch for access to control valves.
- The distance between the holes for attaching a wall-hung toilet is 23 or 18 cm;
- If the flush button is mechanical, then the wall thickness between the wall and the cistern should not exceed 5 cm.
5 1 vote
Article rating
Installation of a wall-hung toilet on an installation
An installation is a structure on which a wall-mounted toilet is installed. Performs the main function of holding the bowl, water supplies and, in some models, holds the cistern. It can be purchased either complete with the toilet or separately.
Manufacturers present installation options with bowl height adjustment, which allows the consumer to individually install the toilet to the desired level.
The installation system is divided into several types:
- standard: width 50 cm, height 112, depth 12 cm. Used in rooms where the dimensions of the structure allow the installation of the system
- low: if installation is planned in a place of limited height, for example under a window sill, the installation height is up to 82 cm
- double-sided: provides for installation of the toilet bowl on both sides
- corner: the frame is installed in the corner of the room
- linear: used when installing several plumbing fixtures, such as a toilet, bidet
To complete the installation of a wall-hung toilet, you will need a set of tools:
- hammer drill or hammer drill
- drill for concrete and brick with pobedit coating
- screwdriver with bits
- construction level or laser axis - builder
- anchor bolts
After selecting and purchasing the model you like, you should open the packaging and check the toilet for integrity, absence of cracks and chips, as well as completeness. The box should contain assembly instructions and a product passport, which specifies all the elements included in the kit.
If necessary, by turning off the water supply tap, dismantling work is carried out to remove the old toilet.
Before proceeding with the installation, it is necessary to check whether all communications (sewer pipe, water supply hose) are connected for further connection.
Step 1
The first step is to install the frame. The location for mounting the frame is determined, necessarily on a load-bearing wall. It is necessary to install the frame structure efficiently, since the reliability of all equipment during further operation depends on this. Using a laser axle builder or a building level, horizontal and vertical lines are determined for clear installation of the frame.
Markers are made on the wall with a marker through the holes in the frame. Using a perforator or drill in impact mode, holes are drilled at the fastening site. The steel frame is installed and secured with anchor bolts under strict level control.
Step 2
The next step is work on connecting to the water supply. The tank valve must be closed during all installation work.
Step 3
The installation is then connected to the sewer drain. There are several connection options, the most common is using a special corrugation for connecting toilets.
Step 4
When the installation is installed, the next step is decorative design - hiding communications by creating a false wall made of plasterboard or other material, followed by decoration with tiles.
Step 5
When the wall is completely ready, the toilet bowl is hung on special studs. After complete connection, the water supply tap opens. A visual inspection is carried out for leaks.
Installation procedure for a regular toilet
Installation of a floor-standing toilet Compact or Monoblock
Toilet installation drawing
As a rule, when selling, the toilet and cistern are disconnected. The internal fittings of the barrel are most often already assembled, which greatly simplifies the installation process.
First step. We put the toilet bowl in its place and make marks at the attachment points.
Marking
Markings on the floor for fasteners
Second step. We remove the toilet and drill mounting holes in the marked places.
Drilling holes in tiles for dowels
Third step. We hammer the dowels into the mounting holes.
Fourth step. Install the bowl. We insert the fasteners through special sealing gaskets. Tighten the fastenings. You should not pull too hard - you can damage either the fastenings or even the toilet itself. We pull until the sanitary ware is firmly attached to the surface. We close the fasteners with plugs on top.
Tighten the nuts
Close with a cap
Make sure the toilet is level
Fifth step. We install the cover and seat. A manual for assembling them usually comes with the toilet, so we won’t dwell on this event separately.
Sixth step. We connect the toilet to the sewer. The procedure depends on how exactly the toilet outlet is connected.
We install the corrugation. We coat the connection of the corrugation with the sewer pipe with sealant. We stretch the corrugation onto the toilet outlet without additional seals
Video - Installing a Compact toilet with a wall outlet
Prices for components for toilets and urinals
Accessories for toilets and urinals
If the release is made into the wall, we work like this:
- We check whether the toilet outlet coincides with the sewer pipe. If everything is in order, we connect using a sealing cuff. If there are displacements, we use corrugation;
- we treat the ends of the connecting element with silicone sealant and connect the toilet to the sewer;
- We screw the plumbing product to the floor.
Sealing the joint between the toilet and the floor covering
If a floor outlet is being installed, do the following:
- install a screw flange with a lock on the floor, where the drain pipe exits;
- We see a hole in the center of the flange. The sewer pipe must go into it; Fastening
Fastening
Fastening
Installing the wax seal - installing a toilet. The screw flange collar must fit into the toilet outlet socket. We rotate the cuff, ensuring complete fixation;
- We seal the connection using a special silicone compound.
Installing a toilet
Helpful advice! If the connection of the toilet bowl to the drain pipe is made using corrugation, in most cases sealing can be abandoned, because the design of such an adapter hose itself is capable of providing a fairly tight fit.
Seventh step. We are installing the tank. Drain mechanisms are usually sold already assembled. If the mechanism is disassembled, reassemble it according to the manufacturer's instructions (the assembly procedure may vary slightly for different models).
Lubricate the reservoir ring with sealant
Connecting the cistern
Tank mount
Tighten the tank bolts
Closing the lid
We take the gasket from the kit and install it in the water opening in our toilet. Place the tank on the gasket and tighten the bolts.
The most convenient way to install fasteners is as follows:
- we tighten the first bolt so that the tank is skewed towards it by about 1.5-2 cm;
- press the raised edge of the tank with your hand and tighten the second bolt.
Installation and connection diagram for the drain tank
Eighth step. We connect the tank to the water supply using a flexible hose. We turn on the water supply and check the quality of the system. If it leaks somewhere, tighten the nuts a little. We adjust the level of filling the tank with water by moving the float lower or higher.
Connect the water supply hose
Let the tank fill several times and drain the water. If everything is fine, we accept the toilet for permanent use.
Do-it-yourself installation of a floor-standing toilet
The process of installing a toilet on the floor and putting it into operation consists of three main stages: 1. Installation of the bowl and fixing it to the floor. 2. Connection to the sewerage system. 3. Securing and connecting the flush tank to the water supply system. The list can be supplemented with preparatory work. These include dismantling old plumbing and leveling the floor where the new toilet is installed. Moreover, if models fixed to the floor with dowels are easy to remove (just unscrew the fasteners), then the glued base can only be removed if it is broken.
Types of mounting a floor-mounted toilet
To install a toilet with your own hands in an apartment, in most cases, the fastening method using bolts and dowels is used.
This method is considered the simplest, although it has several disadvantages. The first is the need to drill the floor - if tiles are chosen as the floor covering, incorrect actions by the contractor can lead to damage. The second drawback is that only light models can be secured using dowels. Heavy plumbing fixtures are usually installed only with glue. The method of installing a toilet on silicone is used almost as often, and requires the use of special construction adhesives or mixtures that can be prepared independently based on epoxy resin.
But this installation of a toilet without drilling the floor does not require cleaning after the work is completed, and the plumbing is held in place more firmly than when using fasteners. True, removing it will require more effort.
Installation and connection to the sewer
1. Oblique release2.
Vertical (floor) outlet3. Horizontal outlet The process of installing a floor-standing toilet consists of the following steps:
1. Connection of the corrugated cuff with the sewer drain. Next, we insert the toilet outlet into the already installed and fixed corrugation.
2. Checking the stability of the plumbing fixtures at the intended installation site. 3. Pour several buckets of water into the toilet. Making sure there are no leaks. 4. Mark on the floor the place where the toilet will be installed and mark the places for drilling. We take the toilet back out and put it aside.
We outline the contours of the toilet and mounting locations
5. Drill holes in the floor and insert dowels into them.
6. Mounting the bowl in place and fixing it with screws.
We install the toilet in place, pre-lubricate the drain connection with silicone and fix it with dowel-nails to the floor
We installed the bowl, connected the drain using corrugation to the sewer system and secured the toilet to the floor
Connecting a cistern
The next step is to install the flush tank on the toilet: 1. Insert special bolts (on which rubber seals and washers are already threaded) into the holes at the bottom of the device. 2. We fix the rubber gasket on the outlet part of the drain mechanism.
1. Special bolts 2. Rubber gasket
3. Installation of the tank in the place intended for it; there are no problems with aligning all the holes (mounting and drain). 4. Tighten the screws with special nuts.
Attaching the tank to the toilet
Video: Installing a flush tank on a toilet
After securing the tank, install the toilet lid and proceed to connecting the system to the water supply.
Connection to water supply
Drain tanks are connected to the water supply in two ways: • using a lower connection, which provides a low noise level, but requires more time to connect; • using a side connection, the advantage of which is simple installation, the disadvantage is the noise of water when filling the tank. When connecting, they usually use a flexible hose, which allows you to connect the tanks to the water supply in any convenient place. One end of it is connected to the pipe, the other to the drain tank, always using sealing gaskets. A tap is installed on the pipe that comes from the water supply to ensure that the water supply is stopped. After checking the tightness of the connection, the tank can be considered ready for use.
Video: Tips for installing a toilet
Design features of the equipment
When choosing a wall-mounted toilet, it is important to consider the approach to the sewer lines. It is equipped with an outlet, which, when connected to a pipe, should ensure unimpeded drainage of liquid.
Manufacturers produce products with three types of releases:
- Oblique.
Belongs to the subtype of horizontal options, the pipe is located at the back of the bowl and is directed from top to bottom at an angle of 45°. It is the most ergonomic and efficient type. - Straight.
The tube is parallel to the floor and is suitable for sewer pipes hidden by wall structures. By means of a corrugated adapter it can be converted into an oblique view if necessary. - Vertical.
A very convenient option for Stalinist and private houses. The pipe exits at a vertical angle and connects to the socket of the sewer pipe directly below the equipment. The ladder goes to the riser under the ceiling of the lower floor apartment.
Keeping the inside of the bowl clean and the difficulty of this process lies in its shape. Models of attached equipment are available with plate-shaped, funnel-shaped bowls and in the form of a half-shelf.
Disc type
was common in Soviet times. Waste products were placed on a shelf, after which they were washed off under the pressure of water from the tank. This form is practical in that there is no splashing during the process, however, due to the small depression in the shelf, liquid accumulates. This contributes to the appearance of an unpleasant odor and the formation of salt deposits from process water. Such models are in less demand on the market and are gradually disappearing.
Funnel shape
much more perfect, as it eliminates unnecessary contamination and specific odors. When visiting the toilet, the contents are sent directly into the water mirror through the drain funnel. The design reduces water consumption, but contributes to the formation of splashes, which are unpleasant to the body and do not comply with hygiene rules.
Half shelf bowl
is a combined version of the first two types. On one side, the shelf has a flat shape, and the water surface is shifted closer to the side. This model allows you to extinguish splashes, eliminates the formation of plaque on the shelf and a specific smell in the toilet.
Methods for organizing drainage
An attached floor-standing toilet is placed flush against the wall or with a small gap, and the flush cistern is installed in a false wall or installation. The flat-type tank has a drain tube connected to the device and a housing, the fittings in which are activated mechanically or pneumatically using a button.
The drain is classified into several operating options:
- Shower.
It is triggered along the perimeter of the bowl and forms a kind of whirlpool, allowing for high-quality flushing of waste products without residual masses. - Cascade.
It is a uniform flow of water, which is capable of washing only the internal volume of the bowl, therefore it is less efficient in operation. - Sucking.
Belongs to the most powerful type. The principle of operation is to fill to a certain level with water, which completely falls into the drain hole through the open valve.
Hidden tank design
Installing an attached toilet involves hiding the cistern into the wall structure based on factors such as:
- appropriate design of the drainage system;
- minimum gap between the toilet and the wall;
- creating a good appearance of the bathroom, where the system is hidden in a false wall, and only the flush button is located outside.
The system is mounted on the wall and does not take additional loads other than its own weight, therefore it has sufficient strength and durability. The sewer connection is made from above, behind, left or right. There must be a built-in valve for locking. The tank is recessed into the wall to a depth of no more than 10-12 cm.
Drain system fittings
The connection of the fittings to the drain button is carried out pneumatically or using a cable as a lever. Drains with two buttons are very popular, since one allows you to drain water in half the volume, which reduces consumption, and the second - only. The system operates thanks to a quick-acting storage valve.
Models with a stop-drain function are also available. The principle of operation is quite simple: the first press of the button flushes the water, and the second press instantly blocks the supply if it is no longer required.
Installation on taffeta
Installing a toilet on taffeta was previously considered a generally accepted installation method. We will not recommend it, since a toilet installed in this way will become loose over time. The reason for this is moisture falling on the wooden surface. The board is laid in the floor level with the surface and secured with anchors. The remaining space is filled with cement mortar and after the mixture has completely hardened, installation begins. The installation process is the same as installation with dowels, only the mounting ears of the toilet bowl are screwed to the board with self-tapping screws, having previously placed rubber washers under the heads.
Installing a toilet on taffeta
How to determine the installation location of the system
To choose the right model of installation and toilet, you need to decide on the location.
If we are talking about replacing an old model of a floor-standing toilet with a wall-hung one, then this place has already been chosen taking into account the size of the bathroom and can be left for installing the wall-hung model. The design with a hanging bowl will not violate the ergonomic requirements for the size of passages, minimum dimensions on the sides and in front of the toilet.
When installing a toilet installation with your own hands in a new place (during reconstruction or remodeling of a bathroom), the following requirements must be taken into account:
- the toilet bowl should be located as close as possible to the sewer riser to ensure a normal slope angle of the sewer pipe, and the upper edge of the bowl (without a lid) would be above the floor level at a standard height of 40 cm;
- the minimum distance from the front edge of the bowl to the wall, door or other plumbing fixture should be 50 cm, optimal - 75 cm;
- the minimum distance from the center line of the toilet to the side walls, furniture or other plumbing fixtures is 38 cm, the optimal is 45 cm.
There are also recommendations for placing a special accessory - a toilet paper holder. It is advisable that it be located on the side wall, slightly in front - at a distance of 20-30 cm from the edge of the bowl and at a height of 60-70 cm from the floor level.
After choosing a location, depending on the nature of the wall, the possible method of fastening and hidden installation of communications, the type and specific model of installation is selected.
Required materials and tools
When purchasing a toilet, you should pay attention to the delivery package. Depending on the design of the device and the installation method, the installation kit must include appropriate mounting brackets, studs or bolts, plastic dowels, gaskets, washers and decorative plugs
If there are no fixing elements, they should be purchased separately.
It is also necessary to prepare the tools that will be needed during installation activities:
- a hammer drill or impact drill with a set of drills for working on concrete and ceramic tiles;
- Adjustable wrench;
- center punch or marker;
- rubber spatula;
- pencil;
- screwdriver;
- hammer;
- construction level.
In addition, you will need to purchase materials and accessories that will be needed to install and connect the device to utilities:
- flexible hose for supplying water to the drain tank;
- ball valve;
- FUM tape or tow and special paste for sealing threaded connections;
- fan or corrugated pipe for connection to the sewer.
What else to consider?
- That the height of installation of plumbing fixtures depends on the tiles being laid, i.e. plus 12-20 mm to the semi-finished floor surface.
- That the connection of sewer systems is carried out with a rigid liner. Connection using corrugated cables is not recommended due to their rapid wear.
- That at all stages, until final fixation, control of the spatial orientation of the construction blocks is used using a level.
- That the connection of pipes will become easier and more reliable if plumbing silicone is used to connect them.
Compliance with simple installation techniques, as well as the recommendations of the factory instructions, which are necessarily included with the attached toilet, will provide you with a guaranteed long term of comfortable operation of this plumbing product.
Source: https://santech-info.ru/santexnika/pristavnoy-unitaz-so-skrytym-bachkom.html
How to properly assemble a device with a hidden tank?
Another common version of toilets is with a hidden cistern. To assemble it, you need to follow a certain action plan:
- Install the installation (if available). These actions are carried out strictly according to the instructions included with the toilet.
- Assemble and install the tank. The tank is assembled according to the instructions, and installation can be carried out using several methods: the equipment is completely walled up in the wall, partially recessed into the main wall, suspended on special slats to the surface of the load-bearing wall.
- Install the bowl. At the fastening points, the bowl is put on studs and secured with nuts.
- Connect communications to the bowl. After installing the pipes, the outlet is connected to the sewer, trying to be placed along a vertical axis. If there are levels of different heights, elbows are used for connection. The joints are tightly tightened and sealed.
Hidden tank
The floor-mounted design involves the installation of a hidden tank. To do this, the drainage system must be securely hidden in the wall. Completing this task will involve:
- With tight installation to the wall of the floor-standing toilet;
- Hidden installation of the tank;
- By bringing the flush key into the external working area through a special technological hole.
The hidden tank has sufficient strength, thanks to the high-quality material from which it is made. By itself, it does not receive loads associated with the weight of the toilet.
Its connection to the water supply system can be:
- Upper;
- Rear;
- Left;
- Right.
A prerequisite for this will be the presence of a built-in shut-off valve. The installation depth for a hidden tank will be sufficient within 8 - 10 centimeters.
Drain fittings
The tank fittings can be connected to the output button by a lever cable or a pneumatic connection.
An innovative solution is a two-button flush. One button here is intended to drain half the volume, and the other - all. The double drain is equipped with a quick-acting storage valve. This option allows you to significantly save water consumption.
In addition, there are products with a stop-drain system, where pressing the drain button again blocks the flow of water, using only the required amount, and not 100% of the contents of the tank.
Connecting water pipes and sewerage
This is the most important part of installing a new toilet, because if a leak appears in one of the pipes, the entire structure and the lining of the wall on which the wall-hung toilet is located will have to be dismantled.
For such a toilet, only time-tested materials are used - it is better to choose pipes made of copper, and if material possibilities do not allow, then they should be replaced with polypropylene analogues. The seams are sealed with tow. If it is necessary to use flexible hoses, they must be made of stainless steel.
The last step is to check all connections, which can be done by running water. Confirmation of the correct installation of the toilet installation - smooth operation of the entire system without leaks.
After testing the water, you need to install the pipes to which the toilet will be connected. The frame has a crossbar to which a special plate with a diametrical recess is attached. Thanks to it, the drain pipe is fixed to the installation. All steps for connecting pipes are carried out according to the instructions.
How does a toilet with a concealed cistern work: how it works
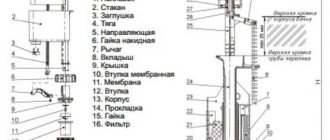
Any tank consists of additional elements. They are responsible for the functionality of the overall system. Built-in tank includes:
- container for collecting water, volume from three to six liters;
- float mechanism - regulates the water supply;
- button or lever - activates the entire system;
- valve - drains liquid into the bowl;
- rubber stopper - controls the volume of water in the tank.
The tank has a simple operation scheme. When the system is empty, the float drops and releases the inlet valve. Then the water gradually fills the container. After reaching the desired level, the valve shuts off the liquid supply.
The drainage mechanism can be shower, suction and cascade. The type of flush depends on the toilet model.