To make daily use of the toilet comfortable, a special pad is used - a seat. Moreover, most of them are equipped with a lid. It is the breakdown of the latter that one most often encounters. Agree, there is little pleasure in a broken fastener.
But even the usual fastening of the toilet lid often raises questions among people. No wonder, considering that depending on the model, the fasteners and configuration of toilet lids differ radically.
Why not call a plumber over such a trifle? Do you want to replace the seat yourself, but are you afraid of breaking the new one due to inexperience? We will help you figure out the secrets of installing a new seat - the article discusses the main designs of toilet seats and their features.
Detailed instructions for attaching the hinged lid and models equipped with a micro-lift are also provided. For a better understanding of the replacement process, the material in our article is supplemented with visual photos and a video that demonstrates the installation of a seat with a micro-lift.
Installation of a toilet lid with a microlift
Installation of such a device is also carried out in two holes in the toilet bowl.
The process is similar to installing a standard lid, you just need to make sure that the seat fits tightly and softly to the toilet. If you can’t achieve this right away, then you need to adjust it. If you use an incorrectly installed microlift cover for a long time, its breakdown cannot be avoided, and this is tantamount to buying a new device.
The seat fastening with a microlift is demonstrated in the video:
When using a lid model with a microlift, you need to remember that forced manual lowering can lead to damage to the product.
Installation of a toilet in the appropriate room of a house or apartment is completed with a “control” touch - installation of the seat and lid. Usually this device comes with the main kit, however, if necessary, simply replace the old product or it is not included in the kit; the seat can be purchased separately
The most important thing to do before installing the lid on the toilet is to choose the right parameters: shape, size, color and appropriate holes for fasteners
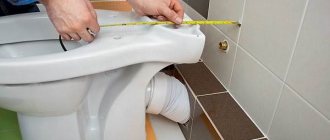
The easiest and most reliable method is to sketch the toilet rim in full size and measure its maximum width, length and distance between the mounting holes on a large piece of paper or newspaper. Using this unique drawing, it costs nothing for plumbing store specialists to select the correct model for the buyer.
Do-it-yourself toilet lid fixing
Another option that simplifies the first one is to photograph the headband with a mobile phone camera or digital camera. True, it is still advisable to take measurements, since the picture will not determine the dimensions of the mount for the toilet seat.
What is the device used for?
A children's toilet seat cover is necessary for convenience. The dimensions of the toilet are designed for adults, so children do not feel very comfortable. Often children are simply afraid of falling into a hole, so they refuse to leave their favorite potty and give preference to the toilet. Of course, there is also special plumbing for children. However, not every family has the opportunity to install such an additional toilet. In this case, a special children's pad will come to your aid.
The device can be attached to the toilet in several ways. Manufacturers often make special mounts that come included. They allow you to hold the accessory on a standard seat. Also, some companies offer Velcro and brackets that securely hold the pad when a standard seat is lowered onto it. How to choose a device? If you decide that you need a children's toilet seat cover, then you need to take many parameters into account. Let's look at them.
Seat fastener
Choosing the right quality seat is only half the task. You also need to secure it, for which you will need seat fasteners. Although at first glance this may seem like a trifle, it is they who will make the operation of the seats reliable and durable.
The mounting kit includes:
- a brass or plastic screw designed to secure the sleeve. The price of the latter will always be lower, but its reliability will also be lower;
- nut - most often plastic or nylon for easier tightening. Sometimes it is made of stainless steel;
- decorative cap (not always used).
The photo shows plastic screws and a nut for attaching the seat to the toilet
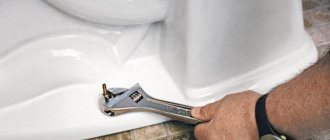
Fasteners for toilet seats are made from different materials. The most popular are systems made of stainless steel; this material is intended for long-term use.
Installation is quick and easy; there are special holes on the toilet for this purpose. Most often, only the strength of your hands is enough; sometimes you can tighten the nut with a wrench.
How to choose a toilet lid
Before you replace the seat, you must select the correct cover shape.
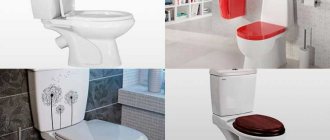
Currently, their range is huge, so you should pay attention not to the fact that it is soft, very expensive or, for example, in the form of an aquarium, but that it is exactly the same size as the previous one.
The lid and seat must match the shape and dimensions of the toilet
- The seat must match the dimensions of the toilet rim. Otherwise, the latter may be wide, and you buy a narrow model, then dirt will begin to accumulate. In addition, the seat itself will become unstable.
When choosing a seat, you must take into account the dimensions of the toilet bowl
Removing the old seat and installing a new one
Let's consider the simplest option:
- Look under the toilet where you should see 2 screws with nuts.
- If they are plastic, unscrew them yourself, otherwise you may need wrenches.
| Installing a new cover |
|
| Tighten the screws |
|
Bottom view of a screwed plastic nut
Installation of a seat with microlift
There is no need to worry in advance about the unclear name of this product. The installation method does not change from loud words. You also need to install the lid in 2 holes on the toilet, which is still considered the most optimal option for attaching it.
After removing the old lid, put special rubber rings on the new fastener for a softer fit to the toilet, and secure it from below with nuts.
Unlike the previous option, toilet lids with a microlift sometimes require some adjustment. This usually concerns the tightness of the seat to the toilet.
How to attach a toilet seat with a microlift
This is necessary in order not to damage the expensive product during operation. To do this, make adjustments using adjusting cups that are screwed onto the mounting bolt. You should get a tight and even fit of the seat over the entire surface of the plumbing fixture.
Universal fastener for plastic toilet seat
Recommendations from experts
- For inexpensive seats, plastic screws are usually used. When twisting them, do not overdo it. In addition, if the nuts are tightened too tightly, the stability of the seat may be impaired. If this happens, loosen one or two nuts.
There is a fastener for the lid on top
- If the seat is combined with a cover, do not rush to tighten it completely until the cover is inserted. There are times when it’s not clear the first time, and the instructions don’t really explain anything. Otherwise, the cover will not be installed smoothly or will not be able to be secured at all. Therefore, you will have to unscrew everything again.
- The principle of installing the seat is approximately the same for everyone; they may differ only in nuances.
Fastening elements for wooden seat
The final stage
At the end of the work, you need to securely fasten the tank, since this is the main part of the toilet and damage to it is unacceptable.
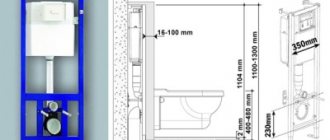
If you wish, you can install the toilet installation yourself. This is a special assembled system with a tank, the height of all elements can be adjusted, so installing the toilet is very convenient.
Recently, toilets with a compact tank have also become very popular; it is located on an elongated shelf of the toilet.
Now we will look at how it is installed:
- Secure the tank to the wall using 2 long bolts.
- Then put a special cuff on the pipe going to the tank; it is supplied in the kit.
- Next, connect the pipe to the tank; first, you need to wrap the thread with fum tape.
- Now turn the cuff back, so all connections will be perfectly blocked by it.
If you have installed a standard toilet tank, then you can use an interesting trick.
We hope that our article will help you in carrying out work on installing a toilet. We wish you success!
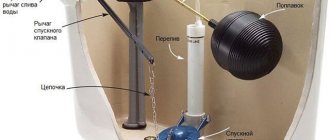
Fastening the toilet lid: elements
The simplest type of fasteners used in budget toilet models are nuts. You can unscrew them even without using special tools. The procedure for removing the seat from a home toilet is quite simple. To do this, you first need to lift the lid with the toilet seat lowered. Then under the rear porcelain edge on the right you need to unscrew the nut. The same must be done on the right. After this, you can remove the toilet seat along with the lid. Nuts are usually made of plastic, so they can be easily removed by hand. It is also not recommended to tighten the fittings too much. The bolts may simply break due to overtightening. The main advantage of this type of fastening is that it is resistant to corrosion.
The new cover is installed in the same way: you need to align the holes on the cover with the openings on the back side of the plumbing. After this, a bolt securing the toilet lid is inserted into the installation space, onto which a nut is then screwed. Today, there are also seat joints on sale that do not use washers. Special nuts are made for them, the end edge of which is made in the shape of a washer.
How else can you attach a toilet seat? Fastening the cover may include a metal bolt with a nylon nut. This combination provides reliable fixation.
Normative documents
Are there any standards in the production of seats and covers? Or are they, like toilet lid mounts, produced entirely by manufacturers at their own discretion?
Nothing like this. The production of seats is regulated by no less than GOST number 15062-83. It also specifically specifies the fastenings used.
What interesting things can you learn from the text of the standard?
- Plastic seats can be manufactured both with and without covers. Wooden ones are produced without lids.
Please note: on sale, however, you can still find seats made of natural wood, equipped with wooden covers. However, most of it is imported. Foreign manufacturers, of course, are not obliged to follow our GOST.
Well... It’s interesting and informative, but the range of seats in construction stores does not always correspond to this standard.
- As already mentioned, most of these products are imported . Why would a manufacturer living in China coordinate its technology with Russian (or rather, Soviet) regulatory documents?
Residents of the Celestial Empire sometimes make their products very creative. But they are of little interest to the standards of the importing country.
- Many small manufacturers produce products not according to GOST, but according to technical specifications, agreed with the wholesale batch customer. In this case, the variation in the strength and quality of products can be very large.
Exclusive toilet seats
Plumbing fixtures for the toilet, equipped with electronics, have not been surprising for a long time. Recently, toilets have also come close to the electronic fraternity. Regulators for drainage, water intake, disinfection, filtration - these functions become integral parts of bidets and urinals.
Some of these functions are also used on toilet seats. Thus, heated seats are quickly gaining popularity. The installation of the electric model is basically the same as the standard version. The only addition is cable laying and installation of an electrical outlet.
The design of models with illuminated bowls is not entirely clear - what benefit do they bring to the toilet visitor? However, these solutions remain relevant due to the stability of their demand in the market.
The installation of a backlit seat must include the installation of an electrical network in the toilet area. At the same time, there are models of seat covers, where the backlight lamps are powered by batteries. The batteries are built directly inside the seat structure. You cannot do without installing electrical communications in the case of using toilets with a motion control function.
Conclusions and useful video on the topic
An installation video will help you quickly install the seat on gas lifts.
The toilet is a household plumbing fixture, the frequency of use of which is not comparable with the use of other household accessories.
It is not surprising that many citizens are puzzled by the problem of removing one toilet seat and then replacing it with another. But this task is solvable and can be done, if desired, with your own hands. .
Have you repeatedly changed the fasteners without changing the cover? Or do you prefer to buy a new seat to replace the boring old one when it breaks down? Or maybe you use one of the exclusive lid options - with a bidet function or with illumination? Share your opinions and recommendations in the comments below.
Problems when replacing a seat
Some problems when replacing a toilet seat or lid may occur on plumbing fixtures that have served the owners for several years. Removing fasteners on an old toilet seat is especially difficult if metal bolts and nuts that are susceptible to corrosion were used.
The high level of humidity in the toilet area is created by the water present in the flush cistern. This is the main reason for the appearance of rust and oxides on threads.
In this condition, it is extremely difficult to unscrew the nuts from the mounting bolts, and sometimes impossible using traditional methods. We have to resort to radical measures.
Metal fastenings of toilet plumbing fixtures, which do not have protection against oxides and corrosion, tend to “boil”. In such cases, only non-standard approaches help to unscrew the nuts
So, if the thread of a bolt or stud is damaged by corrosion and twisting the nut is not possible even with a wrench, the problem can still be solved.
Why do the following:
- Use an electric drill.
- Place a drill bit with a diameter slightly smaller than the wall thickness of the nut into the drill chuck.
- Carefully drill the nut from its bottom edge to the top.
- Insert a suitable metal rod into the hole.
- Try to “break” the nut using the pumping forces of the rod.
Sometimes a similar situation occurs on plastic fittings. It happens that during installation (during cleaning) the threaded part of the stud is accidentally damaged. A defect in the plastic thread will also prevent the seat mount from being removed in the usual way.
If you cannot twist the nuts using a tool, you can cut them off with a sharp thin knife, after heating the knife blade to the melting temperature of the plastic (120-130º C).
Part of the fastening fittings for seats with covers is made of brass and bronze. This metal does not corrode, but has the ability to quickly oxidize in the presence of moisture. The oxides, in turn, form “growths” on the threads, which over time become comparable in hardness to the same metal.
It helps to unscrew such connections by pre-wetting them (and holding them for a while) with machine oil. Apply lubricant to the connection easily and conveniently with a plastic disposable syringe.
Hinged connection
Attaching conventional structures is easy. You need to do all the steps in reverse order. Before this, you may need to assemble the purchased model. Typically, fasteners are based on plastic, metal, metal-plastic hinges.
Plastic ones are more often used in budget series. In addition to the price, they have another advantage - the absence of corrosion. Metal manufacturers use it in expensive structures. They last longer.
If the toilet lid needs to be replaced, the system can be disassembled. To do this, you do not have to remove the general mount; just remove the hinge shafts. The design depends on the manufacturer; it is better to study it according to the instructions. A locking pin at the end of the shaft is often used. You will need to tighten the pin, pulling the shaft out of the hole. There may be latches that have a lock. They must be rotated 90–180° counterclockwise. The shafts can be fixed with screws and screws.
Materials for making tanks
In order to create an ideal corner where you can take water procedures after physical work in the country, you need to choose the right container for a summer outdoor shower, therefore, you need to know what materials the tanks are made from. Today on sale you can find:
- plastic containers;
- iron tanks;
- galvanized steel tank;
- carbon steel tanks.
In addition, each of the tanks can be supplemented with a heating system. It is necessary to know the characteristics of materials, since they directly affect the durability, functionality and reliability of the entire structure as a whole. A standard container holds from 40 to 200 liters of water - this volume is enough for a family of 3-4 people to wash themselves well.
Cover selection
To choose a toilet lid, you need to rely on the following parameters:
- material of manufacture;
- shape and size;
- additional options;
- manufacturing company.
What are the lids made of?
The toilet seat cover can be made:
plastic. The most commonly used materials are polyethylene, polyvinyl chloride or polypropylene. Plastic lids are inexpensive and come in a variety of shapes and colors. Negative qualities are poor thermal conductivity and susceptibility to mechanical stress;
duroplast. More expensive, but also more advanced material for the production of lids. Most often, children's seats are made from Duroplast, since the material contains an antibacterial component that prevents the growth of bacteria on the surface of the device. Lids are also available in different shapes and colors;
wood (MDF, chipboard). Lids made from these materials are expensive and heavy. If accidentally dropped sharply, chips may appear on the surface. A positive aspect is the environmental friendliness of the material used.
The optimal material for home use, according to experts, is duroplast.
Variety of shapes and sizes
The toilet lid should completely follow the shape of the bowl. Only in this case can it last for a long time.
If small children live in the house, you can install a multi-colored lid in the shape of an animal.
To determine the size of the cover, you need to know:
- the distance between the holes intended for attaching the device to the toilet bowl;
- width of the toilet (measured at the largest part of the plumbing fixture);
- length of the toilet (measured from the center line of the fastening elements to the edge of the bowl.
Availability of additional functions
Recently, lids with additional functions have become very popular:
bidet cover. Allows you to install one plumbing fixture instead of two, which helps save space in the toilet room. Depending on the model and cost, the lid may have an autonomous water heating function. The lid is controlled from a panel located nearby or from a remote control;
cover with microlift. After using the toilet, the lid slowly lowers onto the seat, eliminating the possibility of a sudden fall that could cause damage to the plumbing and noise;
The heated seat cover will provide maximum comfort even in the cold season. Using a temperature sensor on the surface of the seat, the temperature is constantly maintained at 35ºС - 36ºС;
a cover for an adult and a child, complemented by two seats of different sizes. For the comfort of small toilet users, special lids have been developed that do not require the installation of additional equipment in the form of a lining.
All additional functions can be installed either separately or together with each other. For example, a cover with a child seat, complemented by a heating function and a microlift.
Separately, we can highlight the “smart” lid, which is equipped with a sensor that reacts to the approach of a person. When the user enters the toilet room, the lid opens, and when he leaves, it closes. "Smart" lids can be supplemented with any functions.
Cap manufacturers
When choosing a lid, you should also pay attention to the manufacturer, on whom the quality and durability of the product depend. The most popular are lids made from:
- Spanish company Roca. Toilet lids are suitable for both sanitary products of this brand and other modifications. Lids are available in different sizes, colors and with various additional functions. The product warranty is 3 – 5 years;
- Polish company Cersanit. The company's products are recommended by experts as the most durable and reliable. A wide range of models allows you to select devices of different shapes and sizes;
- by Jika (Czech Republic). The company is represented on the Russian market relatively recently, but, according to users, the lids are reliable products;
- by Gustavsberg (Sweden). The company specializes in producing caps with additional options.
Among Russian companies, we can highlight the company Santek, which produces high-quality lids of various configurations, colors and sizes.
Replacing the seat cover
One of the significant reasons for fatal mechanism failure is the wrong choice of model and errors during its installation. Therefore, when purchasing a new cover, you should be guided by the following rules:
take into account the dimensions of the plumbing fixtures; pay attention to the shape and configuration of the toilet; give preference to products from trusted manufacturers.
The seats on sale with a lid equipped with a closer are suitable for toilets of any design: floor-standing, side-mounted, wall-hung.
When choosing a new model, it is important to take into account the features of the plumbing fixture and pay attention to ensuring that the distances between the system fasteners coincide with the seat fastening locations
To replace a broken cover with a closer with a new one, you will need a set of tools:
- hacksaw;
- pliers;
- socket wrench.
The materials you will also need are silicone or oil to process dried elements. Ideally, it is better to use a special lubricant that, penetrating into the cracks, freezes the rust.
Traditionally, the lid with the toilet seat is secured with two bolts. But in some models a metal pin may be used instead. To dismantle you just need to lift the cover and then unscrew the pins.
If the cover has been used for quite a long period, there is a high probability that the bolts have become clogged, and the fastening points have become coated and “fused” to the body.
To ensure easier unscrewing, simplifying your task, the bolts will have to be pre-coated with oil or silicone, but this is not always effective
Using pliers, carefully, trying not to damage the decorative surface of the toilet, unscrew the clamp and bolts. To protect your plumbing from possible damage when working with pliers, it is better to cover the surface with rags or pieces of cardboard. This recommendation should not be ignored. Otherwise, at the slightest mistake, you will have to change not only the lid, but also the toilet.
As a last resort, if the processing did not give the desired result and the bolts do not give way, they can be sawed with a hacksaw or cut off with a hot knife blade. There is no need to worry that melted plastic will stain your plumbing fixtures. After hardening, it will not be difficult to remove from the surface.
Having dismantled the old lid, the remnants of dirt, accumulation of rust and limescale are removed from the grooves on the toilet, after which bolts are inserted into the fastening points and the structure is fixed.
Installation of the new cover is carried out in the following sequence:
- 4 rubber inserts are inserted into the new seat cover. They will ensure a soft fit of the product to the seat.
- Fasteners are installed in the cast holes on the toilet. They are screwed using rubberized seals, supplemented with a clamp or by means of a bolted connection.
- Seals are installed in the seat, connected to the fastenings on the toilet.
- Fix the cover to the seat using a bolt, a plastic sleeve and a cup, which will be responsible for adjusting the height.
- The structure is centered and the seat is checked for fixation strength.
Since the key cause of mechanism failure can be the incorrect position of the lid and seat, it is so important to accurately adjust the system when installing the structure. The adjustment process to ensure uniform fit of the device over the entire surface of the sanitaryware is carried out by rotating the cups screwed onto the bolt
An important point: adjustment and alignment are carried out at the stage when the fixing nuts are just attached, but not yet firmly tightened
The adjustment process to ensure uniform fit of the device over the entire surface of the sanitaryware is carried out by rotating the cups screwed onto the bolt. An important point: adjustment and alignment are carried out at the stage when the fixing nuts are just attached, but not yet firmly tightened.
To consolidate your knowledge and better imagine the process of repairing and installing a toilet lid, we offer useful and interesting videos.
Toilet mounting repair:
How to install the system correctly:
In the future, in order to reduce the risk of premature failure, it is important to periodically check the position of the device and adjust it during operation. And remember: a seat with a lift device is a “smart” mechanism that requires careful handling
The microlift in the toilet is similar to a door closer. Thanks to this element, you can really smoothly lower or raise the lid along with the seat
If you want to purchase similar equipment for a toilet, be sure to pay attention to its advantages, disadvantages and selection criteria
Seat fastener
Choosing the right quality seat is only half the task. You also need to secure it, for which you will need seat fasteners. Although at first glance this may seem like a trifle, it is they who will make the operation of the seats reliable and durable.
The mounting kit includes:
- a brass or plastic screw designed to secure the sleeve. The price of the latter will always be lower, but its reliability will also be lower;
- nut - most often plastic or nylon for easier tightening. Sometimes it is made of stainless steel;
- decorative cap (not always used).
The photo shows plastic screws and a nut for attaching the seat to the toilet
Fasteners for toilet seats are made from different materials. The most popular are systems made of stainless steel; this material is intended for long-term use.
Installation is quick and easy; there are special holes on the toilet for this purpose. Most often, only the strength of your hands is enough; sometimes you can tighten the nut with a wrench.
Tip: The plastic fastener is quite fragile, so when tightening it, do not use wrenches, only your hands.
How to choose a toilet lid
Before you replace the seat, you must select the correct cover shape.
Currently, their range is huge, so you should pay attention not to the fact that it is soft, very expensive or, for example, in the form of an aquarium, but that it is exactly the same size as the previous one
The lid and seat must match the shape and dimensions of the toilet
Tip: take a photo of the old lid so you don’t have to take it to the store or forget it, and show it to the sales assistant.
- The seat must match the dimensions of the toilet rim. Otherwise, the latter may be wide, and you buy a narrow model, then dirt will begin to accumulate. In addition, the seat itself will become unstable.
When choosing a seat, you must take into account the dimensions of the toilet bowl
Removing the old seat and installing a new one
Let's consider the simplest option:
- Look under the toilet where you should see 2 screws with nuts.
- If they are plastic, unscrew them yourself, otherwise you may need wrenches.
- Take the new seat out of the box.
- Make sure it fits your toilet and is stable.
- Check the completeness of spare parts and prepare them.
- Insert the prepared screws into the holes of the seat and toilet.
- Attach a cover to them (if the design provides for this).
- Carefully tighten the nuts from below.
Bottom view of a screwed plastic nut
Installation of a seat with microlift
There is no need to worry in advance about the unclear name of this product. The installation method does not change from loud words. You also need to install the lid in 2 holes on the toilet, which is still considered the most optimal option for attaching it.
After removing the old lid, put special rubber rings on the new fastener for a softer fit to the toilet, and secure it from below with nuts.
Unlike the previous option, toilet lids with a microlift sometimes require some adjustment. This usually concerns the tightness of the seat to the toilet.
How to attach a toilet seat with a microlift
This is necessary in order not to damage the expensive product during operation. To do this, make adjustments using adjusting cups that are screwed onto the mounting bolt. You should get a tight and even fit of the seat over the entire surface of the plumbing fixture.
Tip: Make adjustments before fully tightening the nuts holding the cover in place.
Universal fastener for plastic toilet seat
Recommendations from experts
- For inexpensive seats, plastic screws are usually used. When twisting them, do not overdo it. In addition, if the nuts are tightened too tightly, the stability of the seat may be impaired. If this happens, loosen one or two nuts.
There is a fastener for the lid on top
- If the seat is combined with a cover, do not rush to tighten it completely until the cover is inserted. There are times when it’s not clear the first time, and the instructions don’t really explain anything. Otherwise, the cover will not be installed smoothly or will not be able to be secured at all. Therefore, you will have to unscrew everything again.
- The principle of installing the seat is approximately the same for everyone; they may differ only in nuances.
Fastening elements for wooden seat
General information
Problems with the lid and seat occur very often, so they are, perhaps, in second place after breakdowns of the drain tank. Until recently, these devices were simply a circle with a lid, most often made of plastic.
Nowadays, these products can be a rather complex design, including such functions as:
- Microlift;
- Heating;
- Intestinal gas analyzer;
- Built-in bidet, etc.
In the photo - a seat with a microlift
Lids can break for a variety of reasons:
- From time;
- As a result of a manufacturing defect;
- As a result of mechanical damage.
The most common types of breakdowns are:
- The appearance of cracks on the surface;
- Broken fasteners.
Trying to repair the cover yourself is useless. It is much easier and faster to purchase a new one.
Duroplast seat