Attaching the tank to the toilet is a simple process, but it is important to carefully follow the installation instructions. The installation procedure differs depending on the type of waste container. Compact models are the easiest to install; even a beginner in construction work can do it.
Before starting installation, you need to prepare equipment and tools, then prepare the location. If necessary, you must first remove the old tank and clean the surface.
Nuances of choosing a toilet
When purchasing plumbing fixtures for a house or apartment, each owner selects its color and shape based on his own taste and personal preferences. But in order for the devices to work effectively, it is necessary to figure out what type of toilet design with a flush cistern will be most convenient to install.
The most common according to installation method are the following models:
- Compact
is a drainage device, which, after installing the tank on the toilet on a special ledge available on the device, forms almost a single whole with it. For those home craftsmen who do not have extensive knowledge in this area, it is better to choose this configuration scheme, since the assembly process is as simple as possible. - Built-in cistern
, also called hidden, is mounted on a wall-hung or floor-standing toilet. They install it in a specially equipped niche or hide it behind a false wall. In this case, the assembly process itself is not too complicated. The kit includes a support frame to which the main elements should be attached. To make an accurate adjustment, it requires certain skills and attentiveness. After connecting the toilet cistern, all equipment must be covered with decorative material, which leads to additional financial costs. - A hanging option
- it is attached to the wall separately from the bowl and then the flush tank is connected to the toilet using an overflow pipe. Its length can be short, which allows you to use modern fittings and use a small lever or button to release the drain instead of a Soviet-era chain with a handle. To install a tank of this type, you will need to spend a lot of time and effort.
From a financial point of view, the first option is considered the most profitable, since everything necessary for attaching the toilet tank is already included with the product. You just need to check the availability of all parts in accordance with the attached list.
As for the second and third options, to implement them you will need to purchase additional elements, but you need to know that they cannot always be found in the same store where the plumbing fixtures were chosen.
How to adjust the water level
The problem of too much or too little water is the most common problem with a universal toilet flush. When the supply hole is placed on the side, the level is adjusted by changing the length of the spoke. This filling element serves to fix the float. In almost all old models of the cistern, the spoke was made of brass wire. To move the location of the float down or up, the lever is bent in the middle. Increasing the level of its location leads to an increase in the filling volume of the tank.
Modern toilet models use plastic rather than metal levers. As you know, bending plastic is quite dangerous, because... Because of this, it may break. To adjust the level of water entering the tank, a shift is carried out here in one direction or the other. This makes it possible to increase or decrease the lever arm. To increase the volume of water in the container, the float must be moved away from the valve. If the tank is filled through the bottom hole, the float arm is oriented in a vertical position. This makes it much easier to adjust the volume level: just move the float up or down. When the desired position is found, the glass is secured with a clamping nut.
The main difficulty when adjusting the filling volume of the tank is that you have to remove the container lid. The fact is that there is a drain button on it, which is most often connected by a rigid coupling to the release mechanism
Therefore, you have to act very carefully and slowly. First of all, carefully unscrew the clamping plate on the button
This makes it possible to move the lid without fear.
Most elements of modern drain mechanisms are made of plastic. Metal parts are found mainly on old Soviet models. This explains the reduced durability of toilet siphons: they are much easier to replace than to repair. To facilitate maintenance, plumbing departments present assembled modules or their individual units. Therefore, in the event of a breakdown, you must remove the damaged element and take it to the store. There, experienced consultants will tell you how best to proceed - change this part or the entire mechanism.
Preparatory work before installation
Before the toilet tank is installed, the work site and plumbing equipment are prepared.
Before installing this device along with all its components, you must:
- dismantle the old product before replacing it;
- prepare all materials and tools.
Preparatory measures are carried out in a certain sequence, which depends on the selected type of plumbing product. Before installing the toilet tank, you must dismantle the old model. If the plumbing fixture is a model that has served for several decades, the help of a partner will not hurt, since moving a cast-iron product and removing rusted bolts alone is quite difficult.
Dismantling the old tank is carried out in accordance with the following scheme:
- Turn off the flow of water into the device by closing the central valve.
- Remove any remaining liquid from it by simply draining it.
- The container is disconnected from the water supply and overflow pipe, if the latter is present.
- The mounting bolts are unscrewed and then the old device is removed. Dismantling is done carefully so as not to miss a heavy product and not damage the surface of the tile covering or the toilet bowl.
- The free space is cleared for the installation of a new structure. It is advisable to completely get rid of rust and cement mortar residues. The surface for installation must be smooth and without the slightest defects.
After completing all the described dismantling stages, they begin to prepare the materials. Before attaching a new model tank to the toilet, you need to check the condition of the rest of the plumbing and utilities.
You should pay attention to some design elements:
- Toilet bowl
. Even if you plan to replace only the tank, you need to be sure that the main element of the plumbing fixture is installed correctly. To do this, use a building level to check the correctness of its location. If there are large deviations, it is advisable to eliminate the roll. This is especially necessary to do when installing a compact toilet, since due to the tilt of the bowl, the flush mechanism will not function correctly. At the same time, before installing the flush cistern on the toilet, it would not hurt to inspect the quality of the equipment’s connection to the sewer system. - Laid communications
. At this stage of the preparatory work, it is necessary to clarify the location and condition of the water supply pipe, which will then need to be shut off. At the same time, you need to calculate the length of the flexible hose with which the tank will be connected to the water supply. You should also decide on the additional inclusion of a ball valve or water supply outlets in the system. - Cistern
. After the container has been inspected for defects and all components are available, you should make sure that they are suitable for installation. The length of the fasteners and flexible water hose should provide a reliable connection, and the couplings and gaskets should be appropriate in size. It also wouldn’t hurt to check the completeness and functionality of the fittings. You need to make sure that all materials and tools are at hand and then the installation process will take less time and effort.
In order to install a drainage container, few tools are required, and most of them are always available in the household.
You will need:
- To install a compact-type cistern on a toilet with your own hands, you only need wrenches - a cylindrical socket or a flat open-end, or a socket. Instead of a carob plier, you can use adjustable or pliers, and an end plier - composite or monolithic.
- If you have to install other types of toilets, you will also need a tape measure, a building level and a pencil for marking the mounting holes, a hammer drill or drill, and a hammer for installing dowels for the bolts.
- When connecting the bypass pipe, you will additionally need to use an adjustable wrench suitable for the diameter of the coupling.
- To ensure watertightness of the joints, you should have silicone sealant and sealing tape at your disposal, and to prevent corrosion of metal parts that come into contact with water, a special lubricant.
Before connecting the tank to the toilet, you must remember to turn off the central valve to the water supply.
What is necessary?
Of course, you can’t do without the necessary tools and equipment, so first of all you need to prepare them. What exactly is useful is determined by the type of design and certain characteristics.
You need to pay attention to some nuances.
- How is the tank attached to the toilet? This can be a monolithic installation together with a toilet, or a wall-hung structure, or a model where the tank is mounted in a hidden niche.
- How is water supply connected to the tank? It can come from below or from the side. In the first case, the typical reason for the lower supply will be the need to line the pipes. This installation is not very simple. But summing up from the outside is both simpler and more familiar.
- What kind of reinforcement structure is used. That is, it comes with a lever or a drain button.
For installation you need:
- shut-off valve (it is placed on the water supply system, allowing you to shut off the water flowing from the water supply system to the tank);
- rubber, copper and steel liners mounted to the inlet pipe;
- drain fittings responsible for collecting/discharging water;
- silicone sealant or tape sealant used for auxiliary sealing;
- agent against corrosive deformation of metal elements of the installation.
In most cases, fastening involves using bolts and nuts that are included in the plumbing kit itself (i.e., you do not need to buy anything additional).
The following tools need to be selected: a drill, drills for metal and tiles, a marking marker, a hammer (for dowels), a wrench, a level, a core, a rubber spatula that will remove excess sealant. To attach the tank to the compact toilet, you need an open-end and socket-type wrench. To connect the bypass pipe, you should find an adjustable wrench with a diameter corresponding to the cross-section of the coupling.
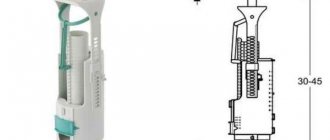
Internal fittings for compact toilets
The mechanism located inside the tank usually consists of two main elements - the inlet and outlet valves. The inlet (float) part is connected to a water pipe, which serves to collect drain liquid and adjust its level.
Its installation takes just a few steps:
- Before installing the mechanism, you should first install a filter for incoming water in its internal cavity near the external entrance or make sure that it was already equipped by the manufacturer.
- Next, the device is attached to the bottom wall of the container, according to the instructions, making sure to put on the sealing gasket from the inside, and securing it from the outside using a special nut included in the kit.
- The external outlet has a thread to which, after installing the flush tank on the toilet, a flexible water supply hose is connected.
The outlet valve, or, as it is also called, the drain siphon, is produced in two versions - single-level or two-level. When the valve of the first type is opened, all the liquid filling the tank is released into the toilet, and in the second case, the user of the plumbing decides whether to partially or completely empty the tank.
The siphon itself consists of three parts:
- connecting bowl;
- main mechanism;
- trigger button.
Installation is carried out similarly to the installation of the inlet structure:
- The lower part, made in the form of a supporting bowl, is placed in the drain hole of the tank. At the same time, use a silicone or rubber gasket and a fixing nut.
- After the container is secured, the main piston system is attached to the lower part with the usual snap-turn.
- The final step, when the cover is already installed, is to install the push-button assembly.
It was already said earlier that after choosing a compact, before attaching the tank to the toilet, you need to make sure that all the nuts and gaskets that will be required during the work are in the kit.
If for some reason the quality of the supplied materials and parts is not satisfactory, since the product belongs to the middle class or economical option, it is better to replace them. For example, instead of rubber gaskets, you can use silicone ones.
But such modernization is carried out exclusively before installing the flush cistern on the toilet, checking the conformity of the acquired new parts and the main components of the flush mechanism using the sample.
Conclusions and useful video on the topic
To make the process of installing valves in a tank more understandable, watch the video instructions, which discuss the assembly and configuration of several types of valves:
We invite you to watch a video where a compact toilet is completely installed by a professional plumber, explaining the nuances for beginners:
Here is one of the installation instructions. See how polished your actions should be:
As you can see, some systems can be installed by a person completely uninvolved in plumbing. But if you understand that you do not have enough experience or time for repair work, and the purchased kit cost a considerable amount, it is better to invite a knowledgeable specialist.
Please write comments in the block below. We are interested in your stories about how you fixed the flush tank to replace the seal or completely changed the container. Ask questions if you have any while reading the text.
Fittings for wall-mounted cisterns
Typically, the internal design of an autonomous container differs from a compact one in the presence of an inlet valve outlet on the side wall using a lever-type drain assembly. For this reason, the type of float element and the release valve device are changed. But as a result, the installation process is not complicated and the home craftsman can only follow the instructions specified in the attached instructions.
Internal mechanism of built-in tanks
If you purchased a wall-hung toilet equipped with a hidden tank, you need to know that it has a great advantage, which is that there is no need to install internal fittings in the drain tank.
The consumer receives a fully assembled design and all he has to do is connect a double button to the front panel. This stage will be discussed later when describing the technology for installing the tank.
Attaching the cistern to the compact toilet
The easiest to implement instructions are how to place the flush cistern on a compact toilet, on its shelf. Before installing and securing the container, assemble the drain valve. A cone-shaped seal is placed on its lower part, turning it downwards with the tapering part.
To attach the cistern to a compact toilet, you do not need a full set of tools, and you can completely do without outside help:
- First, certain fittings are inserted and attached into the inside of the container, as previously described.
- A sealant is placed on a special shelf in the shape of a protruding part. If the fastening bolts are tightened correctly, the gasket will hermetically close the connecting hole for the drain, but to increase reliability it is additionally treated with silicone glue.
- On the toilet, the drain container is positioned so that the gasket is installed under the lower drain point - the outlet valve, and the holes for the connecting bolts in the tank and bowl coincide.
- Plastic washers and cone-shaped rubber gaskets are put on the bolts with the cone down, then they are threaded into both holes, and then another set of flat rubber gaskets and plastic washers is pulled on. The nuts are fastened by hand.
Since the fasteners need to be tightened quite tightly, and this cannot be done manually, you should use tools - wrenches. To tighten the bolt head, use a socket wrench from above, while simultaneously holding the nut from below with an open-end or socket wrench.
There are several rules for installing a tank on a compact toilet. You should not be overly zealous when tightening the bolts, since the service life of the sealing gasket will be shorter the greater the load on it. In addition, if the bolts exert strong pressure on the ceramic coating of the tank, cracks may appear on it.
At the next stage of the installation process, the installed container should be perfectly leveled using a building level. To do this, the fasteners are loosened on one side or, on the contrary, tightened. After completing work with the bolts, their heads must be covered with plastic caps or treated with anti-corrosion lubricant.
After making sure that all the internal shutoff valves for the toilet are completely in place inside the tank, place the lid on top and place the flush button in place. After installing the flush tank on the toilet, the protruding section of the inlet valve and the water supply are connected with a flexible hose using rubber gaskets.
To ensure greater reliability, you can use tow or sealing tape. In this case, glue should not be used, since the hose may need to be replaced.
When the installation work is completed, it is necessary to check the tightness and functioning of the drain mechanism on the tank. To do this, first turn on the water supply to the drain tank.
If no deficiencies are found at the locations where the flexible hose is laid and connected to the inlet valve and the water supply pipe, perform a test drain of water and monitor the possibility of leaks. After completing the testing of the toilet-cistern system, it is fully prepared for use.
What are gaskets for?
The toilet and cistern must become a single system after installing the hygienic device in the sanitary area. This is the only way to avoid leaks and other unpleasant issues associated with plumbing. Everything must function smoothly and clearly. This can be achieved by using a special gasket. Such a product lasts a long time (for several years), and after wear it is easily replaced.
The importance of the gasket can hardly be overestimated; when installed between the toilet bowl and the flush cistern, it provides:
- creation of one coherent “toilet-cistern” system;
- tightness of the connection of these elements;
- organizing a soft, elastic insert between two contacting ceramic parts;
- eliminating leakage problems between the tank and the toilet.
Over time, this seal loses its elasticity, cracks, dries out and begins to leak water - these characteristics are signs that it needs to be replaced. Don’t be upset – you can replace the gasket yourself, without the help of an experienced plumber.
The price of this product is also low, so you just need to decide on the appropriate type of gasket and study the sequence of installation work.
The nuances of installing an autonomous tank
Let's now look at how to attach a wall-mounted cistern to a toilet. This process is more complex, so in this case it will be almost impossible to complete the work without an assistant.
Main installation steps:
- An overflow pipe is connected to the plumbing fixture, and the place where the drainage device is planned to be mounted is marked on the wall. After this, the pipe is removed from the toilet until work on the tank is completed. It is necessary to approximately determine in advance the height of the drain structure, or more precisely, the length of the connecting element.
- At the selected height, mark the locations of fasteners using a tape measure and level.
- According to the marked marks, holes are created using a puncher or drill and dowels are inserted.
- An internal mechanism is placed in the drain tank and an overflow pipe is connected, not forgetting to use sealing gaskets.
- The fully assembled tank is attached to the wall of the bathroom and the bolts are screwed into the prepared holes.
- Before connecting the toilet tank, the pipe is connected to the plumbing fixture, and the container to the water supply system, while ensuring that the connections are airtight.
The nuances of using a variety of fasteners and sealing parts are similar to what happened with the previous installation method. Tests of installed equipment are also carried out.
The process of assembling a built-in type tank
An important difference between a wall-hung toilet with a built-in cistern and previously described plumbing fixtures is the presence of a common (single) installation system, which is a frame frame. All components are installed on it.
The general diagram explaining how to attach a cistern of this type to a toilet consists of certain sequential actions:
- Using alternate connection of the main parts of the structure - a drain tank, an adapter to the sewer outlet and other elements - in test mode, the most convenient location of the frame frame relative to the bathroom walls, flooring and sewer pipes is determined. The precise location of the vertical and horizontal slats should certainly be verified using a level.
- After completing the formation of the installation system, the locations of the fastening elements are marked on the floor and walls.
- Holes in certain places are made using a hammer drill. Special drills are suitable for different finishing materials - for brick, concrete and finishing ceramic tiles.
- The mounting frame is securely attached to the wall and floor using dowel bolts or anchor bolts.
- All the components of the plumbing equipment are mounted on the frame fixed to the surfaces - from the tank to the siphon.
- The drain tank is connected to the water supply system.
- The frame frame is covered with finishing materials. They can be sheets of drywall followed by a decorative coating, plastic panels and much more.
- Holes are cut out in the finishing material and a double button for the tank is inserted, and then they begin to hang the toilet.
Despite the universality of the described scheme, first of all it is necessary to use the instructions for the installation system.
It is advisable to study it carefully before proceeding with installation. Knowing how the tank is attached to the toilet will help you avoid serious mistakes, which sometimes lead to serious financial losses. At first glance, installing a cistern to a toilet may seem complicated, but in reality such activities are quite within the capabilities of every home craftsman if he has the desire to do everything around the house with his own hands.