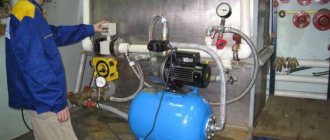
Today, quite often, owners of country houses choose an autonomous water supply system, which allows them to satisfy the family’s water needs, as well as provide watering for the garden. To build such a system, it is not enough to dig a well or equip a well; you need to buy a pumping station, connect it correctly and start it up for the first time. In addition, for efficient and durable operation of the system, the operation of pumping stations must be carried out in compliance with all rules. In our article we will tell you how to properly connect and start the station, as well as use it throughout its entire service life.
Assembly and connection
In order for the first start-up and further operation of the water supply system to go smoothly, it is necessary to correctly install and connect the pumping station.
First of all, you need to choose a suitable location for the station. This could be the basement of a country house, an extension to a house or a separate structure, as well as a caisson. If you are installing a station in the basement, then the room must be well insulated and soundproofed. An extension or a separate building should also be well insulated. The caisson is installed so that its bottom is located 2 m below the ground surface. The best mobile application for experienced players has appeared and you can have a phone with all the latest updates and discover sports betting in a new way.
After this, you can connect to a well or well. In this case, depending on the depth of the hydraulic structure, a two-pipe or one-pipe connection scheme can be implemented. We will consider a more complex two-pipe connection option:
- On the ejector, which should be equipped with a station that pumps water from a well or well more than 10 m deep, we find one of three pipes. It should be on the bottom of the part. We attach a coarse filtration mesh to it.
- On the socket located in the upper part of the ejector, we put a squeegee with a diameter of 3.2 cm.
- After this, it is necessary to select a bend for the diameter of the pipeline. Sometimes this requires using several parts with adapters.
- We install a bronze coupling at the outlet of the drive. This will allow you to make the transition to a polyethylene water pipe. In this case, we seal all connections using tow or a special paste.
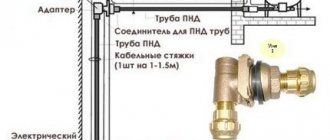
- Now you need to dig a trench from the well to the house, the bottom of which will be below the freezing point of the soil. We lay the pipeline in the trench.
Advice: the length of the pipeline should be taken with a reserve, since it will not be possible to accurately take into account all the turns and bends; in addition, you need to take into account the thickness of the foundation of the house.
- At the exit of the casing from the well, we install the head. Instead, you can use a knee with a smooth bend.
- To connect the ejector to the water supply pipes you will need a coupling.
- Before lowering it into the well, we pass the second end of the pipe through the elbow at an angle of 90 degrees.
- After this, we seal the space using polyurethane foam. We connect the pipe to the corner adapter and the outer part of the water supply.
- We secure the head to the outlet of the column using reinforced adhesive tape.
Nuances of insulation
The main problem is the distance of the distribution well from the heating of the house. It is not practical to make a separate line for heating 1-15 m². Therefore, it is necessary to consider other methods of insulation. But before that, you should familiarize yourself with the operating conditions of the pumping station.
Usually it is a well located 0.5 m below the ground level. Its overall dimensions are 1x1 m with a height of up to 0.7 m. The walls are made of brick or cinder block. In rare cases, the concrete pouring method is used. These materials have high thermal conductivity and cannot provide the proper level of thermal insulation. To ensure this, additional measures will need to be taken.
When choosing heat conservation methods, the operating conditions of the pumping station are taken into account:
- Ventilation. For a normal level of air exchange, a pipe with a diameter of about 50 mm must be installed. In winter, it is the main source of heat loss. Under no circumstances should it be blocked, since increased humidity will increase the likelihood of electrical equipment breakdown;
- Influence on the wall material. The most common mistake is installing insulation on the internal walls of a well. As a result of this, the dew point shifts, and as a result, the humidity of the walls increases;
- Flood protection. Care should be taken not only to ensure a good degree of thermal insulation, but also to prevent water from entering during melting snow or in rainy weather. Therefore, in addition to insulation, the pumping station must be sealed from the ground and the top cover.
At first glance, the fulfillment of these conditions leaves no choice of method for maintaining the required temperature level inside the station. Therefore, you should use several ways to preserve the microclimate.
Preparing the hydraulic accumulator
The hydraulic tank can be installed in the basement of the house, since this unit builds up pressure in the system; water can be supplied even from water intake points located above the installation level of the hydraulic accumulator itself.
Important: in order for the entire water supply system to function optimally, it is necessary to correctly select the pressure in the hydraulic tank.
If the pressure is very high, this can cause the pump to start and stop very often, which will subsequently lead to its rapid wear. The reduced pressure in the air chamber will cause the bulb with water to overstretch, which will cause it to quickly fail.
Repair and causes of breakdowns of pumping stations
Rules for preparing the hydraulic tank:
- Before pumping air into the air chamber of the accumulator, you must make sure that the rubber bulb is empty. If there is water in it, drain it by opening the bottom tap.
- After this, air is pumped into the chamber using a car pump. Pressure is also measured with a car pressure gauge. As a rule, the pressure in the hydraulic tank should be 10% less than the lower value. But since we have not yet set up the system and did not make the first start, we adjust the pressure like this:
- for a hydraulic accumulator with a capacity of 20 to 25 liters, the pressure should be in the range from 1.4 to 1.7 bar;
- for a storage tank with a volume of 50-100 l, the pressure is set in the range from 1.7 to 1.9 bar.
Equipment design
It is important for any owner of a house with a water supply system not only to know what the need for such a main element is, but also to understand its operating principle, including how to drain the water from the accumulator. The last one is at the end of the article
The term “membrane tank” is not used by chance. In addition to the fact that such containers are divided into horizontal and vertical, they can be classified in another way:
- Membrane.
- Balloon.
The first case is just a membrane tank. That is, inside it there is a special elastic partition that divides the entire volume into two chambers: for air and water. The membrane itself is a non-removable element and therefore, if it breaks, the entire hydraulic accumulator must be replaced. Fortunately, they are durable.
In balloon devices, instead of an elastic partition, there is a pear-shaped working element made of almost the same material as the membrane, which allows it to stretch to accommodate the required amount of water. In this case, the internal container can be replaced.
Moreover, the division into chambers is made in such a way that the water does not come into contact with the inner metal surface of the accumulator. The air chamber is equipped with a pneumatic valve, which is responsible for regulating the pressure. It is usually filled with air, nitrogen or some other inert gas. Due to the connecting pipe, the working container is filled with water. In order to control the operation of the pumping equipment in automatic mode, a pressure switch is provided, which is also connected to the hydraulic accumulator.
First start
Before starting the pumping station, it is necessary to fill the pump with water. To do this you need to do the following:
- We unscrew the plug from the hole for filling water on the pump body. Sometimes a valve may be installed instead; open it.
- After this, you need to fill the pump unit and suction pipeline with water. It is necessary to fill the liquid until water begins to pour out through the filler hole.
Before starting an automatic water supply station for a country house or cottage, you need to check the pressure in the accumulator. We described how to do this above. If the pressure is not normal, it can be increased by pumping air with a car pump, or decreased by releasing air through a special nipple on the hydraulic tank.
Rules for the first start of pumping equipment:
Spare parts and frequent breakdowns of pumping stations
- After filling the suction line and the pump unit with water, you must tighten the plug tightly or close the valve.
- Connect the pump to the power supply.
- Open the valve on the unit body slightly to ensure that any remaining air is removed from the pumping equipment.
- The pump should run for 2-3 minutes. During this period of time, water should flow from the outlet of the pipeline or open tap.
- If the liquid does not flow out of the pipe, you need to turn off the pumping equipment and add water again into the filler hole on the body.
- After this, the startup attempt is repeated.
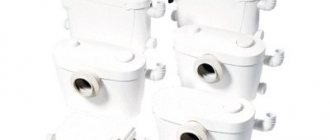
How is the pumping station constructed?
Any station contains such a mandatory element as a storage tank or hydraulic accumulator. It is worth saying that the installation with a storage tank is an outdated design due to the presence of a large number of shortcomings. First of all, the tank has a fairly large capacity. In addition, to regulate the water level and its pressure, a float is used, which ensures that the sensor is activated if the water level drops. In this case, the sensor sends a signal to turn on the pumping.
The main disadvantages are the following:
Water is supplied to the system naturally, which is why the pressure at the outlet is insufficient; Due to the large size of the unit, it is not always possible to find a suitable place to install it; The system installation process is accompanied by certain difficulties; It is important to allocate space for the storage tank at the station itself, and this is fraught with additional problems; If the water level sensor fails, it overflows over the edge of the tank.
Installations equipped with a hydraulic accumulator are the most reliable and practical. Their popularity is due to their small size and lack of installation difficulties. The system design contains a relay that performs the duties of regulating the ambient air pressure limit.
By creating water pressure, it is compressed in the hydraulic accumulator. At the moment when the pressure reaches the required limit, the pump automatically turns off, as a result of which water from the tank flows into the tap. If the level decreases, the pump turns on again and continues to operate until the required water level is again achieved.
Automation check
After starting the pumping station, you need to check whether the automation is working correctly. If you purchased a pressure switch with factory settings, it should turn off the pumping equipment when the upper pressure threshold in the system set on the relay is reached. After opening the tap and water flowing out of the hydraulic tank, the pressure switch should start the pump again when the pressure in the system drops to the set minimum. If necessary, the factory settings can be changed by setting the relay to the on and off pressure you need. This is done like this:
- We turn off the pumping equipment and drain the water from the hydraulic tank by unscrewing the bottom valve in the system. Open the cover on the pressure switch using a screwdriver or wrench.
- We start the pumping equipment, which will begin to pump water into the hydraulic tank.
- We detect and record the pressure gauge readings at the moment the pump is turned off. This will be the top pressure.
- Now open the tap farthest from the pump or the tap that is located at the highest mark. As water flows out of it, the pressure will drop and the pump will start again. It is necessary to record and record the pressure gauge readings at the moment the pump starts. This will be the lower pressure. We find their difference.
- During testing, you need to pay attention to the pressure of water flowing from the farthest or highest tap in the system. If you are not satisfied with it, then the pressure needs to be increased. To do this correctly, you need to turn off the pump and tighten the nut on the large spring in the relay. To reduce the pressure, on the contrary, we loosen this nut.
- Now let's set the pressure difference. You have already found it by taking the recorded pressure gauge readings. If this number is 1.4 bar, then you do not need to adjust anything. If the value found is lower, this may lead to more frequent pump starts and uneven pressure, which will cause premature wear of the equipment. If the value is higher, then the station’s operating mode will be more gentle, but the difference between the maximum and minimum pressure will become noticeable. To adjust this parameter, you need to tighten or loosen the nut on the small spring in the relay. To increase the pressure difference, tighten the nut more, and to decrease it, loosen it.
- When you have adjusted the pressure, you need to check the operation of the system again by repeating the previous steps. If necessary, the adjustment can be repeated.
If your pressure switch has no settings at all, that is, all the springs are completely weakened, then the adjustment is done as follows:
- We start the pump and build up pressure in the pipeline so that the water pressure from the farthest or highest tap in the system is satisfactory. We note the pressure gauge readings and turn off the pump. Let us assume that the device showed at this moment a pressure of 1.3 bar.
- Turn off the power to the station and open the cover on the pressure switch. We begin to tighten the nut on the large spring. When you hear a click of the contacts closing, we stop rotating.
- Replace the cover and turn on the pump. We bring the pressure in the system to 2.7 bar. We obtained this value by adding our indicator of 1.3 bar with the recommended difference in values equal to 1.4 bar.
- Disconnect the pump from the network, remove the cover and tighten the nut on the smaller spring. When the contacts open, you will hear a click. At this moment the rotation must stop.
- After our settings, the pressure switch will start the pumping equipment when the pressure in the system drops to 1.3 bar, and turn off the pump when the pressure rises to 2.7 bar. Now all settings are completed. We install the relay cover in place, and connect the pump unit to the power supply.
Attention: the upper pressure setting on the relay should not exceed the limits for this pumping equipment under specific conditions of use.
Is insulation necessary?
The question of how to insulate a pumping station for the winter is relevant for any owner of a country house. After all, residents of the private sector are familiar with the situation when, early in the morning in winter, not a drop comes out of the tap instead of the usual stream. Frozen water in a pipeline can be a serious problem. And not just because you won't be able to drink your morning coffee or brush your teeth.
We remember from school physics that water tends to expand when it freezes. If there is water inside the pipe, at the connection point or in the pump mechanism itself at the time of severe frost, the tightness of the structure will be compromised. As a result, you will be left without a working water supply, and you will have to spend a lot on winter repairs of communications or, even worse, replacing the pumping station.
Therefore, it is important not only to think through the entire communication system in the house and on the site, but also to take care of proper care. In our case, we are talking about timely insulation
Operating rules
The operation of pumping stations must be carried out in compliance with the following rules:
- Once a month, as well as after a long period of inactivity or storage for the winter, it is necessary to check the air pressure in the accumulator.
- Periodically it is necessary to clean the coarse filter installed on the horizontal section of the suction pipeline. If this is not done, then the water from the tap may flow in jerks, the performance of the pumping station will decrease, and a completely clogged filter can lead to the fact that the unit will not be able to pump water and will work “dry”, which will quickly fail. The frequency of cleaning the coarse filter depends on the concentration of impurities in the water pumped from a well or well.
- The station must be located in a special dry and warm place.
- The water supply pipeline must be protected from freezing in winter. To do this, the bottom of the trench where the pipes are laid must be below the freezing point of the soil. Otherwise, the pipeline is insulated and additionally heated with an electric heating cable, which is also laid in the trench.
- If you will not use the station in winter, then all water from the system must be drained before frost sets in.
Video instructions for starting and operating the pumping station:
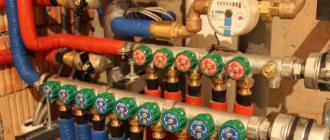
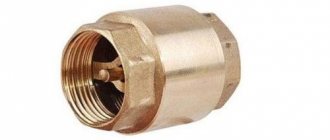
Valve.
Most likely, an electrified valve will be installed on the meter bypass pipeline. When ordering a control cabinet for a pumping station, it is necessary to provide for the possibility of connecting a valve to the cabinet.
Although, the water utility requires installing a water flow meter on this bypass loop as well. As a result, we see insanity: a water meter, and around it a bypass loop through an electrified valve and with the same water meter.
One way or another, it is necessary to find out in advance which drive the electrified valve has: single-phase or three-phase. If the cabinet is equipped with a single-phase valve control channel, it is impossible to connect a three-phase valve to it and vice versa.
Common mistakes
When installing all components of plumbing equipment, a number of common mistakes are possible, knowledge of which will help you avoid them:
- Small stock of pipe lengths used. Often overlooked are the presence of corners and the thickness of the foundation, which increase the distance to be laid. Be careful. It’s better to overpay for an extra length that can be reduced than to worry about increasing the product and losing large sums on sealed adapters.
- Tightening threaded fasteners with bare hands. At the moment of tightening, it may seem that the part is seated tightly, but during operation it may leak. Be sure to use a key to ensure complete sealing.
- Negligence in relation to the hydraulic accumulator. Be sure to check the internal pressure in it. If it falls below 1.2 atmospheres, then it must be increased using a compressor or pump for cars.
Filtration system at the station
Any water carries many impurities in the form of sand, clay and other heavy elements. They are harmful enough to the internal structure of the equipment that, if accumulated in large quantities, they can damage it. Therefore, if you want to extend the life of the station, its installation is required.
But at the same time, it is necessary to remember about the negative effect: a decrease in the force of water influx. To prevent this problem, it will be enough to regularly clean the dirty filter elements. The main thing is to prevent the system from becoming completely clogged, which will certainly lead to a breakdown of the device.
Briefly about the main thing
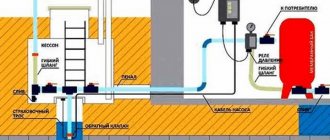
Before starting a system for drawing water from a source underground, you need to make sure that the equipment is connected correctly. If an ejector is used, check the presence of a recirculation line and its connection to the storage tank. When using a single-pipe connection to the pump, you need to prepare the hydraulic accumulator for operation in advance.
To start the system for the first time, you must completely fill it with water. And after checking the functionality, carry out the final adjustment of the automation. This will allow you to achieve better system functionality. Also, after adjustment, the equipment will be able to operate in a more gentle mode with greater productivity.
Ratings 0
Using recycling
The recirculation line serves to maintain water pressure in the supply and protect the pump from idling. It is necessary to understand that this wastes part of the pump power.
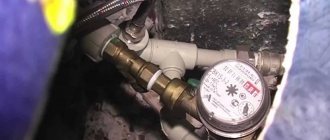
To organize recirculation, a tee must be installed on the pressure pipe of the water supply system. It is advisable to install a shut-off valve on the recirculation line. It will provide regulation of water flow. The second tee must be installed on the suction pipe in a convenient place and connected to the recirculation pipe.
1 - tee; 2 - shut-off valve; 3 - recirculation pipe
When repairing or servicing the water supply system, in order not to relieve the pump pressure and refill it with water, install a tap on the accumulator, then you will leave water under pressure in the accumulator. After the repair, simply unscrew the valve and the pump with the pressure pipe will fill with water. In most cases, the hydraulic accumulator reserve is sufficient to fill the pump and start it.
Such simple actions will increase the reliability of the uninterrupted operation of the system.
Installing a water pump in a private house
The process of connecting a station to resources depends on the type:
- good or good;
- centralized water supply.
When connecting the station to a centralized water supply system, the sequence of work is as follows:
- water supply disconnection;
- the free end of a city pipe with a pipe or piece of pipe is connected to the battery;
- all station nodes are connected and located;
- checking system performance.
First start-up connection The first start-up of the pumping station is carried out to test the composite system.
To do this you need:
1. Fill water through the special plug or pump opening and all connected pipelines. Charging the pump must be done at the very top so that all the air is released.
second
Connect the pressure side of the system to all piping distribution in the house. Close the pump fill port if it is full. Check the air pressure in the tank. If it is lower than the value specified in the instructions, start the air using a regular pump pump. In case of excess pressure at the threshold, bleach the air to the nominal value.
3. Connect the power supply through the socket. Water will begin to fill the highway and battery.
The pump automatically turns off when it reaches a pressure of approximately 3 atm.
4. After stopping the pump, open any cord in the house. The pressure should be reduced as indicated by the pressure gauge. If the device readings differ from these parameters in the instructions, adjust them according to the recommendations.
Cost of connecting a water supply system by third party experts
Equipment installation and connection work is carried out in the following range:
- Placement in the basement or pallets;
- Laying pipes in a ditch from a well or from the end of the connection to the central water supply of the house;
- Battery storage;
- Installation and configuration of automation systems and electrical equipment;
- Checking the system's functionality.
Labor costs depend on the need to find the trench and the complexity of installing the equipment.
For example, installation with attached equipment starts from 2500 to 3000 rubles.
The final estimate can be assessed comprehensively if the scope of services offered includes container installation, automation testing, pumping station piping. In this case, the total labor costs for the Moscow region are 7,000 rubles:
- suction in the central water supply network - 2,000;
- mandatory - 3,000;
- tank installation - 1,500.
Criterias of choice
When it is planned to install a pumping station in a private house, it is selected so that it fully performs its function, and therefore meets the needs of people who live there permanently or who often come to visit.
Before installing a pumping station in a private house, certain criteria are taken into account:
- Technical features of the equipment.
- Features of the operation of water sources.
Pumping station for a summer residence
| MiSHiK |
| Leolik We are currently working on insulation issues; there is no consensus yet on how best to do it.( |
There are only 2 “working” methods of insulation. The simplest is to provide a constant flow of water. Since the water in the well/well is always at above-zero temperatures (usually > +5 degrees), it will always heat up the pipe and everything around it. Typically, at -20 degrees below zero, “standing water” will turn into ice in ~20 minutes, i.e. your task is to ensure a complete change of all the water in the main during this time. How - very simply - for example, by making a hole at the outlet in the form of a drilled hole into the sewer or a slightly open tap (there are no water meters at the dacha - pour as much as you want) there. Once every 20 minutes the pump will turn on and pump up water. The question is simply to calculate the diameter so that everything works out as it should regularly.
But, God forbid, if the electricity goes out, you’re screwed. It’s very difficult to just warm up a frozen pipe - it requires both superheated steam and pressure, in general - few people have succeeded... You will wait until spring, and not until the snow melts outside, but when the underground pipe warms up - and This is no longer March, but April or even May. Remember - until what month does the ice lie in the dark forest...
The second option is a self-heating cable. When you buy a cable, you pull it inside the pipe and plug it into the outlet. It will cost more money (the cable itself is about 500 rubles per meter, i.e. a 25 meter cable will cost about 10 thousand rubles), and it will also consume about 100 W for this length. Somewhere electricity will cost ~ 300 rubles/month
But if the electricity goes out, it doesn’t matter. The cable itself will heat it along its entire length in about 3-4 hours. There is also this story - the pipe goes deep, but somewhere there is a stupid half meter (such as an entrance to the foundation, the head of a well, a sudden breakthrough of groundwater, etc.) - where there are constantly drafts and cold. No matter how you insulate it, it still freezes. And because of these half a meter, you will run out into the street on a cold night and pour boiling water on this frozen area. And at the most inopportune moment - on holidays, weekends or New Year. I thought - my nerves are worth more than 300 rubles. That's how it turned out
Other options - for example, burying a pipe to the frost-free level - did not work. Firstly - deep - in the Moscow region the level of frost resistance can reach up to 1.5 meters - I’m not a horse to dig so deep. And secondly, see - the previous case - there will still be a “bad area” - where your whole idea will go down the drain. Another option - wrapping the pipe in super-duper insulation - is also not very successful. You will wrap it up - but the water is “stagnant” - if you are at the dacha on short visits - do you guarantee that the pipe will not freeze in a week?
ps It’s the same story with sewerage - a self-heating cable. It is used “on occasion” - for severe frosts, but it is laid just in case.
| MiSHiK |
| Is there any point in installing a common hydraulic tank if there is already one in the well, albeit not a very large one? |
“not very big” - how much? I think 50-100 liters is more than enough. Specialists usually select the pressure so that the pump turns on at the lowest point of pressure drop without breaking the jet. Then you won’t feel “scalding” under the shower - first ~ 30 liters of water will come out from under the membrane, and if it runs out, the pump will connect and the stream will flow with the same pressure. One “but” - if you don’t consider the case when there is no electricity. Then a large tank will save you - but are you ready to drink 1 m3 of rotten stagnant water from a large storage tank for the sake of this moment of lack of electricity? Can I supply an uninterruptible power supply or a generator?
So a very large tank is also not good - the British (who have tanks on the roof and the water flows by gravity) or the Egyptians regularly suffer from stomach pain, because some bacteria appear in stagnant water. Therefore, the capacity should be reasonable - for 1-2 hours of standing time and no more.