In any apartment or house, a drainage system is important. Thanks to it, unpleasant odors and various impurities are eliminated. Although it is quite difficult to install a sewer system yourself, it is quite possible to do this after first familiarizing yourself with the work processes. First, the hot water pipe is laid, and then the rest of the technical work is carried out. How to make a sewer system so that it lasts for a long time? Complete instructions for installing a do-it-yourself sewer system in the bathroom will help.
Device Features
Before that, the installation of sewer networks and replacement of the sewer system in the apartment is carried out, and the sewerage system is considered. The main purpose of water supply and sewerage networks is the natural flow of sewage into the pipes. Therefore, it is worth remembering the important features of the design of the sewer system at home:
- When installing a pipeline, it is worth considering the main condition - the presence of a slight slope of 2 to 15 percent to the collector and tank. The slope level is always calculated individually. For this matter, tabular forms are used that display the average parameters used to connect different plumbing elements with pipes of the required dimensions. The smallest slope value is intended for the general drainage of the shower, bathtub, and sink, and the highest slope value is for the sink drainage. Pipes with a length of 170-230 cm and a diameter of 5 cm are intended for draining a shower, bathtub, and sink, and for draining a sink - with a length of 80 cm and a diameter of 4 cm;
- An important part of sewerage is ventilation. The presence of a ventilation system ensures regulation of pressure changes in the sewer system during the flow of waste;
- material - when installing water supply and sewerage systems, you should prepare pipes from different compositions. Plastic products are often installed. You can use products made from different plastic compositions - polyvinyl chloride, polypropylene, polyethylene. They differ from products made of cast iron - they do not crack, are not subject to corrosion, and are lightweight. In addition, they do not need to be lubricated, and installation of sewerage in bathrooms with your own hands is carried out in a short period;
- color - the color of pipes for cold and hot water supply can be chosen differently. For example, for hot water supply, plastic pipes can be painted red, and for cold water, blue;
- As for the connection diagram of plumbing fixtures with the sewer system, there are some nuances. This is due to the fact that some products can be installed on the ground floor, in the basement, or other similar rooms. In these situations, it is almost impossible to make a slope;
- additional equipment - often special pumping equipment is installed. In addition, a shredder for toilet paper and fecal waste is additionally included. This design complements other plumbing fixtures for hot water supply or cold water supply. It can be automatic, so during use it does not cause any particular difficulties for the owners.
For cold and hot water supply, many people choose pipes of different colors
Simple sewer wiring diagram
Examples of wiring diagrams, their types
Before starting repair work, it is necessary to draw up a diagram, following which you can accurately calculate the amount of materials. The layout of plumbing pipes requires careful planning.
First of all, it is planned how many highways, where they will be located, and connecting points are identified. Creating a wiring diagram is the first stage of creating bathroom communications.
The following types of connections are distinguished:
- connection to the central water supply;
- autonomous station.
The first method is suitable for both a private house and an apartment. In this case, you need to draw up a layout of the bathroom pipes so that it logically fits into the existing system.
In order to ensure that the room has the correct piping, it is necessary to take into account some points:
- pipeline diagram;
- laying methods;
- determination of water intake points;
- correct calculations of materials and tools;
- ensuring safe use.
In addition, if repairs are being made in a building with two or more floors, it is necessary to carry out calculations to distribute the load across the entire water supply system.
The maximum load must take into account all parameters, including the equipment. You can develop a pipeline routing scheme yourself, but if any difficulties arise, it is always better to contact specialists.
Types of pipe routing
Today, the following types of communication wiring are most often used;
- serial connection;
- connection with additional sockets;
- collector
First, determine the places where all consumers of cold and hot water will be located. It’s better to do everything on the diagram, but you can also mark it “on the spot.” Not only the geometric dimensions of the devices are important, but also the exact location of the place where the water needs to be supplied.
Drawing a plan indicating dimensions and distances is the first step
Many devices are connected to the water supply network using flexible hoses. Then the outlet from the main may end 10-20 cm before the device. The main thing is that the connection point is easily accessible. This is necessary for convenient and fast connection maintenance. This connection method is easier to implement - there is no need to accurately calculate the length of the pipe.
There is also a hard water supply to plumbing fixtures or household appliances - pipes to the entrance itself. This type of connection is more difficult to make, which is why this type of wiring is less common. This is basically how gas water heaters (boilers) and bathroom faucets, which are attached to the wall, are connected.
External or hidden gasket
First of all, you should decide on the type of pipe installation - will they go on top or be hidden in the wall or floor. Hidden wiring in the bathroom or toilet is good from an aesthetic point of view - nothing is visible. But the pipes are inaccessible; to eliminate the leak, you will have to break the wall, which is not at all happy. Therefore, they try to lay only whole pieces without joints into the wall - there is less chance of leakage.
Hidden water pipe installation in progress
There is another difficulty when laying a hidden water supply system - the need to have channels in the wall (grooves) into which the pipes are laid. Firstly, not every wall allows you to make grooves in it. For example, in panel houses, where the wall thickness is only about 10 cm, it is definitely not worth making a channel 5-6 cm deep. The slab will lose a significant part of its load-bearing capacity. There is probably no need to explain why this threatens. Secondly, laying grooves in the wall is not the easiest job, even with a hammer drill it takes a lot of time. So this option has more than enough disadvantages.
Another type of hidden piping is behind a false wall. To do this, retreating some distance from the main wall, install a frame, and plasterboard on it, on which tiles are then laid. The second option for a false wall is made of plastic panels.
You can hide the pipes behind a false wall
From a practical point of view, external pipe routing is better - everything is visible and available for repair at any time. But the aesthetic side suffers. To hide all communications - water supply and sewerage - they try to lay them closer to the floor, then they build on a plasterboard box with a removable lid or upper part. So all the pipes have easy access, and they themselves are almost invisible.
External gasket is not so aesthetically pleasing
Laying method
In an apartment or house, water supply wiring is done in two ways - by connecting all consumers in series or installing a manifold, from which a separate pipe goes to each device. Both options are not without their drawbacks.
When the pipes are connected in series, little is spent, but if more than two plumbing fixtures are connected in a row, the pressure may be insufficient when they operate simultaneously. This type of wiring is also called tee - all branches from the main main pipe are made using tees (sometimes crosses or corners).
Series connected consumers
When installing a water supply system with collectors, a lot of pipes are consumed, and additional equipment is required - a collector for the water supply system. So this pipe routing scheme is an expensive undertaking, but the pressure on all connected devices, regardless of the number of workers, is the same.
Parallel connection - each device has its own line from the collector
There is one more nuance: a large number of pipes must be laid somewhere, and compactly, and this is not at all easy. Therefore, this type of wiring is more often used for hidden installation or open installation, but in those places that require such a connection or can be covered by furniture.
For example, in a bathroom or toilet only two devices are connected. There you can do serial wiring. In the kitchen, a water heater (boiler), a faucet for the sink, a washing machine and a dishwasher are connected. In this case, it makes sense to install a collector in the kitchen, and from it separate separate water supply branches to all consumers. This connection method is called mixed - part of the water supply is routed using tees, part - from the collector.
Hot and cold water pipes are laid parallel
Please note that if cold and hot water are being installed at the same time, the pipelines are laid in parallel. If the supply is hidden, it makes sense to wrap the hot water supply in thermal insulation - then the water will really be hot and you will not heat the walls. If the pipes are polypropylene or plastic, this is not so critical - polymers have a low heat transfer coefficient. For metal (any metal - steel, stainless steel, galvanized, copper) thermal insulation is very desirable.
Pipe routing: rules
As in any business, plumbing has its own rules. They are also present when laying water pipes. If you are going to do the plumbing for yourself, it is up to you to comply with them or not, but it is better to do everything correctly. The rules have their own logic, which most people adhere to:
- The pipes should run parallel, it is better that they do not intersect. It is better to lay them not diagonally, but vertically and horizontally. This rule is especially important for hidden installation - this way you will know where the pipes go and won’t make a hole in them when trying to hang/fix something on the wall.
- It is advisable to have free access to the joints and connections.
- Each outlet in front of a plumbing fixture or household appliance ends with a shut-off (ball) valve. It is necessary so that the device can be removed or repaired without cutting off the water supply to other consumers.
- When installing water supply in an apartment, be sure to install a coarse filter after the riser (further filters are optional, but this one must be there). Pipes are laid out in different diameters
- When laying out the water supply, each branch is made one step smaller in diameter. This is necessary to maintain stable pressure. For example, the circuit is sequential, assembled from polypropylene. The riser is 32 mm, the outlet from it is 20 mm, and 16 mm goes to consumers (devices and plumbing equipment).
If you look closely, you will see that most of the water pipes are made exactly according to these rules.
Types of sewerage
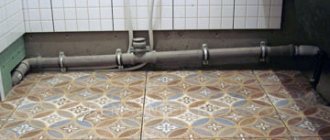
Usually, do-it-yourself sewerage in bathrooms in an apartment or house is installed in several stages. Each stage should be carried out taking into account certain technical features that need to be taken into account:
- installation of internal sewerage - this stage includes the laying of all sewerage elements that are located indoors, namely the connection of siphons to the sewerage system, sinks, cold and hot water supply:
- external sewage system - this stage includes laying pipes that connect the internal sewer system, drain, septic tank or central sewer system.
External
Internal
Algorithm for performing installation work
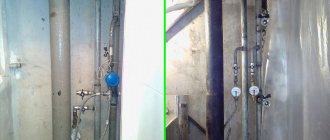
The very first step, regardless of whether it is a hidden or open system, is to install a control valve. Considering the fact that the quality of the supplied water from their central water supply is, to put it mildly, unsatisfactory, a mandatory step is to install a coarse filter. It is installed immediately after the valve. Then a water meter and a fine filter (optional) are installed.
If the pressure of the supplied water in the main exceeds the permissible limits, then a pressure reducer is installed. It is important to note that the gearbox must be equipped with a pressure gauge, through which parameters are set that will be most optimal for the operation of specific plumbing fixtures, usually 3-4 atm.
At the very end, the collectors are installed. In the retail chain they are offered with outputs ranging from 2 to 4. If there is a need, the products can be combined. Ideally, the manifold should be equipped with shut-off valves. When connected in series, a tee is used to transfer to the devices.
Materials for internal and external laying
Before starting to lay internal networks for water supply and sewerage, the necessary materials are prepared. It is best that the color of the pipes is orange. So, replacement of sewer pipes should be made from the following products:
- pipes made of polypropylene material;
- pipes made of polyethylene material;
- PVC pipes;
- adapters;
- couplings;
- bends.
Pipes and elements
Fitting
Elements of the sewer system
For internal drainage, devices made of polypropylene material are used. This is due to the advantages of this material. The main characteristics are softness, resistance to temperature changes, and long service life.
Installation of sewer pipes is most often made from polymer-type products, the diameter of which is 110 mm. Painting pipes orange or gray is done to mark their purpose.
Design and installation
The whole point of the design part of a drainage system for a bathroom, be it a private house or a city apartment, lies in the exact observance of dimensions. An important parameter is the location of sanitary and technical devices. As a rule, you have to find a compromise between the desire to place everything as compactly as possible and ease of use.
An experienced specialist will install the water drainage line with an inclination towards the riser, and be sure to use high-quality fittings with tight sealing collars.
Preparatory stage
Many people are interested in the question of how to properly make a sewer? It is worth paying increased attention to the preparatory stage. If you neglect this stage and do not prepare the necessary tools, then laying out pipes in the bathroom and installing the sewer system will take quite a lot of time.
The preparatory stage consists of important rules:
- First you need to decide on the devices and their location. You can draw a diagram on a blank sheet of paper. Be sure to consider what fittings and additional pipes will be needed for the full operation of the sewage system;
- if suddenly there is an installation of some additional device, the working process of which will require a sewer drain, then it is better to provide a closable type outlet with an additional plug;
- Once all the dimensions have been calculated, the products can be cut. Be sure to consider the fitting parameters;
- many experts advise cutting the pipes before starting installation, because they can be easily tried on when assembling the networks;
- It is better to cut plastic pipes with a hacksaw for metal products;
- To easily cut the pipe, it can be outlined in a circle in the desired area. The cut will be even and tight;
- products are cut only at right angles;
- cut edges of products are cleaned with sandpaper or a knife;
- Be sure to remember that replacing a sewer pipe in an apartment should be done on a slope, because the working process of almost any sewer system occurs under the influence of “gravity.” The tilt of the products is fixed using brackets that are attached to the wall.
Special tool for manual pipe cutting
The following equipment will be required for the work process:
- grinder or hacksaw for cutting metal materials;
- impact drill or hammer drill;
- mounting gun;
- chisel;
- screwdriver;
- hammer;
- adjustable wrench.
Required Tools
Determining the installation method
Practice shows that the wiring of communications in the bathroom can be organized in three ways.
Method #1: Open
Involves laying pipelines over walls and floors. Used when it is not desirable or impossible to lay pipes in the walls. The main advantage is the ability to constantly monitor the condition of the pipeline and easy access to it in the event of an emergency. In addition, the cost of such a design is an order of magnitude lower and installation is much simpler.
However, the appearance of a pipeline installed in an open way leaves much to be desired. Unaesthetic communications spoil the interior of the bathroom. Therefore, whenever possible, they try to disguise them with all kinds of screens and boxes made of plasterboard or plastic and place them in the most inconspicuous areas of the room.
In addition, open communications can be inadvertently damaged. Communications laid in an open way do not have the most aesthetic appearance; if possible, they should be covered with decorative elements
Communications laid in an open way do not have the most aesthetic appearance; if possible, they should be covered with decorative elements
Method #2: Closed
Pipes and connections are laid inside the walls, only fittings are brought outside, and plumbing equipment is connected to them. The method is prohibited for use on load-bearing walls that cannot be tapped. The closed installation method does not interfere with the design of the room, since utility lines are hidden under the cladding.
In addition, it is impossible to damage such a line through negligence. However, the process of installation and preparation for it is much more complicated than when carrying out open installation
According to building codes, before installation, the system elements are placed in a special casing pipe, after which they are laid in pre-prepared channels cut inside the walls. After the main is laid, the walls are sealed and leveled, maintaining plane.
A significant disadvantage of closed installation can be considered the lack of control over the condition of the pipes and the need in the event of an accident to dismantle the lining over a section of the pipeline that has become unusable.
The holes in the wall after laying the pipes are carefully sealed, the plane is completely leveled for finishing
Method #3: Combined
The mains are laid on top of the walls, after which they are masked using boxes or false panels. The difficulty of such finishing is to lay the sewer and water pipes close enough, which will later allow them to be covered with decor.
In addition, you need to think carefully about the type of finish, which should fit into the design of the bathroom and not clutter it up. To disguise pipes, profiled plasterboard boxes, all kinds of plastic decorative elements or tiles are most often used.
Installation process
Before installing water supply and sewerage systems, you need to remove old pipe elements. Technical work is carried out in stages:
- the hot and cold water supply to the sink, bathtub, shower, and toilet is turned off;
- Next, remove the hose designed to supply water to the toilet tank. This process is carried out using an adjustable wrench;
- the toilet is removed - to do this you need to remove the bolts that hold it to the surface;
- The bathroom area is completely cleaned. It is necessary to remove all objects that will interfere with the laying of the sewer system networks - washing machine, bidet, sinks;
- then the old sink drain and other plumbing fixtures are dismantled. All pipe elements made of cast iron material can be broken with a hammer;
- The pipes are removed next to the riser. Carefully remove the pipe elements extending from the tee mounted in the riser. Using a grinder, you need to cut the pipe at a distance of 100 mm from the socket of the riser. The remains can be easily removed - you just need to rock them a little in the socket and then they will fall out on their own.
Dismantling old wiring
Dismantling cast iron pipes
However, if the residues do not fall out and are firmly stuck, then more effort will have to be spent on removing them. To do this, a pair of cuts are made with a grinder along the segment and up to the socket itself with a distance of 2 cm from each other. Next, a chisel is inserted into the cut, and it is tapped lightly with a hammer. Tapping is done until the pipe inside the tee cracks.
Next, the tee socket is cleaned. Before installing a new cuff on the bell, you should clean off any remaining lubricant. After installing the new cuff, pipe wiring is done.
Features of dismantling a dilapidated system
Before installing a new sewer system, it may be useful to remove old pipes. During the work, you may encounter serious difficulties. For example, it is not easy to work with sections of pipes that are tightly embedded in cement walls.
Advice! Before dismantling, make preparations so that the pause between the removal of the old sewer system and the launch of a new one is not too long. Since now no one will be able to use the toilet and sink, which is very uncomfortable.
Remember that apartment buildings are equipped with a non-specialized drainage system. When dismantling the riser, proceed with caution, so as not to damage the equipment of your neighbors.
Pipe installation
How to install sewerage correctly? Do-it-yourself sewerage in an apartment must be done according to the rules. To ensure that the plumbing installation in bathrooms is correct and of high quality, you should remember the following recommendations:
- During the installation of sewer system networks, the most difficult and responsible process is the installation of the toilet. This product is connected to the sewer system using pipes made of plastic material, the diameter of which is 110 mm;
- then you can make a smooth transition to pipe elements with a diameter of 50 mm;
- You should not immediately install an adapter for this diameter size. A suitable option would be to use a small bridge with a diameter of 100 mm, and only then you can switch to a diameter size of 50 mm;
- The drain and slope are mounted at the same level. The joints are firmly fixed;
- It is not advisable to use adapters with right angles. A suitable option would be to use 2 angles of 45 degrees;
- usually wiring in bathrooms and connecting the bathroom to the sewer does not require welding of pipes;
- after this, the sewage system in the bathroom is completely assembled - the pipes are inserted into one another through gaskets, thereby ensuring a high level of tightness;
- For good fixation of hot and cold water supply networks, you can use silicone sealant. Thanks to this product, a strong fixation of all parts of the sewer is ensured. In addition, it will not burst during startup and will operate normally;
- At the end, a tie-in is made into the sewer and connection to the sewer.
First you need to mark the location of pipes and plumbing fixtures
It is better to secure sewer pipes motionlessly using clamps
The distance between supports must be at least 1 meter
Joining plastic and cast iron pipes
Hidden installation
Outdoor installation
Minimum connections - more reliability
Preparation for work: partial or complete dismantling of the old system
Laying must begin from the lowest point, and preferably in a hard-to-reach place.
To make it easier to close the sewer pipe later. In apartments, you often have to go for either complete or, if you’re lucky, partial dismantling. But, nevertheless, even if you are lucky enough to protect yourself from unnecessary manipulations, be sure to make sure that the water supply is turned off.
Schematic drawing of the sewerage layout in the bathroom.
If you are changing the wiring in an old apartment, we can only sympathize with you. Cast iron pipes were previously connected using a mixture of oiled hemp and sulfur. A kind of glue and sealant from the past, it connects the pipes so tightly that sometimes they can only be dismantled using a sledgehammer and a crowbar.
Advice.
If you are faced with such work, you need to be more careful when working with hand tools. The integrity of the drain pipe must not be compromised. In this case, the “bed” and the wiring are dismantled to the junction with the riser, acting as carefully as possible as they approach the given point.
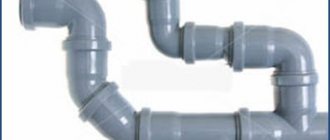
How to make a turn
Often, the installation of sewerage systems requires turning the pipe. The rotation ensures a change in the direction of the water supply. In order to carry out the rotation, various fittings are used. They may have different characteristics and design features. The color of the fittings can also be different - white, grey, black, orange and so on. The color can be chosen depending on the tone of the pipes themselves.
If the sewerage wiring is done incorrectly, leaks may occur at the connections. Draining water can lead to leaks, and areas with swivel fittings often become areas where sediment accumulates and clogs occur. For this reason, revisions need to be installed.
Swivel fittings
In addition, it is necessary to approach the installation of networks of water supply turning units very carefully. The rotation should not be immediately made at 95 degrees in a horizontal position. It is better to turn the fitting at an angle of 45 degrees. If this is not possible, then it is better to mount an inspection-type well in the place where the turn should be located.
Sewerage distribution using internal pipes must be carried out without connections with bends to a central riser and always at right angles. If this is not followed, it can cause serious problems:
- firstly, this will make it impossible to correctly set the angle of inclination;
- secondly, in the place where the turn is located, all waste and particles will accumulate and they will not drain properly, which will ultimately cause blockages.
Installation Rules
Example of wiring with rotation
You should pay close attention to connecting the toilet. There should not be a large number of turning points in this area. For this reason, installation of sewerage in an apartment should be carried out next to a drainage channel. Regardless of the size and characteristics of the sewer risers, they are all connected into one sewer type branch.
Sequence of placement of plumbing fixtures
The toilet is installed first from the riser. A large distance between the toilet and the riser (especially when there are turns in the pipeline) provokes blockages. Shower, washbasin, etc. It is advisable to plan so that the water from them is drained through the toilet.
It is also better to make a bathtub and shower with a low drain closer to the sewer; this will help avoid many problems with slope.
And, as already mentioned, the technical documentation for plumbing fixtures must be studied before the installation of communications begins. It is good if a single-level arrangement of the pipeline and the axis of the sewer outlet is provided; but you may encounter an atypical connection, and this must be taken into account.
Having chosen the models and determined exactly where they will stand, you can begin installing the pipelines.
How to lay out pipes and install a riser
The most suitable location for the riser is the toilet. Because the optimal parameters of the pipe that is installed between the toilet and the riser are 100 mm. It can be installed either openly or hidden, it all depends on how the pipes themselves will be installed - in special boxes, inside wall structures, in channels, niches or near walls using fasteners, clamps, staples.
The pipes in the bathroom and the riser are routed using oblique tees. And in areas where pipes with different diameters are connected, adapters must be used. In the areas of intersection of pipes and sink, siphon, bathtub and shower, a collector-type pipe with a diameter of 100-110 mm is installed. The presence of a siphon and a water seal will provide protection from unpleasant odors. It is extremely important that the siphon is installed correctly, otherwise unpleasant odors will come out of the drain hole of the sinks or bathtubs. The presence of a siphon ensures the normal operation of the sink and bathtub drainage system.
Pipe routing option
Piping to heated towel rail
The supply pipes can be extended to the heated towel rail from the heating riser or from the hot water supply line. It is worth considering that when operating from a central heating system, the radiator will function only during the heating season. Also, inserting taps into the heating system will require temporarily shutting off the supply to the riser, which housing and communal services representatives do for a fee. In winter, such work is not carried out at all due to the risk of freezing the pipe.
Therefore, it would be more rational to connect from a hot pipeline. At the same time, for convenience and saving hot water, we recommend installing a bypass jumper between the main line and the heated towel rail. It connects the forward and return pipes, and ball valves before and after the coil will allow you to cut off the heated towel rail in case it is replaced or to preserve heat.
When laying supply pipes, you need to accurately maintain 2 dimensions: the center-to-center distance of the pipes for connecting the radiator and the minimum distance from the bathroom wall. For radiators with pipe diameters up to 23 mm, it is 35 mm, for pipes with a diameter over 25 mm – 50 mm. In general, to connect a heated towel rail you will need 2-3 taps for the bypass jumper, 2 tees for the main pipe and outlets from it, 2 tees for the bypass and 2 adapter couplings for connecting the coil.
Prevention of unpleasant odors
Often unpleasant odors come from the sewer system. To avoid this, when installing plumbing in the bathroom, you should follow the following rules:
- lay the sewer system using wide pipes. Because in products of small diameter the pressure often changes, which is the first cause of the appearance of an unpleasant odor. But in wide products, during the movement of liquid, an air cushion is created, blocking the escape of odors to the surface;
- be sure to clean the pipes in a timely manner;
- Stagnation of waste and water at the site of the siphon can lead to rotting and the appearance of an unpleasant odor. Therefore, the siphon should be constantly cleaned of various wastes and liquids;
- Another reason is faulty ventilation. Stagnant air in the room can lead to the development of fungus and mold. Therefore, you need to monitor the operation of the ventilation and eliminate any malfunctions.
Wide pipes should be used for the bathroom drainage system
What materials should I use?
It is quite difficult to answer this question unequivocally - there are a lot of influencing factors. Let’s just say that the most popular among the consumer audience when creating sewer pipelines and cold water systems are polypropylene and PVC pipes. Where it is intended to transport hot water, it is worth giving preference to metal-plastic. A stainless steel heated towel rail will last longer than a brass one.
Recommendations for sewer installation
How to properly lay a sewer? A few important tips will help:
- during the installation of sewer system networks, it is necessary to use as few joints and turns as possible;
- for sinks, bathtubs, toilets, showers, it is better to use pipes with a diameter of 50-100 mm;
- the size of the angle of inclination varies from 1 to 2 cm;
- when installing sewerage systems with plastic pipes, you need to use a special lubricant;
- turning the pipe must consist of revision. Otherwise, waste will accumulate in the place where there is a turn;
- for strong fixation of plumbing fixtures with the material, it is necessary to use transition-type cuffs made of rubber material;
- the risers must be fixed from top to bottom using clamps;
- the color of pipes for cold and hot water supply should be different;
- the presence of a siphon in the sink or bathtub. Using a siphon, the drain works normally. And also the presence of a siphon eliminates all kinds of unpleasant odors from the sewer;
- cutting polypropylene pipes should be done using a hacksaw or grinder;
- If sockets are used when joining polypropylene pipes, then there is no need to use sealing.
The sewer system in the house has a special place and everyone chooses their own option as to how to choose a connection and outlet. Thanks to it, the normal operation of hot and cold water supply to sinks, showers and other plumbing fixtures and sewerage is ensured. Therefore, the installation of water supply and sewerage must consist of various nuances - material, color, quality of pipes, and there must also be a drain, couplings, connections, good sealing against leaks and the presence of a siphon. These are, of course, not all the technical characteristics of the sewer system. The main thing is that you do the sewerage yourself according to the rules, then the sewerage installation rules for which are described and the hot and cold water supply system will last a long time and will always delight you with its full-fledged work.
Dead-end and closed circuit: pros and cons
The sequential and collector-beam circuits discussed above belong to the so-called blind (dead-end) methods of water supply wiring. In them, each water supply branch ends at a discharge point (dead end). This network configuration is good in terms of saving materials and space, but it loses in comfort when it comes to hot water supply. The water in the main will constantly cool down, so before you can take advantage of all the benefits of the hot water supply, you will have to pour several liters of liquid down the drain each time. It would seem that not such a big expense over the year will result in several wasted cubic meters. In addition, delaying the supply of water at the appropriate temperature wastes time and causes discomfort.
A water supply system with constant circulation of hot liquid will save several cubic meters of water per year
A way out of this situation can be found in the installation of closed-type wiring. A characteristic feature of this scheme is the constant circulation of hot water in a circle. Since it has a constant temperature at each point in the main, the consumer will receive hot water as soon as the valve is opened
The obvious advantage of this method is complemented by another advantage - the absence of sudden temperature changes, which is important specifically for hot water supply systems. It has a closed circulation circuit and disadvantages. A more intricate design complicates installation and requires additional costs of materials and equipment
So, when arranging it, you will need almost twice as many pipes, and in addition, you will have to install a separate circulation pump, which will ensure forced movement of liquid through the system
A more intricate design complicates installation and requires additional costs of materials and equipment. So, when arranging it, you will need almost twice as many pipes, and in addition, you will have to install a separate circulation pump, which will ensure forced movement of liquid through the system.
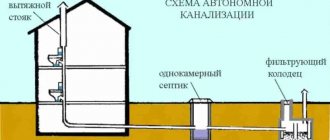
Measurements and drawing up a work plan
As one famous person said, I don’t remember his name, even the worst architect differs from the best bee in that before starting work he draws up a plan. I don’t consider myself a bad specialist, so I don’t neglect this stage. I don't recommend it to you either.
Scheme of the sewer system in the apartment.
Let's start drawing up a diagram. I haven’t told you yet, but the apartment where I was asked to install a sewer system was undergoing general renovations. Therefore, I didn’t have to decide how to connect the sewer to existing plumbing fixtures, or how to move the sewer from the kitchen to the room.
But I didn’t always encounter such ideal conditions. Yes, and it will probably be different for you. Therefore, when drawing up a diagram, you need to mark all the connected equipment on it. It is advisable to do this on a scale in order to immediately calculate the length and diameter of the pipes.
The following equipment was supposed to be connected to the client’s apartment:
- shower cabin;
- toilet with bidet;
- dishwasher and washing machine;
- sink in the kitchen and bathroom.
I can’t give you a diagram, since we marked everything with markers directly on the walls (there was no decorative covering on them yet). You do everything on a piece of paper. I have a small instruction, following which you will not encounter problems in the future.
When planning a sewerage scheme, I recommend taking into account the following factors (the price of all these tips is the liters of sweat and blood that my partners and I shed during work):
- Remember that laying drain pipes under an already installed bathtub is difficult. If you are not going to dismantle it, provide a drain gasket consisting of several parts. But at the same time, do not forget to take care of the tightness of the joints, otherwise Niagara Falls will spill on your neighbors from above, which they will not be happy about.
Installing sewer pipes under the bathroom is not an easy task.
- The bathtub must be connected through a siphon - a special outlet that turns 90 degrees. If the bathtub and sink are located next to each other, I would advise making your work easier by using a tee.
- If the total length of sewer pipes is large, do not forget to install pipe cleaning inspections, as I did. Otherwise, you will be remembered later with a kindly, quiet word if the sewer becomes clogged and it is not possible to clean it.
It is important to correctly calculate the diameter of the pipes. Some consumers (dishwasher, toilet) drain a large volume of water at a time.
Therefore, they need to be connected to pipes of larger diameter. For example, 100 mm. For everything else, parts half the size will do.
When planning your sewer system, remember that as you move toward the main vertical drain, the pipes should increase in diameter, not decrease. Otherwise, over time, a plug of accumulated debris will certainly appear at the junction.
As for the length, it’s impossible to accurately calculate it. In the store, sewer pipes are sold in pieces of different lengths. It is advisable to select and calculate everything so that there is less waste. This will turn out to be both more economical and more reliable (I mean the possibility of the appearance of Niagara Falls).
Installing pipes in the bathroom yourself
Naturally, not everyone can install metal pipes with their own hands, so below we will talk about how to install polypropylene or metal-plastic structures in the bathroom yourself.
To work, you will need to prepare the following set of tools and materials:
- soldering iron for plastic with the necessary attachments;
- Bulgarian;
- hacksaw for metal;
- perforator;
- linen sealing winding;
- screws and dowels;
- pipes;
- adjustable wrenches;
- ball valves;
- couplings, tees and bends;
- filters for water purification;
- gearbox
Features of entering communications into the apartment
The distribution throughout the apartment serves simultaneously to supply/shut off, clean, monitor leaks, distribute water between consumers and perform other functions depending on the needs of the homeowner. Pipe routing is also applicable for sewerage.
At the beginning of the system there should be a tap that opens the flow of water or shuts it off in case of an emergency.
If a valve was used in the old design, it is better to replace it with a new ball valve.
Opening and shutting off the water should be done by smoothly turning the lever, otherwise you can cause water hammer, which can damage the plumbing.
After an emergency valve, it is recommended to install leakage protection with automatic shut-off valves. Next, you should purify the water using a filter. It is better to install self-cleaning models. The filter will not allow coarse impurities contained in the water to pass through, which will extend the life of the plumbing equipment.
You can install optional devices in the wiring. These include gearboxes, pressure gauges and meters. The wiring diagram has two varieties.