The internal structure of the cisterns of many modern toilets, at first glance, is completely different from what was used 30-40 years ago. Therefore, when many questions arise related to the maintenance of sanitary fittings, for example, how to adjust the float in the toilet or adjust the outlet valve, apartment owners sometimes have uncertainty - should they solve the problem themselves or invite a third-party specialist? However, the functionality of current devices is based on the same principles as before. Their understanding, as well as knowledge of plumbing maintenance algorithms, makes it possible to maintain it in working condition on your own.
Picture 1
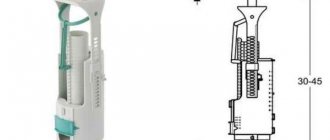
Types of shut-off and overflow structures for toilet cisterns
We are not talking about automatic or installed systems. The devices in question are widely used sanitary equipment. The principle of its operation will be easier to understand using the example of outdated designs (Fig. 2), especially since they have not yet completely gone out of use, and sometimes they also have to be adjusted. In them, as in modern products, two main mechanisms can be distinguished: filling and draining, as well as an overflow unit.
Outdated designs
Inlet
The design of the filling fittings includes an inlet valve 5 of the rod type. Its operation is controlled by the float of the toilet tank 3, acting on the shut-off rod through a brass rocker arm. A similar system was called a float valve and is still used today in a slightly modified form.
Figure 2
Figure 3 will help you understand the functioning of the filling unit more clearly. It shows the water level 1 after the storage tank has been emptied, after which the float mechanism 2 (including the rocker arm or spoke lever 3) is in the lower position. The upper part of the rocker arm 3, located in the body of the tap (valve) 4, moved the pusher rod 5 with the elastic gasket 6 to the left, thereby activating the water supply through the inlet 8 and the inlet 10. As the container is filled, the lower end of the lever moves up, and its upper arm Accordingly, the pusher moves to the right and gradually closes the spout hole, pressing gasket 6 against it.
The tap is secured to the wall of the tank using a fastening nut 9 from the outside. The threaded connection of the tap is sealed with a rubber gasket 7 from the inside. To dampen the noise of the falling jet 11, a tube of suitable diameter is additionally placed on the spout fitting of the inlet valve, lowering its lower end below the minimum water level.
Figure 3
Release (drain)
Adjusting the toilet tank cannot be complete without adjusting the outlet and overflow units. Their diagrams are shown in Figure (diagram) 2 - plumbing fixtures with lever-type drain mechanisms. But, despite the similar types of drives (rocker arms 4), they have fundamental differences in operating principles.
Tank with siphon
Figure 2a shows a drain system using siphon chamber 1. The curved cavity solves two problems at once:
- Serves as a fixed height overflow. The liquid level in the right receiving part of the siphon cavity always corresponds to the adjusted water level in the tank; it cannot be higher than the dividing partition. If the toilet float 3 is not configured correctly - it does not have time to close the inlet valve 5, then the liquid flows into the left side of the siphon (air) and flows out through the flush pipe.
- Supports (automates) fluid discharge, allowing handle 6 to be released immediately after activation. At the beginning of the flush cycle, water rushes down under the raised valve 2. When it is in the lower position, the flow continues through the curved siphon tube due to the vacuum created by the flow falling at high speed in the vertical flush pipe. An effective pressure drop caused by a moving liquid is only possible if the plumbing tank is placed high enough.
Sanitary fixtures manufactured according to scheme 2a no longer meet modern aesthetic requirements. At the same time, they are characterized by too large and unregulated water flow.
Tanks with bulb or membrane
Figure 4
In the flush design in Figure 4 and Scheme 2 b, the level of water overflow in the toilet tank is also not adjusted. In this case, the overflow functions are assigned to the rigid tube 7. The discharge of liquid through the raised valve 2 is activated by the handle 6, and the drive itself can be of a lever or direct type. The pouring process continues due to the fact that a light hollow valve (pear) floats up in the water flow, remaining in the upper position. After the toilet tank is empty, the bulb lowers, closes the valve seat, and filling of the container begins. The flushing process is clearly presented in Figure 5.
Figure 5
The design diagram from Figure 2 b is distinguished by its simplicity, and its use made it possible to create a “compact” type assembly (Figure 6), combining a storage tank and a sanitary bowl into one whole. Indeed, in this case, a flow of liquid falling from a great height is not required to create a vacuum that ensures the functioning of the overflow siphon. In addition, the bottom installation of the flush tank makes it easier to adjust or repair the float in the toilet tank, inlet and outlet valves.
Figure 6 “Modern” version of the lever mechanism of the toilet cistern
Note! Figures 4 and 6 show similar shut-off and overflow valve mechanisms. However, the first model supports automatic but unregulated drainage (bulb valve), while the second, on the contrary, requires manual control of the entire liquid release process (membrane valve).
Current designs
They were created taking into account the shortcomings of their predecessors. Therefore, push-button devices replaced lever devices. With their arrangement, adjustment of the water level in the toilet tank and the volume of liquid drained is allowed by both the inlet and outlet systems. On some models it became possible to set two flush modes: full and partial. In addition, the overflow height has also become variable.
Inlet
There are two main types of modern plumbing fixtures: with bottom and side water supply (Fig. 7).
Figure 7
If we talk about lateral supply, then quite often you can find flush tanks with lever inlet valves (Fig. 7 a). However, they are also gradually being replaced by designs that include a vertical type membrane float valve (Fig. 8). Through it, the sanitary storage tank of the toilet is filled faster than through a lever-rod inlet. It maintains maximum water flow and cuts off the flow immediately, unlike a rod valve system controlled by a rocker arm. In addition, the advantages of vertical cranes are: their more stable and quiet operation, compact dimensions of the mechanisms.
Figure 8
Models with a bottom connection can also be equipped with filling fittings with a horizontal rocker arm, as in Figure 6. Meanwhile, an increasing number of manufacturers of plumbing equipment are supplying their products with vertical type float valves (Figures 7 b and 15).
Release (drain)
Although modern exhaust valves (columns) have a different form factor from their predecessors (Fig. 10), their operation is based on the same laws as the models shown in Fig. 2. At the same time, they have many advantages, which are also complemented by some useful functions depending on the specific model (Fig. 9).
Figure 9
Due to rising water consumption tariffs, proper adjustment of the toilet cistern is becoming part of a rational approach to family budget planning. Therefore, columns with customizable discharge are increasingly in demand, including those equipped with the possibility of double discharge (full and partial). It is calculated that, based on average water consumption, a dual-mode toilet flush fitting passes about 25 liters per day, a single-mode 35 liters, and outdated models about 70 liters per person.
At the same time, due to the seemingly complicated design of economical plumbing mechanisms, it may seem that they will be difficult to maintain or configure. For example, it is not immediately clear how to adjust a flush tank with two buttons and set them to the desired operating modes. In fact, the entire setup comes down to one or two simple operations, which self-respecting manufacturers of outlet fittings always describe in detail in the product data sheet.
Figure 10
Purpose of the float
A separate float mechanism is a simple, small-sized device. But, working together with other elements, it performs a significant function - it regulates flushing. He is a kind of intermediary between two systems - draining and collecting water.
To understand the function performed by this element, it is necessary to understand the structure of the cistern.
It is usually made of earthenware (cisterns are made of porcelain or plastic). It is a container with a lid on which a reset button is installed. In addition to the hole for the button, there are two more technological holes in the tank. The underwater hose is connected through one, and the drain is carried out through the other.
In addition, there are fittings inside the tank. It consists of several elements assembled into a single structure. The fittings can be of various shapes and sizes. All this depends on the manufacturer.
Despite the differences, the principle of their operation is the same. Water is drawn into the tank through the supply hose. As water fills the tank, it raises the float. Once the required level is reached, the set is closed. It continues to remain in this state until the release button is pressed.
After pressing it, other parts begin to work. The button starts the rod with the membrane attached to it. This opens the drain valve and empties the tank.
This way the float regulates the volume in the tank. When the mechanism fails, dialing continues continuously. But an overflow system will help prevent your neighbors from flooding.
Typical breakdowns and ways to fix them
Even despite the abundance of different models of modern shut-off and overflow equipment, adjusting the toilet tank often comes down to standard algorithms. Many methods for detecting and troubleshooting are reminiscent of those that accompanied the operation of previously popular products. At the same time, plumbing problems are much easier to sort out if they are separated into separate groups. As a result, we get the following series of questions, arranged in descending order of frequency of occurrence:
- Continuous flushing of water into the toilet.
- Filling the storage tank is not activated.
- Water detected outside of plumbing fixtures.
Continuous flushing of water into the toilet
It’s not for nothing that the question comes first, since it arises in the vast majority of cases of plumbing breakdowns. If the water in the toilet tank does not stop, the reason may be:
- in exhaust valve leaks;
- overflow setting;
- constant operation of the inlet valve.
To begin diagnosing the system, you first need to remove the cover from the flush tank. For the majority of plumbing fixtures used today, it is enough to unscrew the decorative nut of the stem or the button nut located in the center of the cover. The operation may require some effort and ingenuity, since the flanges of the nuts are often completely smooth. It is easier to grip the edges of the fastener by wearing rubber gloves. For push-button models, for convenience, it is easier to rotate the button in a recessed position (Fig. 11).
Figure 11
Having removed the lid, you can begin to adjust the water drainage in the toilet; but first it is better to put the ceramic part away or even take it to the next room so as not to accidentally break it. If it is damaged, it is unlikely that you will be able to purchase a replacement separately.
Exhaust valve
Its tight fit to the seat ensures the tightness of the flush unit. The valve is made of elastic rubber, which over time loses its original properties: it hardens and deforms. In addition, deposits may accumulate and mineral particles may adhere to the sealing surfaces of the bulb or membrane and outlet. In all such cases, the valve in the toilet tank does not shut off the water. It is quite simple to make sure that the problem is in this particular unit - you need to weigh it down, press the valve element with your hand, sealing the place of its contact with the outlet hole. If the leak in the bowl has stopped, then you should find out the reason for the violation of the seal of the shut-off unit.
- Inspect the mating surfaces and clean them if necessary.
- Deformed or hardened rubber parts will have to be replaced (Fig. 12). To slow down the aging process of the material, you can use special preventive lubricants.
- Make sure the reservoir valve fits evenly in place. This can be prevented by distortion on the guides of the release mechanism, sticking of the button or float, if it is present in the design (Fig. 10, far right). In this case, adjusting the water flush in the toilet is easily achieved by returning the corresponding parts to their working position. However, if the misalignment is caused by the breakdown of their parts or wear, then the exhaust valve assembly will have to be replaced.
Figure 12
Overflow
When the liquid level reaches the edge of the overflow tube, water begins to flow into the sanitary bowl, which ensures its emergency release from overflowing the storage tank. In older models, the flow boundary (Fig. 2, positions 1 and 7) was strictly fixed, which narrowed the variability of plumbing fixture settings. Now, adjusting the water level in the toilet tank (if the inlet valve is working) begins with setting the height of the tubular overflow. To do this, loosen the crimp nut on combined drain mechanisms (see Fig. 13)
Figure 13
The freed tube is pulled out or pushed in, thereby adjusting its length. Guided by the following parameters:
- the water mirror should be 1.5-2 cm below the edge of the overflow;
- the pressed drain button should not rest against the edge of the tube.
After completing the settings, tighten the crimp nut, and the liquid level in the toilet tank will be located approximately 40-45 mm below its upper edge (the value depends on the specific model of plumbing fixtures).
Inlet valve (cock)
The water supply is cut off under the influence of the force created by the pop-up float. Therefore, it is with visual diagnosis of its position that the adjustment of the inlet valve of the drain tank begins.
Toilet floats of old designs
On outdated models, float elements are used, made from sealed hollow containers of cubic, spherical, cylindrical or other volumetric shapes. Sometimes their shells lose their tightness, they take on water and sink. Normal repair of a toilet float of this design is practically impossible, therefore, the part that has lost its buoyancy must be replaced.
Attention! Before adjusting the float in the drain tank, you should turn off the water supply tap to the plumbing fixture. This will protect you from a flood if the intake valve body accidentally breaks.
If the tightness of the shell is not broken, then the shape of the rocker may need to be adjusted (Fig. 3, item 3). The rods of the brass levers are bent, but the mating geometry of the plastic segments made from twisted plastic segments is changed by tightening the bend of the knee angle (Fig. 14). If the valve in the toilet cistern did not have time to shut off the water before its level reached the edge of the overflow tube, then the “arc” of the rocker arm protrudes upward more strongly. Accordingly, for later closing of the filling valve, the rocker arm is bent down.
Figure 14
Floats of modern toilets
Before figuring out how to adjust the float in a modern toilet, it’s a good idea to carefully study its structure. The locking mechanism of the filling system contains some fragile plastic parts that are quite easy to damage. If you have preserved the factory instructions containing a diagram of the product, then the setup task will be even simpler.
The operation of diaphragm valve models is usually controlled by floats made of dense plastic, similar to inverted glasses (Fig. 15, item 1). This is true for filling fittings with both side (Fig. 8) and bottom (Fig. 15) water supply connections. Therefore, the submerged position of the floating element can be observed in two cases:
- when dirt has filled and stuck inside the glass, which rarely happens;
- The float in the toilet cistern is stuck on guide 2.
Both problems can be easily eliminated; you just need to wipe the internal cavity of part 1 and adjust its fit.
Figure 15
If, after filling the tank before overflowing, the water supply still does not shut off, check whether the free play of the lever 4 of the diaphragm valve 3 remains. Perhaps it simply does not have enough lifting height. Then the toilet float is lowered lower to shut off the flow earlier (by analogy with adjusting the bend of the rocker arm). To do this, rod 5 is rotated or relatched (depending on the specific model of the valve) to ensure the required position of the parts of the locking mechanism.
Liquid supply is not activated
The main reasons that the drain tank does not fill, in the absence of problems with the float, both on old and new models of plumbing, are often associated with a malfunction of the inlet valve. This equally applies if the adjusted float in the toilet does not shut off the water.
The inlet of the rod valve (Fig. 3, item 10) or diaphragm valve (Fig. 16, plastic cone) should be inspected for contamination. Foreign solid particles can completely block the flow of fluid or, conversely, interfere with the tight fit of the elastic element of the valve, which causes fluid leakage. The passage hole is carefully cleaned with a wire of suitable diameter. In addition, leaks can also be due to a defect in the gasket (Fig. 3, item 6) or membrane (Fig. 16), which must be replaced as they wear out.
Figure 16
When purchasing new plumbing fixtures or shut-off valves separately, it is necessary to take into account that the membrane-type float valve (modern model) has operational restrictions on the minimum pressure threshold. Usually it corresponds to 0.5-1 atm. If the pressure in the water supply network is unstable or low, the valve may stop opening. The filling of modern sanitary fixtures is also sensitive to increased pressure, so it is worth considering installing a reduction reducer for your home plumbing.
Water detected outside of plumbing fixtures
It often happens that puddles of water constantly collect on the floor of the toilet. There can be many reasons for such troubles, and not all of them are related to the operation of the float in the toilet or other sanitary fittings. The surfaces of the floor, plumbing fixtures and all connections should be wiped dry. A good indicator for determining the area of leaks is a newspaper spread on the floor - falling drops are clearly visible on it. Frequent causes of such malfunctions are:
- the elastic insert between the bowl and the toilet cistern has lost its elasticity or is not compressed enough when assembling the kit;
- laying the threaded fitting of the filling fittings, through which it is secured to the wall of the tank;
- a leaking toilet flush valve or float valve, as well as a low overflow pipe. The constant discharge of cold water leads to the formation of abundant condensation on the external surfaces of ceramic plumbing. As it accumulates, it flows onto the floor, forming puddles;
- broken tightness of the connection between the toilet outlet and the sewer outlet.
Features of the tank
The mechanism for draining water from the tank is of two types. In the first, all the water is drained when you press a button or when you lift the handle up. The first option provides two buttons for rational use of water. When you press one of them, the water is partially drained, and using the second you can remove all the water from the tank.
If the flush works normally, then water flows into the toilet bowl quickly and without delay with a characteristic sound. If problems arise, the flow of water either does not stop and the walls of the toilet are constantly wet, or the water overflows from the tank.
This kind of breakdown can cause flooding of the toilet room, or provoke the formation of limescale on the walls of the toilet and, undoubtedly, lead to high water consumption due to its constant supply. Another sign of a malfunction may be the appearance of condensation on the cold water pipe that leads to the toilet.
Sometimes, to eliminate a leak, it is enough to clean the tank and parts from plaque and rust. They appear due to poor quality water and failure to follow simple plumbing hygiene rules.
To avoid further problems and eliminate the leak, it is important to find out the cause of the leak and determine in which part of the tank the breakdown occurred and check all the parts. To do this, you need to turn off the water in the riser, then clean the tank and study the design.
How to shut off the water riser in an apartment
There comes a time in a person’s life when the water in an apartment, house or other premises is cut off. This is due to a problem with cold or hot water supply, damaged mechanisms, or preparation for a sudden climate change.
To shut off the hot water in the apartment, you will need valves located on the supply pipes. This is enough in case of a faucet repair or pipe leakage.
Even when used correctly, inexpensive and counterfeit items sometimes fail to cope with their load. In our case, this is a valve. Only durability and strength determines the period of a quiet life.
A polypropylene ball arm is a good option because there are no threaded connections. They are reliable and don't cause too many headaches. If something happens, a soldering iron can easily cope with the flaw.
Many people place more trust in bronze and brass products. It is possible to tighten, unscrew, or replace the stripper yourself; they also believe that such an alloy is more reliable.
Several types of durable and reliable cranes from different production series.
Anyone who cares about a long, quiet life should take a little time to search for popular models.
If you don’t know how to turn off the water in your apartment, use a riser. An important lever, attached to the wall in a vertical position, is turned off for a while and the water stops flowing regardless of the actions of turning the valve. Except in emergency situations, loading under pressure is prohibited.
The main causes of extraneous noise in the tank
To deal with a problem, you need to understand its source. In the case of noise in the tank while filling with water, experts identify the three most common problems that cause the toilet to “sing”:
Faucet gasket wear
A shut-off valve is installed in the toilet cistern, which is responsible for shutting off the water supply to the toilet if necessary. With prolonged use, the rubber gasket near the faucet begins to wear out and tear. When the flow of water passes through this damage, a strong noise and hum appears.
No tube on tap
Each tank with top water supply is equipped with shut-off valves, which have a bottom water outlet. It is in this area that there should be a tube, which is responsible for ensuring that water flows down the wall of the tank or is supplied to the very bottom when collected. If there is no such tube, the strong water pressure when drawing water will create noise.
Salt coating
It's no secret that the water flowing through our water supply system leaves much to be desired. Impurities, salts, etc. settle on the inner walls of the tank, inside taps, tubes, floats and other mechanisms. This plaque prevents the normal supply of water, and as a result, a decrease in pressure causes extraneous sounds.
A few words about the design of the tank fittings
Before I tell you why a toilet tank may leak, I will introduce you to the design of the fittings so that you understand the principle of its operation.
Of course, there are currently a great many options for mechanisms.
However, the principle of operation of the tank always remains the same, since any fittings include three main elements:
- shut-off mechanism - is a tap that automatically shuts off the water as it enters the tank. The float is responsible for the water level at which the shut-off valve is activated;
- discharge system - is a valve that closes the drain hole. The valve is controlled by a button or lever;
- overflow system - prevents flooding of the apartment in case of failure of the locking mechanism. If the water in the tank rises above a certain level, the overflow system ensures that it is drained into the toilet.
How to replace a toilet with your own hands - dismantling, installation and connection
You may need to install or replace a toilet under a variety of circumstances: moving, renovation, or unexpected breakdown. If you don’t have time to wait for a plumber or want to save money, then it’s quite possible to do it yourself.
- Tools and components
- Preparation: removing the old toilet
- Installing a toilet
Tools and components
Before replacing the toilet, you need to make sure that everything you need is at hand.
- Toilet with cistern. It is better to opt for monoblocks, in which the toilet itself is attached to the cistern. They are well adjusted to each other, there is no need to worry about leaks. A rubber seal - trapezoid - between the tank and the toilet is included in the kit. If the tank and toilet are purchased separately, then you definitely need to buy it. Bolts for screwing the toilet to the floor are also often included in the kit; if they are not available, then select fasteners of a suitable diameter, usually 10 cm long.
- Hoses and pipes. You will need a flexible hose in a metal braid of sufficient length to connect the tank to the water supply, as well as a corrugated pipe to connect the toilet to the sewer. They need to be paired with rubber gaskets and a sealing collar for the corrugated pipe. Flexible pipes allow you to slightly vary the installation location of the toilet and make this work easier, although water supply and drainage can also be done using polypropylene pipes, the connection of which we have already written about.
- thin piece of dense rubber 1-2 mm thick for the backing under the toilet to prevent cracking of the tiles on the floor.
- Tools: hammer drill with 10 mm concrete drill, wrenches, screwdriver, pliers. If the pipes are metal, then you will need a grinder or a hacksaw.
How to remove the tank completely if repair is impossible?
If your toilet cistern cannot be repaired, it should be carefully replaced - but how do you do this? You need to act in a certain sequence:
- Stop water supply. Using a Swedish adjustable wrench, disconnect the water line.
- Unscrew the drain button.
- Remove the cover.
- Unscrew the two screws that attach the bowl to the toilet (they are located at the bottom of the tank).
- Install a new one in place of the old gasket. This will help avoid possible leaks in the future.
- Attach a new tank to the toilet, strictly following the reverse sequence of actions.
If problems arise with the operation of the toilet, there is no need to panic and immediately contact a specialist. Having a few screwdrivers and pliers at home, as well as listening to the recommendations of experts, you can do all the work yourself, even if this is your first time.
- https://www.rmnt.ru/story/sanitary/remont-izamena-slivnoy-armatury-bachka-unitaza.1457596/
- https://sovetporemonty.ru/santexnika/kak-samostoyatelno-zamenit-armaturu-slivnogo-bochka.html
- https://sekretymastera.ru/nowosti/kak-zamenit-armaturu-unitaza/
- https://vannayaa.ru/unitaz-bide/zamena-armatury-v-slivnom-bachke-unitaza.html
- https://sansovet.com/remont/unitazy/slivnoj-bachok.html
The boner may not be yours
Pipe lines are sometimes very confusing, especially if you are loading something in the basement. You can find your line by agreeing with your neighbor to knock on the pipe - to hear a clear sound and distinguish your being from someone else’s. You don’t have to hit it too hard, because the rust clumps together and fills all the space in the tracks, causing additional stress.
When the owner has found his risers, but cannot turn off the water, then the whole issue is faulty fittings. To begin checking, fixing, and turning on your valves, you need to turn off the water load throughout your home. This must be done immediately, because dissatisfied apartment residents will have time to call the REU.
TIP: When inspecting your valves, you need to keep all the necessary items on hand so that the loading is as productive as possible.
The central valve is cast iron and when turned clockwise the water will begin to subside. When you turn it on and the water does not subside, a knowledgeable person will tighten the engines with a gas wrench, and if it makes noise again, then turn it on again and close it again. Another option is to tighten the stem and tap it with a gas wrench, then open and close it again. The seal may become very tight due to long use or corrosion, so the stem may not interact well with the valve.
If the shutoff methods do not help, then there is only one application left to the REU to turn off the water. A locksmith will come and clear the blockages or decide to completely replace the valve on your home.
At the first sign that there is a leak on your property or in your apartment, you need to take the necessary measures to eliminate it. If left unattended, it may result in property damage and harm to others. Only if the leak is small can you handle it yourself. In case of really serious leaks, you should contact the rescue team.
A number of works necessary to prevent leakage of heating or plumbing:
- Shut off the water supply using a valve or house shut-off valve. If this is not possible, you need to let the water drain into a separate bucket.
- A piece of rubber will help to temporarily stop the gust of water by placing it in the shape of a C. The filler should be larger in size than the place where the breakdown occurred. Wait for the plumber.
- Press sealed glue into the leaking area and it is recommended to first clean the area inside the pipe. For convenience, gloves are worn.
When pipes are leaking, work must be done as quickly as possible, because slow action will affect your finances and the meter.
Who should turn off the water - yourself or a plumber
It is possible to shut off the water supply to only one apartment if the bathroom has the appropriate fittings. This shutdown technique is suitable for minor repairs, such as replacing a faucet. Such taps can be located in the bathroom or kitchen, in residential buildings built in recent years. In addition, some homes have sensors on the pipes with an automatic mechanism that is triggered when a problem occurs.
If it is necessary to replace larger plumbing equipment (toilet, bathtub), the homeowner turns off the water along the entire water riser.
Thus, the supply will be cut off for several homeowners. To shut off the resource, you need to turn the valve clockwise until it stops.
But if the apartment building is old, then there may be no taps in the bathroom. Then you need to call a plumber from the management company. In this case, the water will be shut off not in one apartment, but in the entire entrance.
If there is a break in the main water supply, the supply may be cut off in the entire house or in several buildings at once.