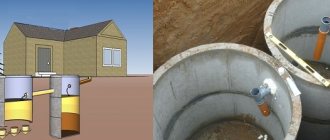
Even if the house has a centralized water supply, a well will not be superfluous: it is too expensive to water the garden or flower beds with tap water, and in case of a power outage it will be very useful. At the dacha, this is generally the main and only source of life-giving moisture. So its value is difficult to overestimate. Building a well with your own hands is not easy, but it is possible. Even if you decide to hire a crew (physically difficult), you will need to supervise them. Not everyone does it the right way. More often, as it is easier and faster. So you need to know how it should be.
How to choose a place
The most reliable way is to order hydrogeological studies. You will get the exact location where you need to dig with an analysis of the water that will be there. But this service is not cheap and is worth it if you plan to use the water for drinking, that is, near your permanent home. At the dacha, you need it mostly for technical needs, and before drinking water, you can only clean the part that goes into the house.
If you do not order research, be guided by several signs at once:
- position of wells in neighboring areas;
- analysis of growing plants;
- observations of insects and animals;
- traditional methods.
All these methods are only ways to roughly determine where aquifers may lie. None of them gives guarantees, but if as a result of several methods you get a more or less specific place, it makes sense to try to dig a well here.
Wells in neighboring areas
You probably know that rock layers are completely uneven, just like aquifers. If your neighbors have water at a distance of 6 meters, this does not mean that you will have it exactly there. It may be higher or lower, or it may go sharply somewhere to the side. So this is only an approximate “sighting” on the ground.
The aquifer can lie at different levels
Plants
This method is suitable if the area has not yet been plowed. You examine the “local” vegetation, identifying islands of characteristic grass. Not single plants (they can be accidentally introduced), but islands, clearings, etc.
Plants indicating the depth of the aquifer
Observations of animals and nature
The best predictors are small midges. In the warm season, in calm weather, in the evening, before sunset, look at the site. If there are places where midges “hang” in columns, most likely there is water in this place, and quite close.
Midges hover in places where the water comes closest
To verify this, you can observe this place in the morning. If the water is really close, there will be fog swirling around here.
By the “concentration” of fog you can determine where the water is closest
Traditional methods
We find a clay vessel. Preferably not glazed. But it’s hard to find one now, so any jug or pot will do. Not even this? You can also use a regular pan, just a wide one.
Oven-dried silica gel is poured into the dishes. You don’t have it, don’t know where to get it? Take ceramic bricks, break them into fine crumbs (not flour, but crumbs), and dry them in the oven for a couple of hours. Fill the container to the top, tie it with a dry cotton rag. Just so that it doesn't come undone. Weigh and write down the result.
In the expected location/locations of water, dig a hole 1-1.5 meters deep, place a pan in it and cover it with earth. Leave it for a day. Then you dig it up and weigh it again. The more the mass has changed, the more water there is in a given place (or closer to the surface it is located).
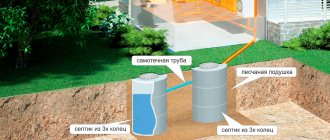
Drop tanks
Quite often there are areas located on the slopes of the area, where elevation changes range from one to 10 meters. In such cases, for proper installation of the sewer system, differential wells are installed in the areas. The maximum angle of inclination of the pipe should be no more than three meters; otherwise, it is better to make a stepped structure with a gradual drop of no more than one and a half or two meters.
The distance in this case will be considered the same as with turning ones. In both cases, installation will take place in places where the angle of the pipe changes. Accordingly, when making calculations, one should proceed from the bends of the sewer line and install mechanisms that level out the strong slope of the terrain.
Best time
There are two periods when it is best to dig a well: the second half of August and the middle of winter - after two weeks of frost. At this time, the groundwater level is at its lowest and there is almost no high water. So it will be easy to work and you will not miss the determination of the flow rate - at this time it is minimal and you will not have to suffer from a lack of water in detail.
Winter and late summer are the best times to dig wells
If a team works, they can do it in a few days: two or three, sometimes more. If you plan to work alone, you may not have enough time in August. This is the “border” zone - before the rains. Then we need to start work earlier. Maybe since the beginning of August. At this time, there is already little high water, and by the middle of the month (even if you work alone in the evenings) you will already be near the aquifer. In general, try to time it so that the exit to the aquifer occurs at the most “waterless” time. It is also advisable to complete the waterproofing of the walls.
Waterproofing of sewer mines
High-quality waterproofing is the key to the proper functioning of the sewage disposal system. The tightness of the structure ensures the absence of foreign water, in particular groundwater, in the sewer line. Their entry into the sewer accelerates the process of accumulation of sewage in the well. Accordingly, poor waterproofing affects the frequency of calling a sewer truck to pump out wastewater.
Waterproofing is carried out in accordance with the following rules:
- Before applying sealing compounds, the joints of reinforced concrete rings are cleaned of dirt and then moistened to increase the adhesion of the mastic to the concrete surface;
- Waterproofing is carried out using waterproof mastics, which fill the gaps between reinforced concrete rings;
- The waterproofing must dry evenly over the entire area of the gap, so it is prudently covered with polyethylene.
A sewer well is the main element of a sewerage system, which can have several functional purposes. Some types of structures are used as a waste collection point, while others are used to control the operation and clear the sewer line of blockages. In the process of assembling sewer shafts, it is necessary to take into account SNiP standards, which relate to the parameters of the installed equipment, as well as the level of the pipeline and the distance between structural elements.
https://youtube.com/watch?v=Lg7l8vHw13s
Type and structure
If you have decided on the location, all that remains is to choose what kind of mine you will make your mine. You can only dig a mine well, and you can drill an Abyssinian well. The technology here is completely different, so what follows will be about the mine well.
Well shaft type
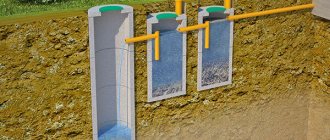
The most common one today is a well made of concrete rings. Common - because it's the easiest way. But it has serious drawbacks: the joints are not at all airtight and through them rain and melt water enters the water, and with it what is dissolved in it and what has drowned.
Disadvantage of a well made of rings and logs
Of course, they try to seal the joints of the rings, but the methods that will be effective cannot be used: the water must be suitable at least for irrigation. But simply covering the connections with a solution is very short-lived and ineffective. The cracks are constantly increasing, and then through them not only rain or melt water enters, but also animals, insects, worms, etc.
There are rings with a lock. Between them, they say, you can lay rubber gaskets that will ensure tightness. There are rings with locks, but they are more expensive. But gaskets are practically never found, as are wells with them.
The log mine also suffers from the same “disease,” only there are even more cracks. Yes, that's what our grandfathers did. But, firstly, they had no other way, and secondly, they didn’t use so much chemicals in the fields.
From this point of view, a mine made of monolithic concrete is better. It is cast right on site using removable formwork. They poured out the ring, buried it, put up the formwork again, stuck in reinforcement, and poured another one. We waited until the concrete “set”, removed the formwork again, and started digging.
Removable formwork for a monolithic concrete well
The process is going very slowly. This is the main drawback. Otherwise there are only positives. Firstly, it turns out very cheap. The costs are only for two galvanized sheets, and then for cement, sand, water (proportions 1: 3: 0.6). It's much cheaper than rings. Secondly, it is hermetically sealed. No seams. Filling occurs approximately once a day and due to the uneven upper edge the result is almost a monolith. Just before pouring the next ring, scrape off the surface of the raised and almost set cement laitance (a gray dense film).
How to identify an aquifer
According to the technology, the soil is removed inside the ring and under it. As a result, under its own weight, it settles. This is the soil that you take out and will serve as a guide.
As a rule, water lies between two waterproof layers. Most often it is clay or limestone. The aquifer is usually sand. It can be small, like seaweed, or large interspersed with small pebbles. Often there are several such layers. As the sand goes, it means water will appear soon. Once it appears at the bottom, you need to dig for some more time, removing the already wet soil. If the water is coming actively, you can stop there. The aquifer may not be very large, so there is a risk of going through it. Then you'll have to dig until the next one. The deeper the water will be cleaner, but how much deeper is unknown.
Next, the well is pumped - a submersible pump is inserted and the water is pumped out. This cleans it, deepening it a little, and also determines its flow rate. If the rate at which the water rises suits you, you can stop there. If it’s not enough, you need to quickly go through this layer. With the pump running, they continue to remove soil until they pass through this layer. Then they dig until the next water carrier.
Bottom filter in a well
Construction of a bottom filter for a well
If you are satisfied with the speed of incoming water and its quality, you can make a bottom filter. These are three layers of cameos of different fractions, which are laid on the bottom. They are needed to ensure that as little silt and sand gets into the water as possible. In order for the bottom filter for a well to work, the stones must be laid out correctly:
- Large stones are placed at the very bottom. These should be quite large cobblestones. But in order not to greatly reduce the height of the water column, use a flatter shape. Lay them out in at least two rows, and do not try to have them stand close together, but with gaps.
- The middle fraction is poured in a layer of 10-20 cm. The dimensions are such that stones or pebbles do not fall into the gaps between the lower layer.
- The top, smallest layer. Pebbles or small stones in a layer of 10-15 cm. Sand will settle in them.
With this arrangement of fractions, the water will be cleaner: first, the largest inclusions settle on large stones, then, as you move up, smaller and smaller ones.
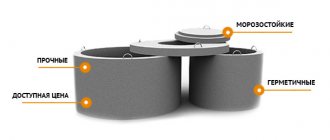
Advantages of concrete wells
The use of concrete rings in the construction of wells is an effective and cost-effective solution due to a number of factors. Among them:
- affordable cost of concrete, reinforcement and, as a result, low price of structural elements;
- increased resistance of seam concrete products to soil shear;
- a wide range of designs with a wide range of sizes, allowing for the construction of communications for various purposes;
- high level of structural strength and reliability;
- durability of the structure, which is estimated at a service life of at least 20 years;
- high frost resistance;
- low surface permeability, which allows the use of products under conditions of exposure to aggressive environments;
- moisture resistance;
- cost-effectiveness of the structure;
- high degree of resistance to compressive loads arising during operation due to soil pressure;
- high speed and ease of installation work.
Digging methods
There are two technologies used to dig a well. Both methods are used, just at different depths. And both have their drawbacks.
Alternate installation of rings
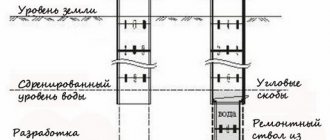
The first ring is placed on the ground, which is gradually removed from the inside and under the side. Gradually the ring lowers. There is a very important point here: you need to make sure that it goes straight down, without distortions. Otherwise, the shaft will turn out to be inclined and, sooner or later, the settlement of the rings will stop.
To avoid skewing, it is necessary to control the verticality of the walls. This is done by tying a plumb line to a block and placing it on a ring. Additionally, you can control it at the top level.
Tools needed for digging a well
When the upper edge of the ring is level with the ground level, roll the next one. It is placed strictly on top. The work continues. If on the first ring the soil can be thrown over the side with a shovel with a shortened handle, then on the next ones you have to remove it using a gate or a tripod and a block. In this way, at least two people must work, and at least three, or even four, are needed to move the rings. So it is impossible to dig a well yourself, with one hand. Unless you can adapt a winch.
So, gradually, the depth of the well increases. When the ring is lowered to the ground level, a new one is placed on it. To descend, use driven brackets or ladders (more correctly, brackets).
The advantages of this method of digging a well:
- You can check how tight and even the ring has become.
- You can lay the same rubber gaskets that will ensure tightness or place them on the solution.
- The walls do not crumble.
These are all advantages. Now about the cons. Working inside the ring is inconvenient and physically difficult. Therefore, using this method, they dig mainly to a shallow depth - 7-8 meters. Moreover, they work in the mine in turns.
The structure of the “knife” for easier penetration of soil when digging wells
One more point: when digging a log with rings, you can speed up the subsidence process and facilitate the passage of soil using a knife. It is made of concrete and is poured into the ground at the very beginning. To form it, dig a groove in a circle. In cross-section it has a triangular shape (see picture). Its inner diameter coincides with the inner diameter of the rings used, the outer diameter is slightly larger. After the concrete has gained strength, a “standard” one is placed on this ring and work begins.
Installation of rings after reaching the aquifer
First, a shaft without rings is dug. At the same time, they watch the walls. At the first signs of shedding, they place rings inside and continue to deepen using the first method.
If the soil does not crumble along its entire length, when it reaches the aquifer, they stop. Using a crane or manipulator, rings are placed into the shaft. Then, they deepen it a couple more rings using the first method, increasing the flow rate.
First they dig a mine down to the aquifer, then they put rings in it
The technique for excavating soil is the same here: as long as the depth allows, it is simply thrown out with a shovel. Then they put up a tripod and a gate and lift it in buckets. After installing the rings, the gap between the walls of the shaft and the ring is filled up and compacted. The top few rings can be sealed from the outside (with bitumen impregnation, for example, or other coating waterproofing).
When working, control of the verticality of the walls is also necessary, but it can be adjusted within certain limits. The control method is similar - a plumb line tied to a block and lowered into the shaft.
Advantages of this method:
- The shaft is wider, it is more convenient to work in it, which allows you to make deeper wells.
- Several upper rings can be sealed externally, which minimizes the possibility of the most contaminated water entering.
There are more disadvantages:
- It is difficult to check the tightness of the joint of the rings: it is prohibited to be in the shaft during installation. It is impossible to move an already installed ring in it. It weighs hundreds of kilograms.
- You can miss a moment, and the mine will crumble.
- The filling density of the gap between the shaft wall and the rings remains less than the “native” soil. As a result, melt and rainwater will seep deeper, where they will get inside through the cracks. To avoid this, make a protective circle around the well made of waterproof material (waterproofing membrane) with a slope away from the walls of the well.
Stages of sewerage installation
- Drawing up and coordination of the project. A sketch of the pipe layout is created, the types of installation work are determined, and the required amount of materials and components is calculated;
- Preparatory work. This includes, for example, dismantling old sewers or digging trenches and drainage holes;
- Installation of risers and sewer pipes, connection to plumbing points;
- If available, installation of an external sewer pipeline and treatment system;
- Checking connections;
- Commissioning.
The cost of sewer installation will depend on the need to dismantle the old system, the complexity of the work to be done and materials.
Installation of internal sewerage
In other words, this is the installation of a sewer system within the boundaries of an apartment or house. This includes replacing or installing a riser and laying a pipeline from it with subsequent connection to devices.
When replacing a riser in an apartment, the pipe is replaced within one or several apartments of a common riser. In a private house, the riser is led outside, its upper part acts as a ventilation hole. The remaining pipes are laid horizontally, at a slight angle to ensure gravity flow.
The standard installation of pipes in an apartment involves running three lines from the riser leading to the bathroom, bathroom and kitchen, where plumbing fixtures are located.
For a home, the distribution of appliances does not matter, because any number of risers can be installed there. Sewage pipes can be laid both on top and inside the floor or walls.
Installation of external sewerage
A private house must have its own sewage drainage system. Therefore, an underground pipeline with a thickness of 11 to 20 cm is laid, which will discharge wastewater into a cesspool or treatment plant.
Pipes underground must be protected from destruction by soil, so a layer of sand is poured under them and on them and filled with water. At the entrance of the pipe to the cesspool, the depth must be at least a meter, otherwise there is a risk of freezing. Every 25 meters or at turns, at differences in height of the pipeline being laid, inspection wells are installed.
There are two methods of operating a sewer pipeline: gravity and pressure, in which wastewater is discharged by pump pressure.
Installation of an autonomous cleaning system
The installation process involves digging a pit at a depth of up to 3 meters. For a station with soil post-treatment, you need to install either a filter well or an absorbent trench - special drainage pipes.
If you plan to install a biological treatment station, an additional filtration well or drainage ditch is dug.
Commissioning
If you think you dug a well and that's the end of it, not at all. You still have a series of daily exercises to do. You can do them yourself, without any help. First you need to waterproof the walls from the outside, then clean and wash the walls from the inside and pump out the water - clean the well.
After the well is dug, it takes a couple of days for the rings to settle and take their places. At this time, nothing needs to be done inside, but you can do external waterproofing.
Waterproofing
If the well was made using the second method - first they dug a shaft, then installed the rings - this stage is a little simpler. You will need to widen the gap slightly to make a waterproof seal. If the rings were installed right away, you will have to dig a decent ditch around. At least until the middle of the second ring. When the soil has been removed, we proceed to waterproofing.
It is best to use a coating. You can use bitumen mastic, you can use other compounds. In principle, you can fuse or glue roll waterproofing, or in the worst case scenario, wrap it in film. Film is the cheapest, but it will last no more than two years, and only if you buy it expensive and reinforced.
Waterproofing, on top of which insulation is laid (foam shell)
Since you dug a well anyway, insulate it. You may not be at your dacha in winter for now, but maybe later the cold weather will come. So make sure you have water in advance.
Cleaning walls and internal sealing of seams
A couple of days after the well has been dug and the glass has sunk, you go down inside with a broom and sweep the walls. Then you wash the walls: you pour them on them and sweep them with a clean broom. Douse it again, then with a broom. The water was pumped out and drained away. The next day the procedure was repeated. So - five, seven, ten days. Until the inside and water become clean.
One more thing. Not all teams immediately coat the joints of the rings. Then after the first cleaning you need to coat the joints with a solution (cement:sand in a ratio of 1:3). To improve the effect, you can add PVA or liquid glass (instead of some of the water, or dilute the PVA with water). It is also advisable to ensure against horizontal shifts of the rings. Especially if they don't have locks. To do this, adjacent rings are fastened with metal plates, which are attached to anchors. This measure is strictly necessary on unstable loose or highly heaving soils.
Connecting rings with metal (preferably stainless steel) plates
After the walls are washed, the water is pumped several times, you can use the water. But to prevent anything from attacking inside, it is necessary to close it. Read about how to make a house for a well here.
For some of the features of digging wells and cleaning them, watch the video.
Characteristics of reinforced concrete rings
Reinforced concrete rings from which water wells are installed are manufactured in accordance with GOST 8020-90. It establishes a list of technical characteristics of prefabricated reinforced concrete rings for wells. These types of workpieces have a number of differences from each other, for example, in diameter, which can be 750-2000 mm in increments of 250 mm. If we take into account the height of the rings, the standard parameter is 800-900 mm. Reinforced concrete products, namely rings, are divided into 2 subgroups:
- with a lock at the end;
- without a lock.
The lock ensures the creation of a more airtight connection of reinforced concrete rings with each other. The structure is durable and airtight. Products without a lock are secured with metal staples. In general, reinforced concrete rings have the following advantages:
- strength and reliability of elements;
- short duration and ease of installation.
The service life of prefabricated reinforced concrete rings for the construction of wells is calculated in decades in any climatic conditions, if they are manufactured in accordance with GOST. This characteristic depends on the properties of the reinforced concrete used. The disadvantage of the products is their significant weight, although this characteristic is not considered critical. The estimator, when determining the number of blocks required for construction, first calculates the volume of reinforced concrete rings for wells. To do this, you can use the following formula:
V = Lx3.14xR (where V is the volume of the well, L is the height of the structure, R is the radius).
The exact price for reinforced concrete rings is set depending on their volume. Usually the norm is 0.16-0.54 m. And the volume of the future structure depends on the size of the rings.
Safety at work
Digging a well (with your own hands or with a team) is hard and dangerous work, especially after the first three rings have been dug. The buckets have to be pulled out with a winch, a winch or a block, but it is heavy. It may break - or the rope or handle may not hold up. Therefore, it is necessary to comply with safety rules:
- Anyone working below must wear a helmet.
- Buckets should have a strong handle, preferably welded, made of thick wire in several layers.
- Tie the buckets to a strong rope, at the end of which there is a powerful carabiner with a reliable fixation system.
- Periodically check the condition of the rope, bucket handle and carabiner.
- When lifting buckets, the person working below should be on the opposite side.
- Work below one by one.
The main thing is to follow safety precautions
Believe me, precautions are not unnecessary. Better to play it safe.
How they dug a well: photo report
We dug using the first method - immediately put rings. Three people worked, taking turns: no one stayed inside longer than “one ring.” This is all the details in a nutshell. The rest is as we go along.
First, they brought the rings and laid them out on the site. A knife was assembled from specially shaped wooden planks.
Rings for a well on the site
This is what knife boards look like
It turned out to be a ring, according to the size of which they began to dig around the chosen place.
In the background lies a wooden knife for digging a well with rings
They dig strictly according to the size of the knife
The first concrete ring is laid on this ring. At first, the soil was only discarded - as long as the depth allowed.
The first one is ready
We installed the second one, sealed the seams inside and outside, and went on digging.
Second ring installed
When the second one went level with the ground, we set up a tripod with a winch and a block. So they lifted and lowered the digger and buckets of rock.
The tripod is placed before installing the third ring
Now: one is digging, the second is “twisting” on the winch, the third is dumping the soil. The same winch was used to lower the well into the shaft.
Go))
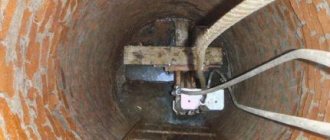
They buried the sixth ring and after that water appeared. If you look at the soil, it looks like this: black soil, sand, clay, aquifer. This means that the layer where water flows is separated by clay that is poorly conductive. This is very good - the water should be good, as it turned out later.
Glimpses of water are visible
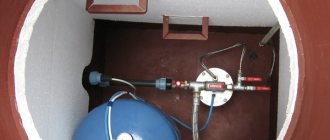
After this, three more rings are installed. One is left for the end of August, when the water is lower, we will lower the well another meter. Then the procedure is standard - wash the walls, pump out the water. So six times - seven times. Afterwards, we saddled the head on the well and installed all the stuffing - the gate, pulled out the cable from the house, and installed the socket. The plans are to bring water into the house.
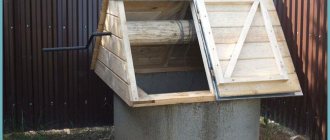
This is what a well looks like “in a house”