When the installation of the roof and facade is completed, postponing the construction of a rainwater drainage system not only makes no sense, but is also irrational. The first heavy rain will show that water falling uncontrollably threatens the walls, foundation and basement. Its power is no less destructive for flower beds planted directly next to the house. The Docke drainage system can help you cope with the elements.
Materials
Docke uses the latest materials with unique qualities for its products. For example, for seals used in joints, siliconized rubber is used, which combines the properties of natural rubber and polymer due to silicon and organic compounds. This two-component rubber is capable of maintaining its original characteristics for a long time when operating at temperatures from –5⁰С to +48⁰C. If the temperature does not exceed +10⁰С, its service life is unlimited. It is resistant to rain and wind, sunlight and salt water, surpassing rubber in its qualities.
The PVC plastic from which the trays are made has amazing strength. It is capable of deforming under load and regaining its shape after the load is removed. This property comes in handy when ice freezes in the gutter. At the point where it freezes, the tray changes shape, however, it completely restores it when the ice melts. If the system is installed correctly, there should be no water left in the tray.
Dock funnel installation instructions
The installation of the structural element is carried out on fixed gutters, but before that you need to make holes in them through which water will flow down the pipe. When cutting, you should pay attention to the size of the hole, otherwise the liquid will flow past it.
What tool is used to cut the hole? The best option is a fine-toothed hacksaw, but you can also use metal scissors.
The funnel is attached to the gutter using a special fold connection, at which the clamp is bent.
Advantages of Döke drainage systems
With the development of plastics, PVC structures are increasingly replacing metal equipment with their low prices, excellent quality, ease and simplicity of installation without special tools, interesting colors that do not fade from the sun, immunity to aggressive precipitation substances, light weight, low noise and other advantages.
Gutters are a great construction set for adults, and having completed the assembly and installation of which, “adult children” feel like creators. The result of this “game” will be peace of mind for the home owners and protection from moisture for many, many years. The design of the Deke designer can bring elements of futurism or classics into the image of housing and is suitable for a wide variety of types of finishing materials.
The production of Döcke brand drainage systems has been established in our country since 2009. Therefore, the Standard, Premium, Lux modifications are perfectly suited to Russian conditions. The manufacturer's Dmitrov plant is equipped with Austrian and German equipment.
Features and Benefits
According to experts, without drainage, the collapse of stone walls due to the ingress of water and the resulting mold occurs 10 years earlier than usual, for wood - 20. The foundation of the house, the foundation, collapses 2 times faster. In order to protect facade panels from the destructive influence of natural factors, a drainage system is used.
The new system drains use advanced European technologies, equipment and a standard of quality raw materials. German technologies allow us to carefully bring the technological process to perfection.
Plastic can withstand various types of loads and all elements are highly sealed. In addition to the above qualities, Deke products offer reasonable and affordable prices.
The Docke drainage system is resistant to ultraviolet radiation, does not fade, maintaining its original color. It has a full palette of colors, which allows you to emphasize the contours of the structure.
Temperature range from +50 to -50 degrees. The drain is designed to withstand the effects of salts, alkalis and acids found in precipitation.
Due to its low weight (690 g per meter), the system does not put a load on the load-bearing elements, and during installation it simplifies and speeds up the process. WITH QUALITY INSTALLATION AND CARE OF THE SYSTEM, THE OPERATIONAL LIFE OF THE DRAIN CAN EXCEED 50 YEARS.
All elements of the drainage system are symmetrical, which allows for a universal assembly. The inner surface prevents leaves from accumulating. Debris is washed away by rainwater due to the longitudinal ribs, thereby reducing the likelihood of blockages.
Among other important advantages of Docke, the following should be noted:
- warranty period 25 years;
- unlike metal, it dampens the noise of falling water;
- practicality, durability, versatility;
- ease of maintenance and installation;
- strength and resistance to deformation;
- attractive appearance;
- Possibility of installation on various types of buildings;
Calculation of the need for parts
When going shopping, you should make an approximate calculation of the required number of drainage parts. The calculation is simple. To do this, you need to measure the length of the roof overhangs and draw a drainage diagram. There are also rules that must be followed: a longitudinal slope of at least 2% must be provided for gutters, and the distance between drainage pipes should not be more than 24 m.
Calculation example for one overhang 18 m long
The catchment area is calculated as follows:
A x B = S m2
Number of funnels:
It is nominally recognized that a 100 mm pipe copes with the removal of precipitation from an area of up to 220 m2. For smaller pipe cross-sections, you can use the table data:
The number of funnels, taking this into account, is determined by the area of precipitation collection or structurally: at least one funnel per 1 roof slope up to 12 meters long.
If the slope is > 12 m in length, then two funnels must be provided.
In our case Nв = 2 pcs
The number of gutters is calculated based on the length of the manufacturer's parts. For Docke it is 3 m. We divide the length of the roof overhang by this footage:
18 /3 = 6 pcs
connectors than gutters:
Nс = 6 – 1 = 5 pcs
The number of corner parts and plugs is taken from the diagram.
The number of brackets (and extensions) is calculated based on the following rules:
- The distance between them should not exceed 60 cm,
- A bracket is placed on both sides of the funnels and connectors.
Total number of brackets:
Nк = А / 0.6 + 2Nв + 2Nс = 18 / 0.6 + 2 x 2 + 2 x 5 = 44 pcs
The number of pipes is obtained by dividing the height of the wall by the length of the element (3 m) and multiplying by the number of funnels:
Nt = N / 3.0 x Nb = 4.5 / 3 x 2 = 3 pcs
Number of plugs (according to the diagram) 2 pcs;
Number of elbows (with simple architecture) 2 x Nв = 4 pcs;
The number of tips is Nв = 2;
The number of meshes for funnels is equal to the number of funnels;
Number of clamps:
Nhom = (N / 1.5 + 1) x Nb = (4.5 / 1.5 + 1) x 2 = 8 pcs
According to Table 2, the number of couplings can be taken.
All system parts are sold individually. It is most rational to purchase them with a reserve, because it is not always possible to calculate their quantity perfectly accurately. In addition, in some places the parts will need to be trimmed or shortened, and in others they will need to be lengthened. When starting installation, you need to have a supply on hand.
Mounting on the front board using plastic brackets
This work involves performing the following actions:
- The funnel, brackets and connector are secured using self-tapping screws to the front board.
- To install the gutter on the brackets, you must first place the edge closest to the board behind the edge of the clamp.
- After this, the second edge of the gutter is loaded until a click is heard.
Thanks to the simple design of all the elements, the structure can be installed by a person who has never done such work.
Installation
To enable users to install the system themselves, installation instructions are included. Installation of a drainage system must first of all provide the following characteristics and parameters of the finished structure:
- Non-susceptibility to deformation under increased load from precipitation;
- The slope of the tray is at least 2%;
- Correct position of the tray under the edge of the roof overhang;
- Tightness;
- Compensation for temperature extensions.
Measures to ensure system rigidity
To ensure that vertical deformations do not occur in the system, the following measures are applied:
- Additional brackets are placed on both sides of the funnel at a distance of no more than 15 cm;
- 1 additional bracket is placed under the connecting element, the distance between the brackets is strictly up to 0.6 m;
- There should be no more than 15 cm from the end of the corner element of the tray to the nearest bracket;
- No more than 25 cm from the plug to the nearest bracket.
Ensuring slope
There are three options for mounting trays:
- If the fastening is made to the frontal board using plastic brackets, then the funnel and the bracket farthest from it are attached first. In this case, the funnel is attached below it to create a slope of 2% to 3%. A cord is stretched along which all intermediate brackets are attached.
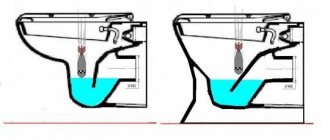
- If there is no front board, and the sheathing has a small pitch, then the trays are supported on metal brackets attached to the rafters. The bracket holders are bent in places according to the selected slope (see figure below).
- For sheathing with large pitches, plastic brackets with an extension are used. The slope is organized due to the position of its attachment point on the extension.
The correct position of the tray under the roof overhang would be such that the latter hangs over the tray at a distance of 1/3 to 1/2 of the diameter of the tray. It is necessary to provide a vertical gap of 3 cm from the line of the roof plane to the outer edge of the side of the tray.
Tightness is achieved by ensuring the cleanliness of the joints and the correct installation of rubber gaskets. To compensate for elongation due to exposure to elevated temperatures, it is enough to correctly mount the mating elements. The connectors have lines labeled “Insert so far.” The ends of the trays must be inserted into the connectors up to these lines.
Mounting features
As already reported, the weir can be secured:
- (plastic brackets) are used on the frontal board;
- On roofs without it (on metal brackets with or without extensions).
In the first case, plastic fasteners, connectors, and funnels are attached to the board with self-tapping screws. In the second case, metal fasteners are used as indicated in the instructions.
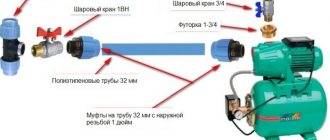
To attach drainage pipes and fix its elements together, Docke developers suggest using a universal clamp. It can operate in the “slip” mode, leaving the pipes the opportunity to elongate with thermal expansion (there should be an inscription “pipe” on the side of the clamp). The “fitting” mode (this inscription should be on the side) is used for rigid fixation. The pipes are attached to the wall with an M6 self-tapping screw. The clamp ring is inserted into the grooves with the arms until they stop.
Assembly sequence
The installation of the drainage system begins with the installation of the drainage part (horizontal). The funnel and the clamp farthest from it are attached first. Their altitude location determines the slope of the trays.
All intermediate fasteners (bracket holders, connecting elements) are exposed; trays are mounted starting from the funnel, to the far edge; plugs are placed at the ends of the outer trays and funnels; Place a mesh in the drain hole of the funnel.
The installation of drains (the vertical part of the system) also begins from the funnels. They are mounted sequentially: a shaped part made up of elbows and a piece of pipe, then a drainpipe is installed and secured to the wall, the last tip is installed, directed towards the rain inlet or rainwater tank.
The installation of drains is completed by pouring tests. Water is poured onto the roof, away from the funnel. If the system has not leaked, and all the water has passed along the prescribed route, the system is installed correctly.
Installation sequence
Installation of a catch basin
- Install the end bracket 5 taking into account clause 2 of the “General Provisions”.
- Install funnel brackets 11. For the version with a frontal plate, funnel 11 is attached without brackets.
- Hang the slope of the gutter from the end bracket to the funnel bracket. For the option with a frontal board - from the cavity of the end bracket 5 to the lower edge of the funnel cut 11.
- Install the brackets for the gutter connector 7. For the option with a frontal board, install the connector itself 7.
- Connector 7 or its bracket is installed taking into account clauses 1 and 3 of the “General Provisions”.
- The distance between the centers of funnel 11 and connector 7 should not be more than 3080 mm.
- Install intermediate brackets 9 taking into account paragraph 3 of the “General Provisions”.
- Secure the funnel 11 and the gutter connector 7 to the fastening elements (bracket, connector). For the option with a frontal plate, funnel 11 and connector 7 are attached without brackets.
- Cut the gutter to the required length 8 and connect funnel 11 and connector 7 with it.
- Cut the gutter to the required length 6 and lay it on the connector and end bracket.
- Repeat the operations for the adjacent side of the roof (bracket 2, gutter 3).
- Install the corner element of gutter 4 into gutters 3 and 6.
- Place funnel plug 12 onto the open end of the funnel.
- Place gutter plug 1 onto the open end of the gutter.
- Insert funnel mesh 10.
Installation of a spillway
- Push the coupling or elbow 13 onto the drain hole of the funnel 11 until it stops, depending on the specific features of the installation site. Secure coupling or elbow 13 to funnel 11 with a self-tapping screw.
- Assemble the required configuration of the figured part of the spillway. (Elbow 13, Pipe section 14, Elbow 15).
- Secure the lower fitting 15 with clamp 16 in the “Fitting” position.
- Place pipe 18 until it stops on the bottom fitting 15 of the figured part of the drain.
- Install the pipe in a vertical position, marking the installation locations of the universal clamp in the middle of the pipe 17.
- Place pipe 18 onto fitting 15. Fix it in clamp 17.
- The middle clamp is installed in the “Pipe” position.
- Cut off the final piece of pipe of the required length 21, putting it on the coupling 19, put the coupling with the pipe on the lower part of the fixed pipe 18.
- Mark the installation location of clamp 20 on the wall of the house at the level with the place where the clamp is fixed on coupling 19. Move 10 mm lower.
- Place the coupling with the pipe (19 and 21) on the lower end of the fixed pipe 18. Fix the assembly in the clamp 20. The clamp is installed in the “Fitting” position. If the length of the pipe section is more than 1500 mm, it is necessary to fix it in the middle with a universal clamp. The clamp is installed in the “Pipe” position.
- Place the tip on the pipe. 23. Mark the installation location of the clamp 22. Move 10 mm lower.
- Place the tip 23 on the pipe 21, fixing it in the universal clamp 22.
- The clamp is installed in the “Fitting” position.
- Let's assume the option of attaching the tip to the pipe with a self-tapping screw.
Installation of drainage pipes on siding
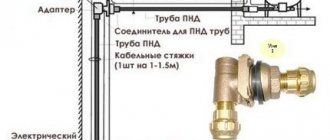
- If there is a significant distance to the wall of the house, instead of an M6 screw stud 1, it is recommended to use an M8 screw stud. If necessary, cut the pin to the required length and drill a hole in the clamp support to the diameter of the pin.
- When installing, it is necessary to drill a hole with a diameter of 10 mm to 12 mm on a flat section of siding.
- Screw pin 1 through the center of the hole into the wall of the house to a depth of at least 40 mm; if the wall is not wooden, you need to install a dowel. The screw part should protrude 20 mm above the siding.
- Screw nut 2 onto the screw part of the stud flush with the siding surface. Place washer 3 with a diameter of 15 mm.
- Place clamp support 4 onto the stud. Screw nut 5 with washer 6 with a diameter of 15 mm from inside the clamp support until it stops.
- Install the clamp in the desired position (“Pipe”\”Fitting”). Tighten nut 2 under the clamp support until it stops, using a wrench to do this.
- Insert the clamp 9 into the clamp support, securing it with an M5x40 screw 7 and an M5 nut 8.
Installation tools
- For marking: tape measure, pencil.
- For attaching brackets: screwdriver, screwdriver, drill.
- To install the brackets: cord, spirit level, hose level.
- For bending metal brackets: bending machine.
- For cuts: hacksaw, miter box, fine-tooth saw.
The lineup
The Döke drainage system is available on the Russian market in three series.
Standard
This economical series is best suited for installation under the roof of small cottages or private houses (rainfall collection area up to 150 m2). To collect and drain water, trays with a diameter of 120.6 mm and drainpipes with a diameter of 80 mm are provided. The trays of this and other series are made symmetrical, so you won’t be able to make a mistake with their installation.
Basically, the palette of the series is represented by pomegranate, brown (chocolate) and creamy (ice cream) colors. Since Russian production uses German materials, a different color can be ordered.
Lux
The series has pipes with a large cross-section to drain water from roofs over a large area. Accordingly, some other details are also enlarged. The plugs are even made in a convex shape, which more effectively blocks the path of a powerful storm flow. The series contains the same technical solutions as the premium one.
Assortment of drains
The Docke gutter system has three product ranges with different kit sizes.
Lux
This deck set includes:
- plugs for gutters;
- collector;
- standard funnel;
- connector;
- clamp;
- fastening;
- hairpin;
- plastic bracket;
- adapter;
- coupling;
- tip.
The Deke Lux drainage system is used in both multi-storey and single-storey buildings and has good characteristics. Available in three colors: brown, gray and white.
Standard
The plastic drainage system Docke (deck) produces a standard series in its product range with its own characteristics.
| components | diameter | length |
| Drain gutter | 12.1 cm. | 3 meters |
| Drain pipe | 8.6 cm. | 3 meters |
The remaining components of the set are similar to the luxury series, but the standard sizes are standard. The product is offered in three colors: white, garnet, brown.
Premium
The premium brand drainage system occupies first place in the market of the Russian Federation.
The length and set corresponds to the brands listed above, but has its own characteristics:
- After mechanical stress, the gutter can restore its original shape.
- The patented universal clamp is capable of securing fittings and pipes.
- Gutter mount with adjustable angle.
- Connection system of elements without sealant and glue, but on seals.
- Patented mounting stops.
- Seals made from silicone rubber retain their properties in all weather conditions.
- Wall thickness (1.8cm).
- Water flow through the gutter (1.8 l. sec.).
- Water flow through the pipe (6.4 l. sec.).
The Docke color palette implements any roofing or facade solution, the main colors are ice cream, pomegranate, chestnut and chocolate.
THE GUTTER GIVES THE FINAL LOOK TO THE ROOF AND FACADE OF A NEW HOUSE OR BUILDING, AND ALSO AFTER RECONSTRUCTION!
Component prices
The cost of the system will depend on the number of parts required, the roof area and its geometry. Color plays an important role in pricing policy. Elements in the Garnet shade are slightly cheaper as they are in less demand among buyers.
Average cost of the main elements of a standard device in rubles:
- funnel – 420;
- gutter elements – 600;
- connectors – 160;
- corners - from 300 to 900;
- pipes – 700;
- pipe elbows – 228;
- brackets – from 75 to 280;
- fastening and muffling parts - within 100.
The price of the elements of the Deke-Lux drainage system will be higher than the Standard option, since the parts are larger. The kit itself will include more elements - such gutters are chosen for cottages with wide roofs.
It is also worth considering that you will have to pay for the work of the team if you install the installation with the help of professionals.
Fixation with metal brackets without wind board
If there is no wind board, the gutters are attached as follows:
- First, the brackets are attached to the roof structure using self-tapping screws. This must be done before the finishing material is installed.
- After this, the gutters are installed. They are pressed tightly against the bracket and then secured using a clamping bar.
During such work, you should check the reliability of the gutters.