The toilet is an important plumbing fixture that any home or apartment cannot do without. Installing a toilet yourself is not as difficult as it might seem at first glance, but for the job you need to have certain skills and knowledge. Understanding the structure of the toilet, the principle of operation of the cistern, and assembling the installation is not all. After all, it is also important to properly fasten the toilet to the floor. From this article you will learn in what ways this is done today.
Attaching the toilet to the floor
Methods for fixing the toilet to the floor
There are several popular ways to secure the toilet to the floor - using:
- dowels;
- adhesive composition;
- cement;
- taffeta;
- fastenings on the sides.
To make the right choice from the possible options, the first thing you need to pay attention to is the quality of the floor in the bathroom or toilet.
Connection to sewerage and water supply
The supplied toilet must be connected to the sewer system for further use. For this, a corrugated plastic pipe is most often used. It allows you to adjust the distance and angle of entry into the sewer pipe. The corrugated pipe has reliable seals that prevent leakage at the outlet and at the junction with the drain hole.
The corrugation must be inserted into the sewer pipe and into the toilet outlet, and lubricated at the junction with plumbing silicone. Then you need to check the tightness by draining water from the drain barrel. If the tank is not yet connected, this can be done using a bucket of water.
Features and nuances of different installation options
In most cases, the plumbing equipment includes a suitable mounting kit. It may well be useful, but with its help it will not always be possible to secure the device. If the plumbing fixtures are attached according to this scheme to a perfectly flat floor, then they will be as stable as possible. Otherwise, you should consider other options.
To understand how to fix the toilet to the floor, you need to inspect the surface in the place where the plumbing will be installed and choose the appropriate method. The methods for attaching the toilet to the floor vary greatly. It is imperative to consider installation methods using glue or cement. Then you will be able to fix the toilet without bolts.
If the plumbing fixtures are attached to the tiles with cement mortar, the connection will be the most reliable. The problem will be revealed later when you have to replace the installed device with a new one, because it is difficult to dismantle the structure fixed with cement. It is logical to use cement if you have purchased high-quality plumbing fixtures and plan to use them for a long time. Another reliable type of fastening to the floor is closed. But you will need to spend more time and effort on installation. Externally, the design will look attractive and aesthetically pleasing. Each element is hidden from view so as not to spoil the appearance of the room with bolts protruding from their plumbing fixtures.
Problems also arise when attaching a wall-hung toilet. In this case, it is necessary to create a niche or build a box to hide the installation, which can withstand the significant weight of the plumbing fixtures (up to 400 kg). The toilet is attached to the installation using long pins that are screwed into the structure.
When choosing an installation method, you need to know about all the possible options, as well as how to attach the lid to the toilet.
What types of toilets are there?
To begin with, before we talk about mounting methods, let’s get acquainted with the varieties of this plumbing fixture. Toilets can be classified according to the following characteristics:
- weight and dimensions;
- the material from which they are made;
- release direction;
- type of tank, bowl.
Types of toilets according to the type of connection to the sewer
If we talk about the materials used for manufacturing, these include:
- faience _ This is a fragile but inexpensive material with a service life of approximately 15 years;
- steel _ It is reliable and strong, toilets made from it are ideal for public places;
- reinforced acrylic . It is characterized by durability, low weight, strength, but reacts negatively to high temperatures;
- porcelain _ More durable, more beautiful and durable than faience, but also more expensive.
About the advantages of a porcelain toilet
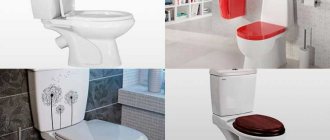
As for the design of the bowl and cistern, you can find the types of toilets classified according to this characteristic in the table below.
Table. Types of toilets from a constructive point of view.
| Name, photo | Short description | Advantages and disadvantages |
| With hidden tank | The device is installed using a metal frame that is attached to the wall. The frame houses the tank, while the bowl is located outside. After installation, the frame is covered with a false wall (usually plasterboard). | The advantages include compactness and attractiveness. But there are also weaknesses - you need to spend a lot of time/effort to install such a toilet, and when repairing a cistern, you cannot do without dismantling the false wall. |
| Monoblock | Here the bowl and tank are a single piece, and therefore do not need to be connected to each other. | The advantages of the design include reliability (there are no connections through which leaks could begin), as well as ease of maintenance. There is only one minus, and it is that if one part (bowl or tank) is damaged, then the entire toilet needs to be replaced. |
| Compact | This is the most popular version of the toilet - its tank is installed behind the bowl and located against the wall. | As for the advantages, these include ease of operation/maintenance, as well as a low noise level during flushing. The downside is the weaker liquid pressure during operation. |
| Separated | Also an extremely popular option, but only among outdated models. The distance between the bowl and the tank is large; the first, as a rule, is located under the ceiling. | The main advantage is good water pressure. The tank, which is still located high, does not “steal” the usable area of the room, which is already minimal. Disadvantages - the water makes a lot of noise during flushing, and if repairs are necessary, it is not easy to get to the tank. |
What types of toilet bowls are there
? Now let’s look at how exactly the toilet can be attached to the floor:
- dowels;
- through a frame covered with a false wall;
- using sealant/glue;
- on taffeta;
- cement (the “hardest” method).
Fastening with taffeta, dowels and glue
Below we will talk in more detail about two methods of fastening a plumbing fixture - with dowels and with glue.
How to glue the toilet to the tile?
Preparatory activities before installation
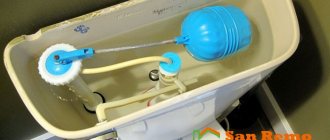
Regardless of which fastener you choose for the toilet to the floor, you first need to carry out preparatory work. The process begins with assembling individual elements and attaching the tank to the toilet. If we are talking about a compact type model, then installation is simple. After installing the fittings inside the tank, it is fixed on a shelf on which a sealing gasket is pre-installed. Then the bolts are inserted into the holes and tightened. When attaching the flush tank to the toilet is completed, proceed to other tasks.
The next stage is supplying water. If you have to connect to a cast iron riser (the sewer system was laid a long time ago), it must be thoroughly cleaned and then dried. Then a connection to the sewer is made using corrugation, plastic elbows or a special flange (if a device with a vertical outlet is connected).
Preparation for installation work
The preparatory stage consists of the following steps:
- choosing a suitable location for plumbing fixtures in the toilet, creating markings;
- sewerage and water supply outlet. The ends of the pipes should be approximately 13-16 cm from the surface so that the device can be connected to communications;
- If a room is being renovated, you first need to lay tiles and then begin installing the plumbing. Otherwise, you will need to cut the required pedestal shape from the floor tiles.
After preparation has been completed, you need to prepare the necessary tools.
How to install a toilet on dowels
Fastening with dowels is the most practical option. Fixing this method takes little time. But to do everything right, you will first have to prepare the surface: to achieve its maximum smoothness. If there are differences in the base, the device will rock.
If the floor is tiled, then you need to carefully drill holes in the tiles for fastening. This must be done extremely carefully so as not to damage the surface of the tile. When drilling holes, do not put too much pressure on the working tool, otherwise the tile will crack and you will have to replace it.
Dowel fastening is usually used for toilets with small dimensions. If it is massive and heavy, reliable fixation will not be achieved.
Detailed installation instructions
To fasten with dowels, you first need to mark the surface and mark the place where the device will be installed. Next, mark the holes for the dowels. The next step is making holes with a drill. Once the holes in the covering have been drilled with the appropriate drill bit, you need to use a hammer drill to drill into the concrete. To avoid going too deep inside, you need to stick a marker made of electrical tape onto the drill. You need to immerse the drill into the floor exactly up to this mark.
Required tools and materials
To successfully complete the task, you should have patience and prepare the following set of tools:
- perforator, drill;
- marker;
- drills for glass and ceramics;
- screwdrivers;
- sealant;
- spanners;
- adjustable wrench and sockets with collar;
- dowels with self-tapping screws;
- pliers;
- corrugated pipe;
- tap;
- core;
- grinder with abrasive wheel;
- connecting hose.
Related article: PVC tiles for walls - an effective and beautiful replacement for ceramic
Installation using adhesives
Using glue or silicone sealant, you can attach the device without using hex screws. But it will take a lot of time, most of which is necessary for the adhesive composition to harden. It should harden within 12-24 hours. If you start using plumbing too early, it will quickly become loose.
This is a safe method of fastening, since it is difficult to damage earthenware mechanically, and this only happens through negligence. The best glue for a toilet bowl is a mixture of epoxy resin or Poxipol glue.
Step-by-step description of the work
- As in previous cases, the first step is marking. The base of the sole is outlined with a pencil or marker.
- Then, before attaching the product to the adhesive, prepare both surfaces by first cleaning them. No debris or dust should get inside.
- If the fixation is carried out on slippery tiles, then the tiles must be treated with a drill with an attachment in the form of a metal brush. The top slippery layer will be removed. After this, the surface must be thoroughly treated with a cloth moistened with solvent. When the surface is completely degreased, its adhesive properties will increase.
- Next, the floor is wiped with microfiber. An adhesive composition is applied to the base of the device and installed in the selected location.
- The area around the sole should be sprayed with soapy water. Thanks to this, after treatment with sealant, excess composition is easier to remove from the floor surface. A silicone spatula is moistened in soapy water and the excess glue is carefully removed. This must be done immediately after installation, before it has time to dry.
- After carrying out these manipulations, you need to give the adhesive composition time to harden. For this, 12 hours is usually enough, but it is recommended to read the instructions. When the toilet is firmly fixed, you can proceed to connecting the communications.
Methods for installing a floor-standing toilet
The installation of plumbing must strictly comply with building rules and regulations, regardless of whether the installation is carried out in an apartment or in a private house. But this does not mean that it is necessary to hire specialists for such work: with careful adherence to technology, any home craftsman can cope with this. There are several ways to mount a floor-standing toilet, and the determining factor for the choice is the type of floor subfloor.
Dowel mounting
This method is considered the most practical and requires a minimum of labor and time to complete. It is used for strong, dense bases with the most smooth and even surface possible - concrete floors, tiles, porcelain stoneware. Fixation is carried out with long dowels or special plumbing fasteners included in the toilet kit.
This is what the toilet mounting kit looks like
It is recommended to lay a rubber or other soft material between the floor and the toilet foot to ensure a tighter and more reliable fit. If the toilet needs to be raised, the base is made from a piece of thick solid board, and the mounting holes are drilled directly through the wood.
The toilet stands on a piece of thick board
When fixing the toilet to the floor, do not overtighten the fasteners so as not to damage the ceramics. The fastening should also not be weak, as this leads to loosening of the plumbing.
The screw must be screwed in carefully to avoid cracks on the toilet.
In some cases, this installation method can also be used for wooden floors. The main condition: the floor boards must be strong, at least 30 mm thick, tightly packed together. Long screws are used instead of dowels.
Glue installation
The method is simple, but takes a lot of time. The toilet is attached with epoxy glue, which takes an average of 12-15 hours to harden. During this time, you cannot use the plumbing fixture so as not to damage the integrity of the connection. The floor base should be strong and smooth; the ideal option is a tiled floor.
Epoxy adhesive
Before installation, both surfaces are cleaned of dust and degreased; it is additionally recommended to treat the tiles with abrasive to improve adhesion. You can buy ready-made glue or make it yourself: for 10 parts of epoxy resin you need 20 parts of cement, 2 parts of solvent and 3.5 parts of hardener.
The adhesive composition is applied to the base of the toilet in a layer of 4 mm, after which the device is installed in the prepared place and pressed to the floor. Until the glue has completely dried, you cannot touch the toilet, so connection to communications is made only after 12 hours, not earlier.
We need to clear all the sagging
Install the toilet and draw the outline with a simple pencil
Turn the toilet over, apply a layer of glue or plumbing sealant
The photo shows what the glue layer should be like.
Install the toilet
Remove excess glue
Install the tank, connect the corrugation and water filling hose
Installation on taffeta
This installation method is considered traditional for wooden floors. Taffeta is a backing made from a piece of solid hardwood, cut to the shape of a toilet bowl and treated with an antiseptic, drying oil or waste oil. Such backings are commercially available, so if you don’t have suitable wood at home, you can buy factory-made taffeta. Its thickness is 40-50 mm, which eliminates any deflections and deformations of the base under the weight of the toilet and a person. The toilet itself is attached to the taffeta using screws or the screws included in the kit.
Scheme for installing a toilet on taffeta
Installing a toilet on taffeta (photo)
Wood underlayment can be attached to the floorboards with screws or recessed flush with the floor covering. The second option looks neater, but the installation process is more labor-intensive and time-consuming. In addition, if it is possible to cut a hole in the floor, it is better to simply fill the hole with mortar and make a concrete base for the toilet.
Condition of the floor after dismantling the old toilet
The floor is concreted, after the solution has dried, a toilet is installed for fitting
Cuff installed
Corrugation inserted
The toilet is installed, the screws are tightened
The toilet has been connected to the drain
Tank and lid installed
Installing a toilet on cement
This is an outdated installation option that is being used less and less. It is used in cases where other fastening methods are not feasible (do not approach with a key). The cement fixation technology is similar to the adhesive fixation method. But instead of modern means, they use self-prepared cement mortar.
- In order not to spoil the appearance of the room, a recess is first made in the floor.
- This place will need to be reliably cleared of debris, install a toilet there and fill it with the prepared solution. The edges of the sole of the plumbing fixtures must be moistened with clean water before the device is secured to the floor.
- If there is excess mortar left on the floor, it must be carefully removed with a spatula before it has time to set. Next, you need to let the solution harden for 24 hours. After this, they begin to connect communications.
Conclusions and useful video on the topic
Here you will find everything about installing toilets, including on tiled floors:
Installation of plumbing fixtures in the toilet on a tiled floor is possible. This fact is confirmed by several installation methods, each of which has been tested in practice and successfully applied.
Another question is that the choice of one or another installation technology on tiles must be compared with the load parameters that are presumably possible during the operation of plumbing fixtures.
Would you like to share your own experience in installing and connecting a toilet? Do you have useful information on plumbing installation technology that is available to site visitors? Please write comments in the block below, ask questions, publish thematic photographs.
How to attach a toilet to taffeta
This option is used to connect the toilet to a wooden surface. Taffeta is a wooden spacer that is pre-cut from a wooden board to the required dimensions. Then the toilet is installed on it and the device is secured to the floor.
- Anchors are installed on the part from below or regular nails or studs are driven in in a checkerboard pattern. This must be done so that the metal clamps protrude from the part by about 3 centimeters.
- A recess is made in the floor, which is filled to the brim with cement. The taffeta is placed in the solution with the anchors facing down - this ensures reliable fixation. The part must be installed exactly level with the floor.
- It is advisable to wait 24 hours for the solution to set. Then the toilet is placed on top and secured with screws to the wooden base. Be sure to place a gasket under the head of the hardware so that the fixation is as reliable as possible.
Experts say that instead of a wooden gasket, you can install taffeta made from a thick piece of rubber (15 mm). But it should be quite dense.
Dowels
This option is considered one of the most popular. The basis for such fasteners is a floor made of concrete. In addition, the floor surface can be decorated with ceramics.
How to install? Before installation, it is important to make sure that the connecting link located between the sewer pipes and the toilet makes it possible to carry out work in the required place. There will be no problems when using corrugation
During the purchasing process, make sure that the mounting kit for your toilet includes bolts. Otherwise, you should buy the kit yourself.
For mounting on a tiled floor surface, the toilet is installed in the appropriate position, marking the locations for the holes. After this, the toilet bowl is removed and holes of the required size are drilled into which dowels should be inserted; a toilet bowl is installed on top, which is attached to the floor surface with bolts.
Some professionals recommend using a rubber gasket between the toilet and the tiles. It will become a damper to ensure a reliable fit to the toilet tiles and will veil the gaps. This gasket should be cut based on the size of the mounting surface.
To eliminate gaps, a colorless sealant is also used, as in the photo of the toilet mounting below.
The most common mistakes at work
To securely fix bathroom fixtures, you need to be careful and consistent. Then you will be able to avoid leaks, unpleasant odors and other problems.
In the case of plumbing installation, the most important mistake is haste. First you need to carefully level the surface. Quite often this requirement is not met.
We must not forget about sealing connections to the sewer system. If the units are not sealed enough, sewer fluid will begin to seep into the cracks, which will lead to an unpleasant odor. Experienced craftsmen do not spare sealant, applying an additional layer to all connecting parts.
If the chosen fastening method is dowels, you cannot tighten the bolts too much, because the toilet leg will not withstand the pressure of the fasteners and will crack. You'll have to buy new plumbing fixtures. But too loose tightening of the bolts leads to problems - the structure will sway. Taking these points into account, reliable fixation can be achieved without complications.
The choice of method for attaching the toilet depends on the initial installation conditions, but in any case it is important not to violate the instructions and properly prepare the floor for installation work. The main thing is the calculation of construction data from which you need to build. Then the structure will last a long time.
Did you manage to solve your problem using the recommendations from the article?
Yes!
45.25%
No. More answers required. I'll ask in the comments now.
38.22%
Partially. There are still questions. I'll write in the comments now.
16.53%
Voted: 484
Installation of a toilet in a country house
Installing a country toilet is often necessary, because often site owners have to limit themselves to outdoor amenities, and this does not at all contribute to comfort, especially in the cold season. If there is running water, it is not at all difficult to organize a normal toilet room in a house outside the city. However, often in unheated country houses there are no water supply and sewerage systems.
You should understand some features of the installation process before installing a country toilet. Many of these plumbing fixtures do not involve sewerage. There are booths with a toilet seat installed, under which a cesspool is dug. With a better option for arranging a wastewater system, a septic tank is used, however, a toilet bowl in an unheated room may crack in winter.
An outdoor toilet for summer cottages can be made using a storage tank - the so-called bio-toilet, or with the construction of a cesspool.
The first option is easy to install, however, you need to clean the biosystem tank as often as possible. The second method of arranging a bathroom involves the presence of a cesspool or a special septic tank. The toilet itself is mounted above them. Moreover, this type of plumbing product has a special straight elbow.
The peculiarity of a toilet in an outdoor toilet is that water should not sit in such a product for a long time.
Plumbing for a cottage made of ceramics
For country houses, as a rule, ceramic toilets are chosen. This type of plumbing differs little from ordinary samples, except perhaps in the absence of a drain tank. Sewage is washed into the cesspool using ordinary running water from an additionally installed hose. These types of toilets are quite durable and can withstand weights of up to 200 kg.
But the floor in a country toilet does not always cope with an impressive faience or ceramic product. It should be remembered that it is advisable to use such plumbing fixtures not on planks, but on a more durable concrete base.
Plastic toilet
Another type of country plumbing fixtures are plastic products. This device is light in weight but quite durable. You can find samples with a flush tank.
Features of installing a toilet in the country
To install it on the toilet stall floor, a recess is drilled along the diameter of the toilet hole. Then the product must be secured using four bolts with caps. The places where the toilet is fixed are treated with silicone to prevent liquid from leaking out. After the sealant has hardened, the toilet is ready for use.
A running water supply for flushing is optional. This is not always advisable, since it leads to rapid filling of the cesspool, which causes a lot of inconvenience.
When the device is mounted above a plastic container or reservoir, one often has to deal with the problem of unequal drain holes and receiving barrels. The toilet drain has an oval shape, while the barrel has a round hole. To combine these parts, a galvanized steel plate rolled into a cone is used. The lower half of the cone is placed in a barrel, and the upper part is fixed on the floor. The diameter of the protruding part of the cone is usually larger than the toilet flush outlet.
During installation, do not forget to seal the junction of the galvanized steel with the tank and the floor. For this, silicone or special mastic is used.
Installing a toilet in a country house is not a difficult task, provided that the technology is followed and the necessary tools and materials are available. The main thing is to try to do the work carefully, following the step-by-step instructions.
Features of the design of wooden floors in the bath and toilet
In those places where plumbing units will be located, it is necessary to make additional reinforcement of the floor: attach logs, secure the subfloor with metal corners, make a solid platform from beams.
Expert advice: when installing joists, make fastening steps more often - this will strengthen the structure and give it strength.
If you are planning to lay a warm floor, then you should take into account the size of the lines and their number. Distribute the heated floor ducts in advance in such a way that they cannot be damaged during repairs. Mark the floorboards with a pencil or glue marks for future drilling locations.
Painless dismantling
For this procedure we need a simple set of four tools: 1) Crowbar (or nail puller); 2) Hammer; 3) Chisel or chisel; 4) Pliers. Before you begin, wash and disinfect the old toilet. Over the years of service, dirt, germs and limescale could have accumulated here. Prepare a rag and a bucket of water. Wear rubber gloves and, if possible, safety glasses. This will protect you from the unwanted effects of antiseptics, as well as from fragments and ceramic chips. Not everyone can remove a toilet that has served its useful life while keeping it intact. If during installation it was screwed with metal screws into a wooden board, which was subsequently concreted, then you will have to use physical force, practically uprooting it from the sewer pipe. The remaining fragments are removed with a chisel and pliers.
Removing an old toilet can sometimes be a real challenge
If the toilet was installed using plastic screws screwed directly to the floor, then you will have to be very careful and careful, otherwise you can injure yourself or damage the floor. Next, remove the toilet from the sewer pipe tee. You don’t have to put in much effort here. It is also recommended to clean the sewer pipe connection in the area where the toilet will be located. This is usually done using sandpaper or special cards.
Connecting the toilet to the sewer
Device Features
Before proceeding with the actual installation, it is worth getting acquainted with the types of toilets. They can be conditionally divided according to such characteristics as the shape of the tank, the shape of the bowl and tank, the material of manufacture, as well as the drainage angle.
Tank shape
- Compact - this type is in the toilet of each of us. It is easy to maintain and flushes more quietly than other types. But it has a little pressure. The tank is mounted on a special ledge, bolted to the back of the toilet and adjacent to the wall.
- The monoblock is a single unit, a bowl and a tank. They cannot leak at the joints. But if the tank or bowl is damaged, the device must be replaced completely, because they cannot be taken apart into individual parts. In addition, the model requires more space than a compact or mounted one.
- Separate - rarely found in old houses. The barrel is mounted almost to the ceiling. Connects to the bowl with a long pipe. This design has a powerful water pressure when draining. Takes up less space due to the high location of the tank. It is still in production, but it costs a lot, because it is sold as an exclusive product in retro style.
We suggest you read How to fix a leaking toilet tank
With a hidden tank (the bowl itself can be hinged) - the tank is installed inside the wall, and the bowl is located outside. The entire structure is supported by a metal frame, which is hidden under tiles or drywall. It looks very nice, but is difficult to repair. If there are problems with the tank, you will have to break down the wall.
Combined with a bidet - has a built-in small faucet. Different manufacturers offer many shapes and sizes. Installing such a device will be more complicated than a regular toilet.
Bowl shape
- Visors are the most commonly used. The water flows out smoothly, at an angle, so unpleasant odors do not linger, as do the contents. The name comes from the protrusion that prevents water from splashing during flushing and provides the necessary slope for flushing from the walls of the toilet.
- Funnel-shaped - there is a funnel in the center of the bowl, which is why flushing occurs very quickly and thoroughly, but it protects from splashes worse than a visor type.
- Disc-shaped ones are an outdated type that are no longer available. Inside the bowl there is a flat shelf for storing bowel products. Although this design was splash-free, it was cleaned only under running water. Another disadvantage of the species is the rapid spread of smell.
Drain angle
- Oblique - suitable if the sewer outlet is at floor level or slightly higher. The angle of inclination can be different - 30, 40, 60, 75 degrees. Choose one that fits well.
- Horizontal - convenient if the drain pipe is hidden behind the wall. Suitable if the sewer outlet is 10-15 cm above the floor level.
- Vertical - was common in houses with sewerage in the interfloor ceilings. If the sewer outlet is directed upwards and it is hidden in the floor.
Regardless of how you are going to fix the toilet to the floor, you first need to make some preparations:
- Prepare the installation site. Clean and degrease the tiles or dismantle the old toilet and level the surface.
- Assemble the tank before installing the toilet (applies to the compact). Follow the manufacturer's instructions that came with the model.
- If you connect to an old cast-iron riser, first dry it and clean it in order to avoid problems with leakage in the future.
- Prepare all tools for assembly and installation in advance.