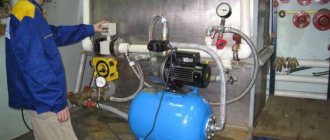
To create an autonomous water supply system in a small private house, a conventional pump, well or surface, with suitable performance characteristics will be sufficient. But for a house in which more than 4 people live, or for a 2-3-story dwelling, you will need to install a pumping station. This equipment already has factory pressure settings, but sometimes they need to be adjusted. When adjustment of the pumping station is required, and how to do it, will be described below.
Features of the pumping station design
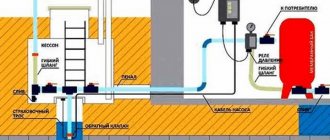
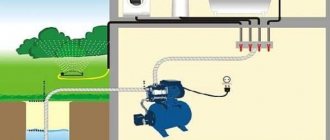
The structure of the pumping system contains a pressure switch designed to control the volume of water filling the accumulator. Additionally, its task is to turn the hydraulic pump on and off; when the tank is empty, the automation activates it, and when the liquid reaches a certain level during filling, it turns off the pump. Thus, the required pressure is maintained in the water supply system without human intervention. In addition to the relay, this complex system contains the following components:
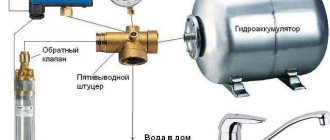
- A hydraulic accumulator, which is a sealed container with a flexible membrane inside, which in certain models is replaced by a rubber bulb. This plate cuts the space of the hydraulic tank into two halves, one of which is filled with air, the other with water.
- A borehole or surface pump, which can be considered in two versions: centrifugal and vortex. It should be noted that the use of a vibration pump in the operation of the station is unacceptable.
- A check valve designed to prevent fluid from leaking from the accumulator when the pump is turned off.
- Power supply. To connect the installation to the electrical network, it is necessary to lay separate wiring, the cross-section of which must correspond to the power of the equipment. The electrical circuit device must be equipped with an automatic protection system.
The functional features of the pumping station are as follows. After the tap is opened at the point of the water intake structure, the liquid in the accumulator enters the system, at the same time the compression ratio in this tank decreases. When its value corresponds to a certain mark on the sensor, its contacts close and the pump motor starts working.
Following the completion of water consumption in the tap or when the compression force in the accumulator cavity increases, the pump stops working due to the operation of the relay.
Causes of unit malfunctions
If we analyze the malfunction of pumping stations, we can come to the conclusion that this kind of problem usually appears due to damage to the integrity of the hydraulic accumulator tank and the pipeline system, which leads to leakage of air and liquid. Problems can also arise due to the formation of significant contamination in the equipment.
It is necessary to interfere with the operation of the pumping station in order to eliminate malfunctions for the following reasons:
- If sand or other substances get into the water, it will cause corrosion, which will reduce the performance of the device. In order to prevent blockages, it is necessary to install filters for water purification.
- A decrease in air pressure in equipment contributes to frequent activation of the pump and its premature failure. Experts recommend periodically measuring air pressure and then adjusting it if necessary.
- Lack of tightness in the connections of the suction pipeline, resulting in continuous operation of the engine without the ability to pump water.
- Incorrect regulation of the pressure of the pumping system, which creates inconvenience in its operation and leads to breakdowns.
To extend the life of this equipment, it is necessary to periodically inspect it.
Troubleshooting
The reason for non-stop operation of the station is usually an excessive switch-on pressure, which was incorrectly set during the process of adjusting the relay. There are also cases when, when the engine is running, the equipment is not able to pump water, which is influenced by a number of factors:
- Lack of water in the pump when first started. The situation is corrected by filling the device with liquid using a funnel.
- Damage to the pipeline or formation of an air lock in the pipe or suction valve. To establish the immediate cause, it is necessary to inspect the tightness of the intake valve and the corresponding connections, and examine the suction pipe for bends and other deformations. In order to eliminate the malfunction, all damaged fragments are replaced.
- The pumping system operates without access to water. It is necessary to identify the causes of the lack of fluid and eliminate them.
- Pipeline contamination. It is necessary to clean the equipment from contaminants of various origins.
There are times when the pumping station operates too often, after which it turns off altogether. The cause of the accident lies in a damaged membrane that requires replacement or in the absence of the pressure necessary for the system to operate. In this case, cracks and defects in the tank are identified.
In rare cases, the check valve becomes blocked due to objects or solid waste getting into it. To eliminate the problem, the pipeline is dismantled in the area of acceptable blockage.
Installation
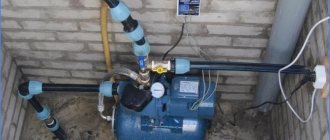
What else should be considered when planning a water pumping station? It is installed near the source. If used year-round, it should have a warm room.
Pipes from a well or borehole are laid in a trench below the freezing depth of the soil. In this case, the source is reliably insulated. A special mesh is installed on the check valve to protect against contamination.
The pumping station is installed on a reliable base, bolted and grounded.
The system is filled with water, after which the pump turns on. After the pressure rises to a predetermined value, it should turn off and turn on again as water is consumed.
Engine problems
Stopping the operation of the pumping station engine is caused by a number of reasons:
- the installation is not connected to the electrical network, or there is no voltage in the latter - to eliminate this problem, the connection diagram is examined;
- the fuse has failed, in this situation it is necessary to replace the element;
- the rotating part of the fan has stopped;
- The relay is not working properly - adjustment or complete replacement is required.
If the motor of pumping equipment malfunctions for unknown reasons, it is recommended to seek advice from a service center.
How to correctly set the pressure switch on a water accumulator - preliminary steps
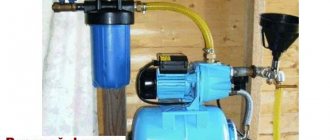
Make sure the entire system is passable. Check for mechanical contamination. Assess the serviceability of the storage tank, paying special attention to the integrity of the membrane. Check the operation of the filtering equipment (ingress of solid particles can quickly damage rubber elements). After this, you can begin entering the necessary parameters.
Lack of water pressure in the system
The weak energy of fluid flow from the sampling points can be explained by certain factors:
- During the adjustment process, the air or water pressure was brought to a minimum value, which is considered unacceptable for the full functioning of the system. In this situation, relay parameters need to be adjusted.
- The pipeline system or working element of the pumping equipment that transmits the energy received from the motor is blocked. The solution to the problem will be to clean the components of the pumping station from dirt.
- Air enters the pipeline. In this case, it is necessary to check all system components for leaks.
Poor quality water supply can be caused by air being drawn in due to lack of density at the joints of water pipes, as well as by low water levels.
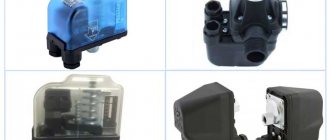
Relay structure and operation order
The relay’s task is to maintain the required water pressure in the water supply system, which contributes to the perfect operation of all units of the pumping station and ensures its safety. After installing this compact design on the hydraulic accumulator, it is necessary to correctly adjust the factory settings for a specific water supply system and a specific pump power.
The regulation procedure is not accompanied by any particular difficulties. But to carry it out correctly, you should familiarize yourself with the functional features and technical characteristics of the relay.
Design principles
The pressure switch is not complicated in design. Its mechanism includes the following components:
- Pressure switch housing.
- The flange with which the module is connected to the system.
- A nut used to regulate the shutdown of the unit.
- A nut that adjusts the compression force in the container, allowing the device to turn on.
- Terminals (screw terminals) designed to connect wires that come from the pump.
- Place for connecting the cable from the electrical network.
- Terminals for providing grounding.
- Couplings for fixing electrical wires.
At the bottom of the model there is a metal cover, behind which there is a piston and a membrane. Depending on the design features of the pumping station and the manufacturer, the relays may differ in their configuration, size and location of components and parts.
Work specifics
The pumping station relay is equipped with springs, thanks to which the pressure parameters are set to enable the pump to turn on and off. These springs have different sizes; thanks to the larger one, the lower response threshold is set, that is, the pump is activated. The small element is responsible for stopping work - turning off the pump.
This automation eliminates the need to manually turn on and off the water pumping device. The large spring, in its initial state, produces maximum pressure on the plate. This leads to the fact that the contacts of the circuit, due to which the pumping unit is powered, close together, respectively, feeding the electric motor, and water enters the container.
The arriving liquid helps to reach the maximum pressure, which leads to the opening of the contacts, and therefore to the cessation of operation of the equipment.
Pressure check
After purchasing pumping equipment and before putting it into operation, you will need to check the pressure level specified by the manufacturer during the manufacturing process. This is due to the fact that storage and transportation of products is accompanied by a certain amount of air leaking from the system, leading to a failure in the factory settings.
For this reason, the system will not be able to function correctly due to the lack of necessary pressure. In addition, the pumping station will not be able to turn on at the lower level, which will lead to problems in the water supply of an apartment or private house. The pressure check is carried out with an empty tank and the equipment disconnected from the electrical power supply.
To carry out this procedure, the following actions are performed:
- Remove the plastic cap from the hydraulic accumulator, which plays a protective role and covers the nipple (connecting tube).
- Using a car pressure gauge on the opened element, the air pressure in the tank is measured. For car owners, this process will be a bit like checking wheels.
- One and a half atmospheres should be taken as the norm.
- If this indicator is exceeded, the air in the container is vented and checked again. The lack of air and pressure is eliminated by pumping up using a car pump.
- For a one-story building, one atmosphere is quite suitable, but the norm is taken to be from one to one and a half atmospheres.
It must be remembered that increased pressure causes the pump to turn on frequently, which leads to rapid wear of this device. In turn, the reduced pressure will not allow the whirlpool bath to function, since the pump will operate too rarely.
With reduced pressure, you can use household appliances that require water supply, such as washing machines and dishwashing equipment. For this reason, professionals recommend that owners carefully weigh the arguments and settle on an acceptable pressure indicator in the accumulator, taking into account the wear resistance of the pumping system. The pear, which is part of it, is negatively affected by both lack (below one atmosphere) and excess (more than 1.5 atmospheres) of pressure.
It is advisable to carry out this procedure not only after purchasing the equipment, but also once a month during its operation. To do this, the tank is emptied of water, and the unit itself is disconnected from the electrical network.
Connection instructions
Setting modes will depend on the location of the storage tank, the maximum height of the distribution point and the number of consumers at the site. Each of these standards will affect the stable flow, so the extreme value will have to be set within certain limits in order to achieve the desired result in all places. It should be noted that the technical characteristics of the devices must correspond to the operating parameters. This applies to a greater extent to the volume of consumption. If the flow rate is high, then with a small storage tank the system will constantly turn on and off. At the same time, the flow in the tap changes as expected, which is very unpleasant when taking a shower.
Inside the container
For optimal functioning, it is necessary to have the maximum possible storage reserve. Therefore, a pressure 10 percent less than the shutdown level is pumped into the air cavity. This allows most of the tank to be used for storage (compressing the gas to 10% of the volume creates a force within two atmospheres).
The correct operation of the water supply is greatly influenced by one-time consumption. Theoretically, approximate values can be calculated based on the following coefficients, which reflect the frequency of use and volume of consumption.
| Appliances used in everyday life | Utilization factor in Cx |
| Toilet with tap | 3 |
| Shower cabin | 2 |
| Bathroom | 2 |
| Kitchen sink | 6 |
| Bidet | 1 |
| Washbasin in the bathroom | 2 |
| Washing machine | 2 |
| Dishwashing machine | 2 |
| Watering valve | 2 |
As the number of floors increases, the maximum shutdown threshold also increases, since otherwise you may experience temporary interruptions in sources on the second and third floors. The height difference is approximately three meters, which means that the minimum value should be 0.3 atm less.
Cutoff points
In order for the stream from the tap to have the same parameters, it is worth setting the turn-on moment at the pressure gauge mark of 1 atmosphere. Each floor increase requires an increase of 0.3 atm. This is necessary so that the water does not stop flowing at the top point even at the minimum value.
SF-mix manual up to 0.8 m3/h
AMETHYST - 02 M up to 2 cubic meters/day.
Aeration unit AS-1054 VO-90
The second standard is accepted as the first plus one. That is, if the switching level is 1.6, then the pump should turn off at 2.6 atmospheres. All devices have slightly different technical characteristics (technical characteristics) and not every model is capable of ensuring uninterrupted supply in a multi-story building with high flow rates.
Cases requiring relay adjustment
Adjusting the relay to individual needs is one of the main steps in the commissioning and maintenance process of the device. The relay is a plastic box, made in the shape of a rectangle, which is located in front of the accumulator. Using this device, the procedure for pumping liquid into the water supply system is automated.
In most cases, the pump system is purchased with pre-existing relay settings made by the manufacturer. But there are situations in which there is a need for emergency regulation of equipment pressure. This operation is caused by the following circumstances:
- the pump motor stops working immediately after starting;
- when the pumping equipment is turned off, the water pressure weakens;
- during operation of the device, too much compression force is generated in its hydraulic tank, but the unit does not turn off;
- The pressure switch and pump are not activated.
If the equipment exhibits all of the listed symptoms, then it is necessary to correctly configure the relay.
Make or buy?
The first question that needs to be resolved: since some mandatory costs (see below) are inevitable, is there any opportunity to purchase a machine for wood processing without taking out a loan or cutting the budget? There are some, and they are very good.
Household woodworking machines for industrial production
If you come across the old UBDN-1 (on the left in the figure) or its modern analogues (in the center) at a reasonable price, don’t yawn! There is no need to convert anything at home: the motor is up to 350 W with double insulation of the windings. The machine plugs into a regular outlet; no grounding is required. And you will receive in one product:
- Circular saw;
- Electrojac for sharpening tools, etc.;
- Jointer;
- Disc grinder;
- Horizontal drilling machine;
- Lathe for wood processing.
Another option, most likely cheaper, but only for horizontal drilling and turning - a drill stand that turns it into a lathe, on the right in Fig. Drill bit beds for drills are almost peddled on the streets, but not everyone knows about lathes. Meanwhile, an electric drill as a drive for a wood cutting machine has serious advantages (see below), and a lathe with it will be no worse than a branded one. But much cheaper.
Preparing the hydraulic accumulator
Before proceeding with direct adjustment of the relay, it is necessary to carry out preparatory work with the storage tank. It is a sealed vessel, inside of which there is a rubber bulb, dividing it into two parts. When water pumped by the pump enters the first, the air pressure increases in the second. The resulting air mass will put pressure on the bulb, thereby maintaining the optimal degree of pressure in the water supply.
For optimal operation of the pumping station, it is necessary to properly organize the air pressure. Since if its value is too high and vice versa, the pump will be started up quite often.
The required parameters in the storage tank are set only after it is completely emptied of liquid. Following the drained water, air is pumped into the accumulator at a rate of 1.4 to 1.7 atmospheres for a container with a volume ranging from twenty to twenty-five liters and from 1.7 to 1.9 atmospheres for larger vessels. Specific values are indicated in the technical data sheet of each pumping station model.
What to glue on
Most often, ceiling tiles are glued using glue such as “Titan”, “Naset”, “Moment” or liquid nails. All of them are not bad, but using them requires holding the tile for some time. You have to hold it from 3-5 seconds to several dozen, and this is not very convenient. “Moment” “sets” the fastest, but it is not ideal: you have to leave the applied glue in the air for some time.
Traditional adhesive for ceiling tiles
In addition to these compounds, there are mastics for ceiling tiles. They are sold in small buckets and are a paste. It is easier to work with this type of adhesive compositions, since they are more “sticky”. The tiles smeared with this composition stick to the ceiling; they do not need to be held for as long as those smeared with regular glue.
Mastics for gluing ceiling tiles
All of the above options are for flat or almost flat ceilings. Where there are differences (joints of slabs) this method is not suitable. If the ceiling is uneven, you can glue the tiles using gypsum putty) or Perlfix type glue. Starting or finishing composition - depends on the required layer, the finish is suitable if the height difference is no more than 5 mm, with a larger layer take the starting composition, but it is better to pre-level such a ceiling or use another system (for example, Armstrong - also inexpensive and fast a way to tidy up a frankly crooked ceiling).
How can I glue it to an uneven ceiling?
Both of these materials allow you to simultaneously level the ceiling and glue ceiling tiles. Only the gluing method changes, and radically (more on this below).
https://youtube.com/watch?v=E9jcP-6JqMQ
Relay settings
To carry out this procedure, you will need wrenches and a set of screwdrivers. The setup process includes several steps:
- The pressure gauge reading is recorded.
- Using a screwdriver, the device is released from the protective cover, which is usually black.
- Under the cover there are two adjustment springs, equipped with the nuts necessary for this process. The upper of these elements is large in size and is responsible for the lower pressure indicator. The lower small nut sets the difference between the indicators. As a rule, next to them there is a marking similar to the letter “P” and arrows with signs such as “plus” and “minus”. In order for the compression force to become greater, it is necessary to rotate the nut in the direction of the plus sign (clockwise); to reduce this indicator, the nut is rotated in the opposite direction. After completing one revolution in the desired direction, you will need to turn on the equipment and put it into operation.
- After stopping the system, the pressure gauge readings are checked again; if its value deviates from the norm, the nut rotates again and the unit is turned on as many times as necessary to achieve the required pressure value in the accumulator.
- The final stage involves setting the moment at which the pumping station should be turned off. For this purpose, you need to use a small spring and act in the same way as when turning on the device, only in the opposite direction. To avoid stopping the relay operation, it is prohibited to tighten the nuts until they stop during the adjustment process.
It follows from this that the difference between the two types of pressure (upper and lower) can be easily adjusted within the desired limits. Increasing the interval between operations implies a rather infrequent connection of the pumping station, as a result of which significant pressure drops will appear in the water supply system.
If the response range is set to decrease, the pressure in the system will be stabilized, but equipment that turns on frequently will have a much shorter service life.
In order to make the settings as accurately as possible, it is necessary to compare the selected parameters with the values specified in the technical data sheet of the pumping system, exceeding which is not recommended.
Indicators inside the accumulator
The air pressure inside the storage tank of the pumping equipment affects the operation of the entire system, but has nothing to do with the adjustment of the relay. When there is no air in the membrane tank and the liquid compartment is completely full, the pump stops working almost immediately. With every opening of the water taps, the pumping station will also turn on.
This will lead to the fact that, due to the reduced pressure, the membrane will begin to stretch more than it should, and due to the increased pressure, the tank will not be fully filled with water. Optimal operation of the unit and maintenance of the operating condition of the membrane are possible by setting the air pressure ten percent below the switch-on indicators.
Checking the pressure in the hydraulic accumulator is carried out after removing fluid from the system by opening the lower valve. It is not recommended to overfill the container with water or allow the pressure to drop so that its readings are less than one atmosphere.
This setting prevents optimal filling with liquid and contributes to premature wear of the rubber bulb, which leads to incorrect functioning of the equipment as a whole.
With proper adjustment of the pumping station with your own hands, the pressure in the taps will be able to satisfy the requirements of consumers.
Prohibited mercury collection options
To collect mercury from a broken thermometer from the floor or other surface, it is prohibited to use the following options:
- Broom. Its use is strictly prohibited. Because of this, mercury balls can split into smaller ones, after which they will be more difficult to collect. In addition, mercury particles may remain in the broom.
- Vacuum cleaner. It should also not be used. And if it is used, it will need to be given to specialists for disposal of mercury. Therefore, you will have to purchase a new vacuum cleaner. You cannot leave such a household appliance. In the future, mercury particles will disperse into the air, increasing its concentration to very high values.
Collecting mercury using a vacuum cleaner is prohibited. Also, do not leave mercury in the room for a long time. It is advisable to collect it immediately after breaking the thermometer.