It is impossible to imagine life in a modern country house or apartment without toilets; internal components installed in the cistern are responsible for their functioning and operating modes. When installing them, specialists or owners most often install shut-off valves for a toilet with a bottom connection.
Before buying a toilet, you need to decide not only on its model, but also on the type of liner. To do this, you should know the difference between the lateral and lower systems; it would not hurt to study their varieties.
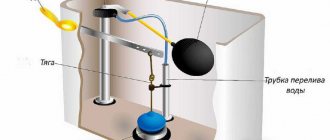
Rice. 1 Shut-off valve for toilet with bottom connection
Design of a typical drain tank
A standard toilet cistern made of ceramics (faience, porcelain) consists of the following components:
- Water reservoir. Typically, water is collected in a roughly rectangular bowl with a capacity of at least 6 liters. This indicator is accepted as a standard; in rare models, the tank volume reaches 9 liters. The use of 6-liter tanks allows you to implement an economical drain mode, in which pressing one button will drain half of the 3-liter volume, and turning on the other will completely empty the container.
- Shut-off valves. Designed to supply water to the tank and automatically stop it after filling the container. The principle of its operation is based on the raising of the float when the tank is filled, which in turn is connected to the locking mechanism. Based on the location of fastening, it is divided into fittings with bottom and side connections. It is located in the side of the tank at some distance from the center.
- Drain fittings. Holds water in the bowl, controls its drainage and performs overflow protection functions. It has different designs with external controls in the form of levers or buttons. It is located in the center of the tank above the drain hole.
Rice. 2 Tank design with bottom supply
Maintenance of drain and inlet fittings
Water in domestic engineering networks often contains mechanical impurities (rust, sand, salt deposits), so many malfunctions occur due to clogged plumbing fixtures. For this reason, the vast majority of valve maintenance activities involve cleaning.
When servicing and carrying out preventive maintenance, special attention is paid to the filter, membrane, inlet nozzle of the filler valve, locking ring or bulb, and drain hole. It should be borne in mind that the filter is usually installed in Russian-made models; it is not always found in samples from foreign suppliers.
Another part of the problems is related to improper filling of the tank and leaks. The basis for eliminating these shortcomings is the connection and adjustment of components, the serviceability and tight pressure of the gaskets, and the tightening of the nuts to the end.
Operating principle of toilet fittings
All shut-off valves work according to the following principle.
As soon as the drain valve opens after pressing the button or lifting the lever head, water leaves the tank and the float in it drops.
In turn, the float bulb is connected through a lever or rod to a locking mechanism, the passage channel of which is blocked by an elastic rubber valve.
As a result of the float lowering, the valve moves, opening the channel, and water begins to flow into the tank. As soon as the water level reaches a certain point, the previously constantly moving valve finally closes the passage channel and the access of water to the tank stops.
Types of drainage mechanisms
To drain the water, we simply press or lift the button, and the sewage is flushed away automatically. Inside the tank, the liquid release mechanism comes into operation, the valve opens, and a stream of water from the tank rushes into the toilet.
The drain mechanism is activated in three ways:
- By lifting the lever.
- By pressing a button.
- By pulling the chain (in wall mechanisms).
A common type of drain mechanism is a shut-off valve, which looks like a plunger. Under the mass of liquid, this toilet flush bulb fits tightly around the drain hole and closes it. After pressing the button and pressing the lever, the valve is slightly raised by the lever system and the liquid is released into the toilet.
An important factor is the direction of flow. There are products with direct (cascade) flushing and circular reverse flushing. In the first case, the liquid moves in one direction, enters the toilet bowl, but does not cover the entire side surface, creating noise.
Shut-off valves for toilets with bottom connections and their advantages
Most modern toilet models are produced with a bottom water supply to the tank and this is due to the following features:
- Compared to a side connection, a toilet with a bottom water supply looks more aesthetically pleasing because the hose is not visible behind the bowl.
- When water is supplied from below, the flow immediately enters the water masses. This significantly reduces noise compared to side inlet, where water falls into an empty space for some time.
- Since the underwater fittings below are not directly accessible, they are rarely damaged and therefore do not need repairs as often.
- The disadvantages of the lower line include not very convenient access in case of repair to the fastening nuts under the bowl.
- Also, the bottom line is a little more difficult to install and check for leaks.
Rice. 3 Bottom connection nodes
Shut-off valve arrangement with bottom connection
Almost all manufactured toilet models have a bottom water supply under the tank. A standard bottom knot consists of the following elements:
- Float. It is made in the form of a short glass with a slot or hole for moving along a guide part. In some rare designs there is a horizontal float on the rod.
- Guide. It is made in the form of a rectangular strip or a section of a cylindrical pipe.
- Lever rod. On one side it is attached to the float, and on the other - to the locking unit.
- Diaphragm valve. It is located inside the inlet pipe and is connected to the rod through a pusher.
- Check valve. Some manufacturers install it, although in most cases you can do just fine without it. Naturally, the check valve prevents water from flowing out of the tank back into the pipeline.
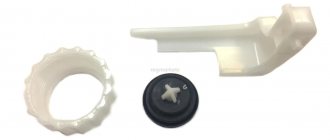
- Fasteners Also, any bottom connection unit includes rubber gaskets and a fastening union nut.
Options for installing a toilet cistern
There are three key methods for installing a cistern in an apartment or private house:
- Under the ceiling;
- Connection directly to the toilet itself;
- Installation in the wall of the toilet room.
Almost no one installs a drain tank under the ceiling, since for this you will need to buy the appropriate fittings. The key disadvantage of this system will be its not very convenient operation, however, water is both collected and drained under fairly good pressure. Today, such a design is very rare, as it has been replaced by more attractive modern systems.
When the tank is connected directly to the toilet itself, then this technology will have a decent number of positive aspects. In this case, the tank will be in a fairly convenient position - if repair work is necessary, you will not have to think about how to get to this device. It is also very convenient to monitor the tank, see if everything is in order, and so on.
If you plan to install the tank in the wall, then you need to remember that this is a very labor-intensive process. Of course, from an aesthetic point of view, this will be the most profitable option, since a tank of this type will be practically invisible, in addition, with the help of this solution you can seriously save useful space, which is not enough in the sanitary unit.
The device of the outlet valve of a modern toilet cistern
Shut-off valves for toilets with side connections
All Soviet-era toilets were made with side connections. The unit was attached to one of the walls of the toilet; a rigid polymer hose was connected to it, the other end of which was screwed to the water pipe. Inside there was a plastic float on a brass rod.
For flushing, a handle was attached to the side, which was connected through a wire to a rubber valve fixed in metal guides. In other designs, the valve was connected to a handle that was located on top of the tank lid.
Fill valve with horizontal float
Modern fittings for a toilet with side connections are structurally not much different from the old Soviet ones. The filler unit with a valve that shuts off the flow is attached to the side of the toilet, and the movement of the membrane is controlled by a horizontally located float on a metal rocker rod.
Water enters the tank through a small-diameter lower pipe in the head of the filler unit; it is fitted with a polymer tube, which simultaneously reduces noise.
The operating principle of such a system is quite simple. When the tank is filled, the float lifts a rocker arm, which, through a pusher, presses on the membrane, which in turn closes the water channel.
Fig.6 Lateral fittings with vertical float
Fill valve with vertical float
If someone still has an old Soviet toilet with a side connection, it is quite possible to install a vertical unit instead of a horizontal float system that has become unusable.
The design is not very complicated, and externally it looks like a filler pipe with a vertical rod connected to it. A float moves along the rod, which, rising, presses through a lever on the pusher and the elastic membrane that blocks the channel. Also, the rod is made hollow inside and water flows through it into the tank.
In other designs, the float moves along its guide, and water is supplied to the tank through a separate tube.
Since not all toilet walls are located vertically relative to the water horizon, an oblique washer is included in the fastening of the side mechanism. It allows you to set the position of the filler unit strictly vertically when twisting it.
Rice. 7 Drain fittings complete with filler
Related article:
Replacing pipes in the bathroom and toilet - choice of pipe material, tools, installation methods . It is possible that before installing a pipe box in the bathroom, you also need to replace old pipes with new ones, and you can read how this is done in a separate article!
Why is the drain leaking?
People often wonder what to do if the toilet leaks after flushing. One of the reasons for drain leakage is dirt getting inside the drain valve. As a result, solid particles accumulate between the rubber pad and the seat. This could be corrosion of metal pipes or sludge. In this case, you can do without replacement. The problem is resolved by simply removing the tank cap and cleaning the space under the rubber cuff. To do this, use a rag or sponge. The only exception is when the rubber element has become old or worn out, which requires its replacement.
Before installing the valve inside the tank, it is fixed to the bowl. The specific design of the plumbing for the toilet and drain does not make it possible to get the coupling bolts after installing the internal filling. Therefore, the first step is to install the flush cistern on the toilet bowl. And only after this can you proceed to installing internal mechanisms for supplying and draining water.
Recommendations for selection
Most toilets are produced and sold with ready-made shut-off and flush valves.
If it is not included in the package or requires replacement, then the following tips may be useful when choosing it:
- When old fittings are replaced in a tank, it is desirable that the new one be from the same manufacturer and of the same brand.
- When purchasing, it doesn’t hurt to make sure that all pads are soft and elastic. You should not choose products with rubber seals that are too thin, as this will complicate the fight against leaks.
- You can visually inspect the plastic reinforcement and make sure that there are no defects in it in the form of cracks, burrs, or irregular shapes.
- Although the fittings are sold in packaging, after damage it is difficult to return it to the seller, it is still better to make sure that the valve in the outlet assembly and the float in the shut-off assembly move easily.
- A more reliable fixation to the tank is ensured by a locking mechanism with a brass threaded coupling and nut. The metal connection allows the rubber gaskets to be pressed more tightly to the surface of the tank, while at the same time making self-unscrewing more difficult.
Rice. 9 Complete set for mounting the bottom line
Article on the topic:
How to close pipes in a toilet: various options and technology for carrying out the work. Choosing a design for a box, what types of installation there are for various structures, as well as installing a box in a toilet yourself, read about all this in a separate article!
- Almost all manufacturers produce fittings with two buttons for operating the tank in normal and economy modes. This is the best option for drain fittings that should be purchased.
- The easiest way to determine high-quality fittings from a number of presented ones is to weigh them in your hands. The heavier the product, the more reliable it will be in operation.
- It is important to pay attention to the dimensions of the mounting bolts of the reinforcement. On low-quality products they have a small cross-section and small size; in high-quality fittings (Alcaplast) the bolts are much more massive.
- Companies that produce the highest quality fittings: Czech Alcaplast, Turkish Nova, Russian ANI Plast.
Operating principle of dual-mode drain
To save water, the tanks are equipped with a double liquid reset button. They provide a two-mode flush mechanism for the toilet: one regular one - for releasing water in full (4, 6 or 8 l); the other is a reduced mode, designed to drain 2, 3 or 4 liters of liquid. This system reduces water consumption.
But at the same time, it is whimsical from the standpoint of customization and repair. This is due to the fact that this mechanism has an increased number of mating interacting parts, which means an increased risk of breakdown.
According to the material of manufacture
Drain containers are divided into 3 types based on the material they are made of:
- Ceramic. The most common option. Sanitary ware is used for production. Such products are considered reliable and affordable classics.
- Metal. The option is economical and durable. The product has low aesthetic characteristics.
- Plastic. Cheap, simple, lightweight blocks. The disadvantage of this option is its fragility. The plastic tank is not solid enough.
You can find different examples on sale, but ceramic classics are the most popular.
Choosing a toilet tank
Each toilet manufacturer tries to provide maximum versatility in the mounting method. If the old tank is damaged, only a partial replacement is possible, that is, it can be purchased separately from the toilet.
The first thing you should pay attention to is the full name and model of the installed unit. This particular model may be available in the store. If you don't have one, you can easily find an analogue.
To give a more compact look, it is better to pay attention to compact type systems. They have enough volume to flush all waste down the toilet. At the same time, due to the fact that the volume is small, water consumption will be more economical, and this, in turn, will allow the water not to stagnate.
Depending on the type of water connection, you can choose the most suitable option, since this factor does not play a role during installation.
Experience built on use and customer feedback has made it possible to apply more modern technologies in the production of drainage devices. A system has appeared that is capable of dispensing drainage. The electronic draining system allows you to start draining with one click and stop it when you press it again. The automated drain system works in the same way, which allows the user to not take any part, while the system does everything automatically.
Repair
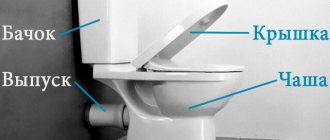
Toilet device
“The miser pays twice,” as the proverb goes. This expression absolutely applies to fittings for tanks. You can often find “all-inclusive” kits with the cheapest parts on sale.
Therefore, when purchasing something, you should pay attention to the manufacturer and the general price category. So, in a system of two elements of shut-off valves, problems may arise with each of them
Water pipes
In the fluid supply kit, sealing gaskets and membranes deteriorate. To replace, you need to disconnect the tank from the main pipe, unscrew the plug and remove the lid from the container. Then disconnect the float lever and unscrew the fixing part. After the piston is removed, the gasket or membrane is replaced. Next, assemble everything in reverse order.
There are often cases where it is necessary to completely replace the float valve. In this case, the tank should be emptied of water. After disconnecting from the float, unscrew the outer and inner fixing nuts. If the water supply is from the bottom, then this may not be very convenient due to the tight fit of the toilet to the wall.
Drain mechanism
Possible problems:
- Part of the structure may leak. In this case, you should check the water supply to see if excess liquid is entering the tank and subsequently pouring into the drain pipe.
- The bulb does not fit tightly to the outlet. This occurs when the material is deformed, contaminated or temporarily worn out. Upon external inspection of the element, it is not difficult to discover exactly what the problem with the drain point is.
- The button is hard to press or does not work. If this problem occurs, you will need to replace the flap valve in the drain siphon or strengthen the fixation of the moving lever. Also, the drain structure in the tank can be deformed and have friction of various parts. To check this, you need to place the fittings on a flat surface, holding them at the fastening points and pressing and releasing the button. The movement should be absolutely free and easy.
Depressurization of fastening
Leaks often occur due to wear of the gasket between the tank and the toilet. In this case, water drips onto the floor. The process of disassembling plumbing fixtures is labor-intensive, so before starting work you should make sure that this particular breakdown is present, and not problems with the fittings. First you need to wipe dry the joint between the tank and the toilet. Then rinse off the water several times. If moisture appears in the seam area, then the reinforcement has nothing to do with the gasket.
Work should be carried out in the following order:
- Turn off the water supply and disconnect the external hose from the tank.
- If necessary, unscrew the valve start button and remove the lid from the tank.
- Disassemble the siphon. In some models it is divided into parts without the use of rigid clamps.
- Unscrew the bolts that secure the container to the toilet.
- Remove the remaining gasket from the joint, clean it, degrease, and wipe dry.
- Then you should install a new sealing part and reassemble the toilet and fittings in the reverse order.
Types of drainage system
Ready-made reinforcement for the foundation
In addition to the internal configuration, the shut-off valves of the flush tank differ significantly in the material of manufacture, which affects the quality and service life of the toilet itself.
Material options for the production of toilet fittings:
- Plastic: Due to the low cost and availability of the material, polymers have rapidly conquered the market in absolutely every industry. However, plastic is a fickle material; the quality and durability of the components, as well as the direct operation of the drainage system, depend on its composition. Previously, the quality of shut-off valves could be judged by the cost of the product itself, however, today there are too many new young manufacturers on the market offering high-quality products at low prices. And established well-known brands allow defects, which leads consumers to doubts. Therefore, today it is very difficult to distinguish reliable toilet fittings from fake ones. Unfortunately, this difference is revealed only during the operation of the toilet.
- Metal: a material that provides high strength and significant service life of shut-off valves. To produce drain systems, modern manufacturers use brass and bronze compounds, because they are truly resistant to mechanical damage and the effects of water. The fittings of the cistern, made of similar metals, do not corrode for several years, maintaining all functional qualities. Metal shut-off valves are typical only for expensive models produced in the appropriate style.
As practice shows, toilets with plastic fittings are in greatest demand, which is understandable. Affordable cost and the ability to repair at any time determine our choice.
The cistern fittings are the basis for the operation of the entire toilet. Water is supplied in two ways: side or bottom. Side water supply is characteristic of our domestic plumbing and is characterized by rather high noise. The lower water supply is much quieter than the upper mechanism.
Before you begin repairing a toilet, you need to familiarize yourself with its design.
Both with side and bottom water supply, the valve closes under the influence of a control rod connected to the float. A float is a kind of plastic container or a small foam element.
Regardless of the type of water supply, the float is carefully balanced during installation of the fittings. Such work is necessary for the efficient and reliable operation of the cistern, which directly depends on a certain water level in the system.
Reinforcement selection criteria
Replacement of toilet fittings is required when malfunctions in the operation of the system are detected. In order for a new device to serve for a long time, when choosing, you should be guided by the following aspects:
- the fittings can be made of plastic or brass. Brass products can last longer than plastic ones;
- If you purchase plastic bottom or side fittings for a toilet, then you need to check the quality of the components. Plastic components must be smooth, free from burrs and deformation;
- It is more advisable to purchase plastic fittings made of polypropylene or low-density polyethylene. Such devices are considered the most reliable;
- The gaskets used for assembly should be as soft to the touch as possible. If you slightly stretch the sealing element, then no cracks should be visible on it. This aspect indicates the quality of the gaskets and the correctness of their manufacture. All gaskets must be of the correct shape;
Sealing elements for fittings
- The fastening elements of the fittings can be made of plastic or bronze. Metal fasteners are more durable during installation. There should be at least two gaskets on the fasteners;
Set of elements for fastening fittings
- the movement of the float valve must be smooth. Sudden jumps or jamming are not allowed;
- the prefabricated structure must be durable. All elements must be securely fastened to each other. If a separate component part has free movement, the valve will quickly fail.
Possible breakdowns and methods for eliminating them
If you suspect a breakdown, you must first shut off the water supply and remove the lid.
External leaks
It is not always possible to see them right away. They become visible with the formation of red spots. Disassemble the tank and carry out diagnostics. If a hard cleaning filter is not installed, elements of dirt and rust may constantly accumulate in the container. They can have a detrimental effect on the internal mechanisms of the system and cause its breakdown.
When the tank is working normally, it is filled with water to the desired level. The bulb is pressed against the drain hole and is held in this position by the action of water. When the trigger is activated, the drain hole opens. The pear should always be provided with air. A protective tube protects it from water. If a bulb or tube is damaged, the entire system breaks down. Therefore, after removing the cover, examine these items first. If they are not elastic, there are cracks, then this is the cause of the leak. Repair in this case is impossible. Needs a complete replacement. If the pear is intact, look to see if there is any dirt or rust under the rubber. They are removed with a sponge.
Next, we look for other causes of leakage:
- The gasket between the toilet and the tank may not be tight. You need to remove the tank and examine it. If it is very hard and covered with cracks, there is only one way out - replacement. It happens that it is simply installed incorrectly. Then you should put the elastic band more tightly. Although the best solution is also a replacement.
- Wear of sealing elements under the connecting screws. Solution: the screws are unscrewed, the seals are changed. Removing the tank is not required here. It is better to install cone-shaped seals - they adhere more powerfully to the working surfaces. After replacing these elements, you need to tighten the screws so that there are no distortions. Their presence will lead to a new leak. The screws are tightened slowly and one by one.
Internal leaks
Their sign is water flowing into the toilet. The reasons are usually:
- poorly adjusted overflow tube;
- damaged valve;
- damaged float.
First, check how the handset is configured. She sits up slightly. You need to see if there is any water flowing into the tube underneath. If so, the float valve needs to be repaired. If not, the lever is corrected.
Debris under the rubber band may also be the source of the problem. If wear is detected, it is better to replace it. If a valve or float breaks, they are also replaced.
Water does not flow into the tank
Here, first of all, you need to check the supply hose. It is detached from the tank, the end is lowered into any container. If there is no water, you will have to replace this hose with a new one.
Another possible reason is that the narrow part of the intake valve is clogged. Repair procedure:
- Drain the liquid from the tank, shut off the water and unscrew the assembly, which includes the valve, float and lever.
- After these steps, a hole will open to fill the tank.
- If there is a blockage there, it needs to be eliminated. A regular needle or wire will help here. For complete cleaning, the valve is removed from the inlet pipe, and any remaining dirt is removed with water.
Noises appear in the tank while it is being filled
In essence, this is not a breakdown, but it does cause a lot of discomfort. In most cases, noises occur immediately after draining the water. Then they decrease.
Solution: pay attention to the locking mechanism; you need to put a piece of tube on its pipe. It should be small
Material: rubber or plastic. The length of the tube should allow it to reach the bottom of the container. After this procedure, the noise will immediately decrease.
There is another way to eliminate noise. It involves replacing the standard float valve with another option - a valve that has a special compartment and a stabilization function. After installing it, the noise in the tank will disappear forever.
Possible breakdowns and repair methods
In any mechanism, even the most primitive one, sooner or later various parts begin to fail. Most breakdowns in old-style drainage devices are fairly easy to fix.
Continuous water supply
First of all, you need to check whether the filling valve is leaking. To do this, remove the cover and lift the float lever. If after this water enters the tank, it means that the valve itself is broken and needs to be replaced.
To do this, turn off the tap in front of the tank and drain the water. Using a wrench, the part connecting the valve to the water supply is unscrewed, the float lever is removed, the fixing nuts are removed, and the valve is pulled out. A new one is installed in its place. The float lever is set to the optimal position after water fills the housing.
If the water flow is completely blocked when you lift the lever, the problem may be caused by the following reasons:
- The misalignment of the float lever (rod) leads to the fact that it begins to cling to the bushing, the float does not float up completely and the valve does not close. In this case, the rod is pulled out and straightened.
- If the seal of the float is broken, it remains partially or completely immersed in water and does not close the valve. In this case, it is replaced with a new one. If there is no suitable model, the damage can be sealed with heated plastic or sealant, after first removing all liquid from the leaking part, but this is a temporary measure.
Constant outflow of water
If water flows out of the container in a thin stream until it is empty, it means that the tightness of the drain mechanism is broken and water is leaking between the body and the bell (pear). There are several reasons that cause this malfunction:
- Corrosion or contamination of the seat surface causes deposits to prevent the drain mechanism from closing tightly. In this case, it is cleaned with emery cloth.
- The appearance of a gap between the body and the seat leads to the same problems. In this case, it is necessary to tighten the fastening nuts with a socket wrench.
- Sometimes the guide sleeve falls out of the seat - this leads to the lock being distorted when lowered. In this case, the sleeve is inserted into the hole of the arc and wrapped with an elastic band.
- The culprit of the breakdown may also be the release lever, which in the wrong position prevents the pear from completely covering the saddle.
In this case, you need to bend it and lower it below the inlet of the underwater pipe by 2.5 mm. The second option is to check the fastenings of the rocker arm holding plates and tighten the loose screws. This is quite difficult since the distance between the wall and the screw heads can be less than 10 cm.
You can try to tighten them with a short tool, pushing it into the screw slot. When performing these steps, you must ensure that the vertical plate with four corners is in the recess on the body.
Overflow problems
This is a fairly typical failure that is easy to identify. Water is drawn into the tank and begins to flow out; if you turn off the tap, the flow of water from the device stops, and when you press the overflow socket, the flow stops - the fastening nut has become loose. In some cases, it is enough to turn the overflow several times clockwise and the nut will take its proper place.
Otherwise, you will have to resort to the following tricks. You need to drain the water from the tank and wait until all surfaces are dry.
If the nut does not unscrew completely, wrap the gap that appears between the overflow socket and the bottom of the tank tightly with sealing material and fill it with silicone glue or paint. Wait until the coating completely hardens.
If the nut is completely unscrewed, the overflow is removed and a sealant is wound onto its threads so that it fits tightly into the hole at the bottom of the tank.
Replacing the supply hose
Damage to the supply hose and gaskets at the junction leads to the appearance of water droplets (the problem can be confused with condensation) at the points where it is connected to the drain body. First of all, tighten the connecting nut.
If the leak remains, you need to turn off the water and disconnect the hose. The gasket is changed, the threads are covered with a winding, the hose is reattached to the tank and the nut is tightened.
Loud noise when filling
Sometimes, when filling an old type tank drain, it makes a loud noise that can wake up the household. You can replace the part with a special stabilizing device, and thus correct the problem. If the pressure entering the housing is not too strong, the problem can be solved much easier.
The filling valve mechanism includes a short tube for draining water. You need to install a muffler vertically on it from a flexible plastic or rubber hose, lowering the lower end into the water at the bottom. This will help to avoid noise when water falls and the sound of a jumping float.