Tank valve: device, causes of leakage, repair
The cistern flush valve serves to supply water to the toilet flush bowl. According to the type of fastening, the fittings can be with bottom or side supply. The shut-off valve has a simple operating principle that allows you to independently eliminate possible malfunctions associated with its operation. The article will discuss its structure, main components, causes of leakage and repair methods.
Tank valve
The inlet valve is responsible for collecting and shutting off the incoming water into the toilet.
In Soviet era systems, valves with a rod float valve were installed. It was characterized by slow, uneven water intake and high noise levels. The only advantage of such a system is the ability to operate normally even with unstable or extremely low water pressure. The new compact toilets are equipped with fittings with a membrane valve. The water supply occurs quickly and almost silently, and the supply is shut off without delay. For uninterrupted operation, a pressure is required, not lower than 0.05-0.1 atmospheres and not higher than 1-2 atmospheres. In addition, the water entering the device must be free of pieces of rust and other contaminants, otherwise it will lead to rapid clogging and the need for frequent disassembly for cleaning.
Main problems with drain fittings
From time to time, small malfunctions arise in the operation of the toilet flushing system, which, if desired, can be easily fixed with your own hands.
- Systematic flow of water into the toilet bowl;
- Water constantly flows into the flush tank.
A systematic stream of water that flows into the toilet indicates damage to the bulb in the system. The pear stops sealing the drain hole in the initial stage. To solve this problem, you can attach some kind of weight, thus weighing the pear down and returning it to its normal position. If the drain system fittings are equipped with a membrane, then in this case only replacement of this spare part is necessary.
Installation of drain fittings
If water constantly enters the tank, it means the float is deformed. If the float is skewed, it is quite easy to correct it. There is a more severe version of such a breakdown - depressurization of the float; to check it, you need to remove it and lower it into a container of water; if it sinks, it means it is unsuitable for further use and needs to be replaced.
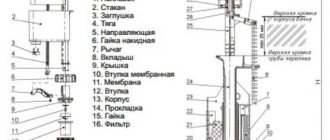
The design and principle of operation of the diaphragm valve of the drain tank
The work of shut-off valves is conventionally divided into several stages. Let's take a closer look at each of them:
Stage 1. The valve is open, water is drawn into the tank.
The pressure of the liquid in the pipe acts on the membrane, pushing it to the side, which allows the process of filling the tank to begin. Number 1 indicates the inlet to the pre-fill chamber. The latter also has a hole that allows water to flow directly into the tank. The mechanism also contains a membrane (number 3) and a piston (4).
There is a hole in the membrane through which a rod with a hole marked with the number 5 is inserted. Its diameter is approximately 1mm. With its help, the liquid penetrates into the filling chamber created by the piston and membrane. When the float is in the down position, hole number 6 in the piston is open, allowing a small volume of water to enter the tank. As a result, approximately equal pressure is achieved in the preliminary and filling chambers, as well as outside them. This condition is the main difference between a diaphragm valve and a stem valve.
Stage 2. Raising the float due to filling of the tank.
The float pushed out by the liquid floats up, moving the rod with the seal to the inlet hole indicated by the number 6. The subsequent movement moves the membrane with a large seat. This ensures the tightness of the filling chamber, thereby stopping the accumulation of water.
Stage 3. Drain.
When you press the drain button, the float drops, stopping its impact on the rod. It opens the hole in the piston, relieving the pressure in the filling chamber. The pressure of the liquid in the pipe pushes back the membrane with the piston, starting the procedure described in the first stage.
Tank valve repair
First, let's consider the problem when the valve of the drain tank does not hold. Even when the tank chamber is completely filled, the valve continues to allow liquid to pass through in small volumes. Excessive amounts of water overflow the top of the flush mechanism and flow into the toilet. To eliminate a leak, you must perform the following steps:
- Shut off the water.
- Remove and disassemble the float fittings.
- Take a used toothbrush and clean the inner chamber of the valve from plaque, pieces of rust and other blockages.
- Assemble and install the fittings in place. Turn on the water supply and check that it is working properly.
If the leak is not eliminated, you will have to purchase new shut-off valves. There are no other repair methods, or they will be more expensive than purchasing a new part.
As a second malfunction, consider the case when the toilet cistern leaks through the valve. The reason for this is the wear of the sealing gaskets installed between the fittings and the hole at the bottom of the tank.
- Turn off the water and unscrew the nut under the tank. This will release the fittings and allow you to get them out.
- Remove and replace all existing seals. In some cases, there are two elastic bands, inside and outside. But often the seal is installed only inside. You can buy it at the market or at a specialized plumbing store.
- After installing the new rubber gasket, reassemble the fittings in the reverse order.
The third problem may be the lack of water shutoff due to the incorrect position of the float. When the tank is already filled and liquid begins to flow into the toilet bowl, the float is fixed too high. Twist the plastic rod to lower the float lower. The float pushed out by water will begin to act on the valve, cutting off the flow.
The article discussed the valve of the drain tank, the principle of its operation, its design and possible malfunctions. Repairing the inlet valve of the drain tank involves cleaning it from contaminants. If one of the device components breaks down, the owner will have to buy new fittings, since spare parts are usually not provided. Replacing rubber gaskets in devices with bottom connections will help eliminate water leakage to the outside.
Breakdowns and their repair
Let's look at typical breakdowns and possible ways to fix them.
Water is leaking at the junction of the tank and toilet. There may be three reasons:
- As a result of long-term use, the bolts became rusty. The clamping force does not work, the gaskets do not hold. Shut off the water supply, open the tank, unscrew the nuts.
When changing nuts, be sure to change the gaskets, including the gasket on the bottom of the drain column. Additionally, we use a sealant to protect ourselves.
We tighten the nuts gently, without unnecessary pressure. We remember the fragility of porcelain and earthenware products.
- The gasket in the area where the drain column is connected has become unusable. We do the same as in the first case, but it’s not a fact that the problem is in the gasket.
We carefully examine and probe the body of the drain channel for cracks. If we find it, we change the drain column.
- The saddest thing: a crack on the tank itself. Using a mirror, we inspect the back wall of the tank. Using toilet paper or a table napkin (they get wet quickly), we determine the location of the leak by applying it.
We definitely change the tank, it cannot be repaired. Don’t be fooled by advice to temporarily cheat. Cracked earthenware can fall into pieces at any moment from the slightest pressure or even a splash of water, the glaze is very sharp, and injuries from a flying tank can be very serious.
Water does not flow into the tank. Causes:
- The water supply hose is clogged. We unscrew the hose, blow it out or rinse it in the opposite direction, and install it in place.
- The supply valve is clogged. The most common reason. We dismantle, wash, blow. If, with hard water, a deposit has formed that interferes with the flow of water, soak the entire assembly with the supply valve in a strong solution of citric acid for 5-6 hours, the scale will easily peel off. We put the cleaned unit in place.
Water constantly flows into the toilet bowl.
- If the setting does not help, then the membrane valve has become unusable, the water level rises above normal, and the excess constantly flows out through the overflow channel. The part must be replaced.
- The membrane on the locking unit has worn out or is simply clogged with trapped rust or debris. We clean it and replace it if necessary.
The drain button is stuck. Open the lid and set the buttons to the correct position. We examine the lever mechanism and the integrity of the hooks.
The fittings in the tank must be positioned strictly vertically, no touching the wall, this is the only way to ensure smooth operation of the system.
If jamming occurs frequently, use a drop (about the size of a match head) of thick lubricant on the inside of the reservoir cap. Even a woman can cope with such a breakdown by easily preparing “graphite lubricant”.
Crush a piece of graphite from a pencil, add a drop of any rich cream, mix, and use. Remove excess on the button and tank with a napkin.
Having assessed the scale of the breakdown and not being confident in our abilities, we call a specialist. And remember: the master is not omnipotent.
Sometimes repairing a device can be more expensive than buying a new one, and sometimes it is simply impossible. Therefore, with a light heart, allow a new sanitary kit to appear in your home, to the delight of your body and soul.
Types and design of the cistern flush valve, toilet flush design
Today it is impossible to imagine that people once lived in houses without toilets. At the same time, the bathroom must have the most modern equipment, otherwise there will be no comfort and ease of use. The central place in any toilet room is given to the toilet. The design of its drain mechanism usually differs slightly between different models. The release device deserves special attention, more precisely the device of the drain tank valve. Let's take a closer look at it; we only pay attention to it when it breaks.
Types of drain devices
There are two main groups of toilet flush mechanisms, which are distinguished depending on the actuation:
- Exhaust,
- Push.
The first ones are also called stock ones. This name is due to the fact that to activate such a device, you need to lift the rod up using the handle, and then the drain hole will open. Almost all new toilet models do not have such a system. Mostly manufacturers have used it before.
As for the second type of drain mechanism, it is also called push-button, and it has two subgroups:
- Single-mode flush - such a device has only one button or key that must be pressed so that water from the tank splashes into the toilet.
- Dual-mode drain - this device has a button of two halves, or two buttons. One half operates the mechanism so that only half of the water splashes out of the tank, and the second serves to release all the water at once. It is also called a toilet cistern valve device with two buttons.
There is a third type, these are tanks with a stop function. They have one key, but water can be released in different ways. To adjust this, you need to press the button more than once. For example, if you press it once, water will begin to splash out of the container, and if you press it again at this time, the release will stop and the valve will close it.
A few words about the design of the tank fittings
Before I tell you why a toilet tank may leak, I will introduce you to the design of the fittings so that you understand the principle of its operation.
Of course, there are currently a great many options for mechanisms.
However, the principle of operation of the tank always remains the same, since any fittings include three main elements:
shut-off mechanism - is a tap that automatically shuts off the water as it enters the tank. The float is responsible for the water level at which the shut-off valve is activated;
Tank fitting options
- discharge system - is a valve that closes the drain hole. The valve is controlled by a button or lever;
- overflow system - prevents flooding of the apartment in case of failure of the locking mechanism. If the water in the tank rises above a certain level, the overflow system ensures that it is drained into the toilet.
Features of the tank
The mechanism for draining water from the tank is of two types. In the first, all the water is drained when you press a button or when you lift the handle up. The first option provides two buttons for rational use of water. When you press one of them, the water is partially drained, and using the second you can remove all the water from the tank.
If the flush works normally, then water flows into the toilet bowl quickly and without delay with a characteristic sound. If problems arise, the flow of water either does not stop and the walls of the toilet are constantly wet, or the water overflows from the tank.
This kind of breakdown can cause flooding of the toilet room, or provoke the formation of limescale on the walls of the toilet and, undoubtedly, lead to high water consumption due to its constant supply. Another sign of a malfunction may be the appearance of condensation on the cold water pipe that leads to the toilet.
Sometimes, to eliminate a leak, it is enough to clean the tank and parts from plaque and rust. They appear due to poor quality water and failure to follow simple plumbing hygiene rules.
To avoid further problems and eliminate the leak, it is important to find out the cause of the leak and determine in which part of the tank the breakdown occurred and check all the parts. To do this, you need to turn off the water in the riser, then clean the tank and study the design
Flush design device
If previously the tank body was made of cast iron, today ceramics, earthenware or special plastic are used. All the main elements of the tank are connected to each other.
There are only three key mechanisms: inlet, adjustable float, flush and overflow systems:
- The inlet or fill valve stops the flow of water into the tank after it is filled. The required water level is “measured” by the float.
- Locking or drain mechanism. This is the flapper/valve that opens during flushing.
Modern models have buttons for this. They can be single or double to adjust the amount of water flushed. Old Soviet toilets use a chain, lever or rope that is attached to a lever with a bulb. These elements are connected by traction. And the pear is at the bottom of the tank.
The standard tank design is quite simple. In some models, the flushing mechanism consists of a siphon. Its membrane is the weak link and often fails, as do the spokes connecting the flush and the float
The toilet float regulates the operation of the locking mechanism and controls the level of water drawn in, the design of which depends on the type of water supply to the tank (bottom or side).
There are several types of floats, but each one has air inside:
- The first, hollow, is made of rubber. It is located at the bottom of the reservoir and functions as a rocker arm.
- The second, plastic, glass-like float. Located at the top of the tank. When the tank is filled with water, it rises up and works almost silently. The latter type is used only in older models; the first type is installed in modern toilets.
The overflow system protects the entire toilet room from flooding if the filling mechanism does not work for some reason. When more than normal water gets into the tank, it is the flush tank fittings that drain it into the toilet. If you find a leak, then do not panic, but remove the toilet lid and figure out what the problem is.
Types of float valves
Float valves are used to inlet and outlet water. They have their own varieties, such as:
- Croydon valve;
- Valve with piston;
- Valve with membrane.
The first has a shell, a lever axis on a float, a seat and a piston. The lever moves the piston perpendicularly. Typically, such valves are equipped with old drain tanks, which are no longer used in many places.
The piston-type tank inlet valve device has a lever axis. It is secured in a forked cotter pin. When the lever moves horizontally, it moves the piston, which from time to time touches the seat, which helps regulate the flow of water into the tank.
The piston has a seal at the end. When it comes into contact with the seat, the seal blocks the flow of water. This type of valve is quite widespread.
The third type of valve has a membrane in its design instead of a gasket. It can be made of silicone or rubber. As the piston moves, the membrane also moves. Thus, it can block the incoming water flow at the right time. This type of valve is the newest and most modern. All latest models of drain tanks are equipped with it. Therefore, further we will consider its mechanism and design in more detail.
Modern diaphragm valves
The diaphragm float valve ensures fast water supply. Depending on how high-quality the fittings are selected, this process can be noisy or almost silent. Unlike older models, it overlaps very quickly.
If we remember the disadvantages of membrane inlet valves, then they also exist. The main disadvantage of using this type of valve is that for it to work effectively, constant pressure must be maintained in the water supply network.
The value of such pressure should be in the range of 0.05-0.1 MPa. Moreover, in order for such a valve not to fail quickly, the water in the system must be clean. It is clear that both of these conditions are quite difficult to achieve in some places, for example in villages or holiday villages.
Another aspect that should not be overlooked if you are considering installing a membrane-type cistern shut-off valve in your toilet is the quality of all fittings and shut-off elements. If the material used for its manufacture is not of very high quality or there were defects in production, then long-term use of the product is out of the question. This valve will have to be replaced frequently. Even repairs here will most likely be powerless. It is not possible to make a new membrane yourself.
Intake valve mechanism
The inlet fittings in the tank have their own operating principle, which should be understood before proceeding with its replacement or repair. Let's consider the phases that replace each other in the process of moving water to the tank.
So, the first phase is characterized by the fact that the valve is in the open position. At this time, water is drawn into the tank. The membrane, following the direction of water flow, moves away. This means that water can easily flow into the tank.
The mechanism of operation of the drain device
At first, water fills only the preliminary compartment. To allow water to enter the tank itself, a special hole is provided in this compartment. This process is very similar to what occurs in devices equipped with valves with a stem, but here there is a membrane that is stretched over the piston. The membrane has a lumen through which a plastic rod passes, which also has a 1 mm diameter lumen. Due to this, some of the water enters the filling compartment. It is formed by the membrane itself and the piston.
If the float is lowered, a small hole opens in the piston, only about 0.5 mm. Through it, a small part of the water can enter the tank. Thanks to this mechanism of action of the diaphragm valve, the same pressure is ensured in the preliminary compartment, in the filling compartment and behind it. This is the difference between this design and the one that has a valve with a stem.
The second phase is when water splashes into the tank and at the same time raises the float up. Along with it, the level of the rod with a rubber seal increases. The seal closes the hole. With further movement of the rod, both the piston and the diaphragm will be pressed against the seat. This seals the filling compartment.
Due to the fact that the pressure from the water in the filling compartment adds up to the pressure of the float, which rises, the membrane is tightly compressed with the seats. And this, in turn, stops the supply of water to the tank.
Flushing the toilet
The third phase is the release of water. When the water comes out of the tank and splashes into the bowl, the pressure of the float on the rod stops. The hole in the piston is no longer closed by the rod, so the pressure in the filling compartment decreases. It remains only from the water supply network; it is this that acts on the membrane and the piston, moving them to the side. As a result, the mechanism goes back to the first phase.
Drain mechanism device
The tank fittings include two components:
- water supply valve;
- flush mechanism for flushing water into the toilet.
The fittings can be separate or combined.
Separate fittings
This is the most common option. Both components are not connected to each other. At the entrance to the tank, a valve with a membrane is installed, connected to a lever with a float at the end. When the water rises to the desired level, the float will be at the same level and the membrane will block the flow area of the valve. The drainage mechanism is a vertical rod with a bulb valve at the bottom.
By lifting the rod by the handle (outdated version), the user removes the bulb from the saddle and opens the drain hole. In modern models, this requires pressing the button at the top. The most practical version of the drain mechanism has a double button: one part empties the tank only half, the second completely.
The bulb valve is made of buoyant material, therefore, after being removed from the seat, it is held in the body of water and does not block the drain hole. After the tank is emptied, it falls back onto the saddle and, when the tank is filled, remains in this position, since the water presses on it only from above.
Advantages of the solution:
- low cost;
- ease of adjustment;
- cheap repairs: if damaged, only the failed component is replaced.
Combined reinforcement
This is a more expensive option, used in luxury plumbing fixtures.
Both components are combined into one system. The advantage is significant reliability. Disadvantages: high cost both in purchase and in repair - if it breaks down, you have to replace the entire complex. The design of the fittings depends on the method of supplying water to the tank - from the side or from below.
But the adjustment of both options is carried out almost identically.
Problems in the mechanism and their elimination
What problems may arise during the operation of the drain mechanism? For example, water may not be filling into the tank, or the water may no longer be shut off. The reason for this phenomenon most likely lies in the fact that one of the holes is clogged. Another reason for such problems is the failure of one of the two most important parts of the mechanism - the rod or the membrane.
In any case, you will have to disassemble the device and check all the elements. They will also be thoroughly rinsed and cleaned. But it happens that the cause of malfunctions is a banal low pressure in the water supply system, or its surges within one day. In this case, the device may simply not work.
If the pressure drops too much, water will stop flowing into the tank altogether. If water must come from a suspended structure, then if the pressure is below normal, the water will not even be able to reach the filling chamber. The float will float, but it will not block the water. To cope with this situation, you may even have to enlarge the water inlets by drilling them out a couple of millimeters.
In general, the smaller these holes, the greater the pressure should be in the system. This must be taken into account if you are installing a drain mechanism, for example, in a country house. If you know for sure that you regularly experience pressure surges during the day, for example, if the water pressure in your house is maintained by pumps that are turned off at night, then it is best to pay attention to fittings with a rod valve.
That's all, we looked at the design of the toilet cistern flush valve, as well as the reasons why it may fail. Now it won’t be difficult for you to understand everything and troubleshoot problems.
Most common faults
- Water leakage at threaded connections . It is usually caused by an incorrect connection (when the nut is screwed on skewed, loosely) or failure of the sealing gasket.
- Water flows continuously from the tank into the toilet , that is, the flush tank does not hold water.
There may be several reasons for this: a foreign object getting between the drain hole and the plug, a misalignment, or a violation of the tightness of the plastic float. Also a common cause is loosening of fastenings or breakdown of mechanical elements - plastic rods, float. - When the control button is pressed, the drain does not occur . This may be caused, again, by the appearance of significant backlash at the joints or breakage of the plastic elements of the system. Your toilet cistern flush button may need to be repaired.
- Water does not enter the tank - even after the tank is completely emptied, the filling mechanism does not work. This occurs as a result of improper operation of the float or clogging of the inlet membrane.
The design of a modern cistern is by no means as complicated as it seems at first glance. Any person who has the slightest understanding of technology can study it, after which he will be able to independently install a toilet tank, adjust the fittings and carry out the necessary repair work in case of malfunctions.
What do you think of this article?
Types of toilet valves
The inlet valve (also known as filler, filling or filling) serves to supply water and stop filling when it reaches the limiter. The outlet valve (aka drain) takes on the functions of flushing water, adjusting the volume and flow rate.
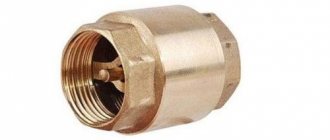
Each inlet valve for a toilet cistern must have a shut-off device to shut off the water. The design of some fill valves for toilets with bottom connections includes a check valve that prevents water from the tank from entering the water supply system when the water supply is turned off.
All inlet and outlet valves for the toilet, in turn, are divided into different types, according to material and design features. Since sanitary fittings are constantly being improved, models with completely new characteristics appear, the information and classification below should be considered approximate.
Valves classification
By material
Inlet and drain valves are made from the following materials:
- entirely made of plastic;
- mainly made of plastic with individual elements made of steel or brass (fitting thread, rocker arm and other parts).
In terms of reliability, modern models for flush tanks with plastic threads, supplied to the market by well-known manufacturers, are not inferior to metal ones.
Gaskets and membranes are made of rubber or silicone; the latter look preferable because they do not lose elasticity.
By location
The following installation options for toilet filler valves are possible:
- with bottom water supply – attached to the bottom of the cistern;
- with side connection – attached to the side wall of the tank;
- 2 in 1 – the valve has a removable fitting attached from the bottom or side; it can be attached to the bottom and side wall.
By type of design
Types of toilet fill valves:
- with a side connection and a conventional float on a long metal rocker, the design is familiar from Soviet toilets; with valves of a later time, the filling goes through a tube to reduce noise;
- with a bottom water supply and a float on a long rocker, is a modernized version of the previous model, rare;
- with a side connection and a vertical stand along which the float moves;
- with bottom water supply and vertical stand for float;
- the previous version, supplemented with a check valve.
Types of fittings for flush cisterns
The principle of operation of a regular tank is not complicated: it has a hole through which water flows and a place where water is discharged into the toilet. The first is closed with a special valve, the second with a flap. When you press a lever or button, the flap rises and the water, in whole or in part, flows into the toilet, and then into the sewer.
After this, the valve returns to its place and closes the drain point. Immediately after this, the drain valve mechanism is activated, which opens a hole for water to enter. The tank is filled to a certain level, after which the inlet is closed. The water supply and shut-off are regulated using a special valve.
The fittings for the flush tank are a simple mechanical device that allows water to be drawn into a sanitary container and drained by pressing a lever or button.
There are separate and combined designs of fittings that collect the volume of water required for flushing and drain it after activating the flushing device.
Separate and combined options
The separate option has been used for many decades. It is considered cheaper and easier to repair and configure. With this design, the fill valve and damper are installed separately, they are not connected to each other.
The shut-off valve for the tank is designed in such a way that it is easy to install, remove or change its height
To control the flow and shutdown of water, a float sensor is used, in which sometimes even a piece of ordinary foam is used. In addition to a mechanical damper, an air valve can be used for the drain hole.
A rope or chain can be used as a lever to lift the damper or open the valve. This is a typical option for retro-style models, when the tank is placed quite high.
In compact toilet models, control is most often carried out using a button that needs to be pressed. For those with special needs, a foot pedal may be installed, but this is a rare option.
In recent years, models with double buttons have been very popular, which allow you to empty the tank not only completely, but also halfway, in order to save some water.
The separate version of the fittings is convenient because you can repair and configure individual parts of the system separately.
Combined type fittings are used in high-class plumbing; here the drain and water supply are connected into a common system. This option is considered more reliable, convenient and expensive. If this mechanism breaks down, repairs will require completely dismantling the system. Setup can also be a bit tricky.
The fittings for a toilet cistern with side and bottom water supply differ in design, but the principles of setup and repair are very similar.
Materials for making devices
Most often, toilet fittings are made of polymer materials. Typically, the more expensive such a system is, the more reliable it is, but this method does not provide clear guarantees. There are also counterfeits of well-known brands, as well as quite reliable and inexpensive domestically produced products. The average buyer can only try to find a good seller and hope for luck.
Fittings made of bronze and brass alloys are considered much more reliable, and such devices are much more difficult to counterfeit. But the cost of these mechanisms will be significantly higher than that of plastic products.
Metal filling is usually used in luxury plumbing fixtures. With proper configuration and installation, such a mechanism functions smoothly for many years.
In bottom-fed toilets, the inlet and shut-off valves are very close. When setting up the fittings, you need to make sure that the moving parts do not touch
Water supply point
An important point is where water enters the toilet. It can be done from the side or from below. When water is poured from the side hole, it produces a certain amount of noise, which is not always pleasant to others.
If water comes from below, it happens almost silently. The lower water supply to the tank is more typical for new models produced abroad.
But traditional domestically produced tanks usually have a side water supply. The advantage of this option is its relatively low price. Installation also differs. Bottom water supply elements can be installed in the tank before it is installed. But the side supply is installed only after the tank is installed on the toilet bowl.
For replacement, the fittings are selected taking into account the option of supplying water to the plumbing tank; it can be side or bottom
Types of float valves
Float valves for toilets are divided according to the type of locking mechanism into the following types:
In a piston device, a floating float, when rising, presses on a piston moving towards the flow of water until it rests against the saddle. Piston locking mechanisms are already outdated; they do not have any unique design features.
The disadvantages of such devices include noise during filling and the constant sound of falling drops due to the loss of tight pressure to the inlet over time.
The membrane locking mechanism is activated by the action of the pusher on the rubber or silicone membrane. Among the advantages of membrane devices are fast water collection, less noise, and constant flow intensity. Disadvantage: good constant water pressure is required.
Modern diaphragm valves
Most modern inlet valves for the flush tank are diaphragm devices. After draining, the membrane with the pusher moves away under the pressure of the incoming flow, allowing water to flow into the tank.
The inlet valve of a membrane-type toilet is structurally different in that during the filling process, part of the water penetrates behind the membrane, creating equal pressure on both sides. After the float rises to the limiting level, the pusher pressure is added to the water pressure and the membrane hermetically seals the inlet nozzle.
Working principle of drain and fill valve
The general scheme of operation of plumbing fittings for a flush tank includes three stages: automatic water supply – overflow protection – draining.
The actuation mechanism of the fill valve is as follows:
- When water is collected after flushing, the float gradually floats up and moves the lever, which actuates the pusher or piston of the locking device.
- When the maximum filling level of the drain tank is reached, which is regulated by setting the float, the inlet hole is closed.
- The water supply to the toilet cistern stops.
The principle of operation of the drainage device is simple - when you operate a lever, button or handle pull, the rod closing the drain hole rises and the water is drained.
Another function of the flush mechanism is to protect against overfilling of the cistern in the event of improper adjustment of the toilet inlet valve or failure of the shut-off device. For this purpose, the drain valve design provides a special overflow pipe.
The upper end of the pipe is below the edge of the tank, and the lower end is aimed at the drain hole. When the water level in the tank exceeds the upper section of the pipe, excess liquid is drained into the toilet. In some models, the overflow pipe is mounted separately from the rest of the drainage device, but the safety drain mechanism is the same.
When installing and adjusting plumbing fixtures, the upper section of the overflow pipe is installed so that it is located on the same level with the upper plane of the float and at least 10 mm below the hole for the side supply, as well as the air inlet holes, if any.
How are shut-off and drain valves adjusted?
If the tank and fittings set were purchased separately, the drain and shut-off valves require adjustment: the user determines the volume of water entering the container and the installation height of the drain valve.
Adjusting the Float Stop Valve
The products are available in two versions:
- with metal lever for float. To increase the volume of incoming water, it is bent so that the float is higher. To reduce the amount of liquid, do the opposite: bend the lever so that the float is lower;
- with plastic float lever. This lever does not bend. The position of the float is adjusted with a special screw.
Usually inside the tank there is a mark for the optimal water level - you should follow it.
Sometimes it is not possible to adjust the filling level of the tank by moving the float; possible reasons:
- The shut-off valve is clogged. In this case, less water is supplied than the required volume. Having shut off the water supply to the apartment or on the branch to the tank, the valve is dismantled, disassembled and washed;
- The shut-off valve diaphragm is worn. Water flows continuously and flows through the overflow pipe into the toilet. Valve replacement required.
Adjusting the drain mechanism
It is necessary to install the bulb valve at the required height.
The procedure depends on the design and is described in the manual. When setting up a drain mechanism with a button, the button assembly is set so that it is located at a distance of 3-7 mm in relation to the lid. This ensures reliable fastening of the cover.
Then the flush button is screwed into the hole in the lid. To center the thread, first make a couple of turns counterclockwise and only then screw the element clockwise. No tools are required - just tighten by hand. The installation is completed by checking the drain mechanism.
When making adjustments, it is important to prevent the moving parts of the water filling valve and the drain mechanism from coming into contact. It is also necessary to ensure that none of the elements touch the wall of the tank
Installation of valves for a toilet with bottom supply
The list of components and parts of the valve device for a toilet cistern with a bottom connection includes:
- float;
- craving;
- rocker arm;
- rocker axis;
- float stand;
- stand extension;
- return element;
- pusher;
- membrane;
- two-piece body with nozzle and thread;
- filter;
- conical gasket;
- swashplate;
- nut for fitting.
The extension is used to extend the float stand when installing a filler valve with a bottom connection, if the toilet tank is very high and it is necessary to raise the filling level. The return element changes the movement of the incoming water flow from top to bottom, thereby reducing noise.
The mechanism of some models, mounted in a drain tank with a bottom connection, is equipped, in addition to a shut-off valve, with a check valve. This additional unit prevents the contents from being discharged back into the water supply when the water supply is temporarily interrupted.
Operating principle of shut-off valves
During operation of shut-off valves, the following parts are involved:
- Float
- Lever design
- Valve
- Union
At the inlet there is a fitting through which water can enter from the system. When filling the cistern, the water level rises, causing the float to act on the lever system. She, in turn, presses the valve to the fitting and blocks access, blocking the liquid.
When filling, three types of location of the filling fitting are used:
- Top position
- With side water supply
- Bottom position
Each of them has its own subtleties in the operation of the system as a whole.
Toilet fittings with top connection
This type is used quite rarely. Due to the peculiarity of this design, filling the tank with water was accompanied by a high noise level. Subsequently, manufacturers abandoned production with such filling.
Toilet fittings with side connection
For lateral connection, the shut-off valve has two versions:
- Rod
- Membrane
The operating principle remains unchanged. The main difference is that the membrane is not able to block the access of water gradually, so when filled, access is blocked instantly.
The rod valve has the ability to close smoothly. At the moment when the float rises, the lever system gradually acts on the rod, thereby smoothly closing the access to water.
Fittings for toilet bowl with bottom connection
This method has a number of advantages over other supply connections:
- Silent filling
- Convenient location
- Possibility to hide water supply systems
- Large selection of varieties
- Availability of components
Due to the fact that the connection is made at the bottom, the toilet allows you to hide all water supply systems. It is for this reason that overhead tank designs are no longer used in apartments and residential buildings.
Such systems, in turn, have also been modernized over time. In order to reduce water consumption, two-button fittings began to be used, which include 2 drain modes. The first mode allows you to slightly open the drain valve of the fittings and release water gradually.
The second mode is designed to drain a large amount of water in a short time. The model range with a bottom connection is equipped with a two-button fitting at the manufacturer’s factory, but if desired, it can always be replaced.
Maintenance of drain and inlet fittings
Water in domestic engineering networks often contains mechanical impurities (rust, sand, salt deposits), so many malfunctions occur due to clogged plumbing fixtures. For this reason, the vast majority of valve maintenance activities involve cleaning.
When servicing and carrying out preventive maintenance, special attention is paid to the filter, membrane, inlet nozzle of the filler valve, locking ring or bulb, and drain hole. It should be borne in mind that the filter is usually installed in Russian-made models; it is not always found in samples from foreign suppliers.
Another part of the problems is related to improper filling of the tank and leaks. The basis for eliminating these shortcomings is the connection and adjustment of components, the serviceability and tight pressure of the gaskets, and the tightening of the nuts to the end.
How to choose a valve
The main characteristics that you need to pay attention to when looking for fittings:
- suitable tank height;
- parameters of the connection hole for the inlet valve, drain hole and hole in
- reservoir cover for the start button.
If the diameter for the start button is not suitable, in some cases the problem is resolved by lining the adapter ring.
Plumbing fixtures with an inlet valve for a toilet with a bottom supply, due to the inconspicuousness of the supply hose of the plumbing system, look more aesthetically pleasing.
Other advantages of such models include reduced operating noise. In a device for a toilet cistern with a side water supply, the mounting hole is located above the filling level of the cistern, so there is less chance of leakage.
The choice of drainage method is determined by the requirements. Touch and single-mode pressure devices are usually installed in public places with high traffic, where the main importance is given to regular flushing and good flushing of the toilet bowl, rather than saving water consumption. For apartments, models with two modes or a “stop” function are more suitable.
Recommendations for selection
Additional criteria can help guide buyers when choosing devices:
- A set with fittings, which is sold initially. The composition should include not only the toilet inlet valve, but also a float with a limiter function, sealing rings and a nut for fixing.
- The presence of deformations and nicks in plastic elements is unacceptable. If a product for a cistern is sold with defects initially, then it will not last very long.
- The same rule applies to gaskets. Softness and elasticity are the main properties for O-rings. It is also important to preserve the correct geometric shapes of the products.
- It is important that the structure moves smoothly. A sharp, jumpy move is a reason to think about abandoning the purchase.
Toilet valve: types of valves and features of their installation. Installation and adjustment of the intake valve
The purpose of the toilet inlet valve is to regulate the flow of water into the toilet tank. The valve ensures silent and fast filling: about 7 liters in 20-45 seconds.
Equipped with a filter with a cell size of about 200 microns. If clogged, it can be cleaned and washed with water without removing it from the tank. The float in such a device can be open, or it can be located inside a protective housing.
Reinstalling the float valve is quite simple. In models with a bottom connection, the valve must be installed before installing the tank.
A rubber gasket is placed on the device tube, turning its conical side towards the hole in the tank. Then the valve is inserted into the hole for the water supply, a plastic washer is put on (if included in the kit) and secured with a nut. The nut is first tightened by hand and then tightened with a wrench.
It is very important to ensure a tight seal by installing the rubber gaskets correctly. In models with a side connection, protection against leaks is not so important; there the water supply is located above the filling level of the tank.
You also need to pay attention to the fact that the float in the tank does not touch anything, otherwise it will not be able to freely rise or fall with the water level.
It is also important to install the float so that the water level is 15 cm below the edge of the tank. Some models provide for adjusting the filling level of the tank. With it you can set the tank to be filled completely or halfway
A flexible hose is connected to the water riser through a tap using FUM tape. A shut-off valve must be installed. If repair work is necessary, it will allow you to shut off the water.
Restoring the float valve is as follows:
If a leak is detected in the area of the shut-off valve, troubleshooting work is carried out in the following sequence:
If tightening the sealing nut of the shut-off valve clockwise does not bring results, we will disassemble it. To do this, remove the sealing nut
Installation and adjustment of the exhaust valve
The flush valve mechanism is designed to supply water to the toilet. Manufacturers produce many different device configurations.
For example, for the economical use of water, a two-level fitting has been developed in which the drainage can be complete or partial. Single-level devices are sometimes equipped with a “stop” system, which stops the draining process as soon as the button is released.
When purchasing a device, you need to pay attention to the material from which the locking gaskets are made.
If previously domestic manufacturers used only rubber, now they are increasingly made from silicone. This material has no mechanical memory and is not deformed.
Silicone and rubber gaskets and a conical lip on the valve seat provide multiple protection factors and prevent valve leakage
Installation of fittings step by step
If the flush mechanism is broken or outdated, there is no need to change the toilet tank - you just need to replace the faulty element.
Even if the toilet model is outdated, the manufacturer produces a new, but suitable device. It is better, of course, that the tank and shut-off valves belong to the same brand.
The water flush valve kit includes a flush valve, a sealing gasket, an adapter ring, fastening the tank to the toilet, as well as detailed installation instructions
Next, the installation of a drain valve will be shown using the example of a device for a dual-mode drain with a cable. Install the tank on the toilet. To do this, put gasket 14 on the base of valve 12.
You may also be interested in information about choosing and replacing the gasket between the toilet and the tank.
The valve is installed in the hole of the tank and the nut 15 is tightened from the outside, onto which the gasket 16 is then put on. It will ensure the tightness of the connection.
Bolts 13 are installed in the mounting holes in a certain sequence.
Install the cable mechanism. Its end is secured in the rocker arm 8 so that the plastic casing is wound in all the way.
Then lower the body of the drain valve 9 into the base 12 and secure it by turning it to the right. Check that the device does not touch the walls of the tank and the intake valve mechanism.
Next, adjust the height of the overflow tube 7. To do this, you must first turn it clockwise to remove it from the lock. After setting the required height, it is locked again by turning it counterclockwise.
When the tube height is correctly adjusted, the water filling level should not rise closer than 20 mm to the edge of the overflow tube.
The edge of the overflow tube, in turn, if there is a side hole in the tank (for connecting to the water supply), should be 10 or more millimeters below it.
Next, attach the push button to the tank lid. A special holder is designed for this. Connect the button to the cable so that it does not twist and does not cling to the filling valve. In tanks with a non-standard opening, an adapter ring is used.
If necessary, you can adjust the water filling level in the toilet cistern using the inlet valve settings.
In a correctly installed device, the valve ring, when the button is pressed and released, should fall freely and tightly close the hole for draining the water. If this does not happen, then you need to adjust the length of the cable by rotating the regulator
Adjusting the water drain
You can change the volume of remaining water after complete drainage using regulator 10 on the toilet valve body.
To increase the balance, it is raised; to decrease, it is lowered. You can adjust the valve so that the water completely drains from the tank by lowering the regulator all the way down.
To adjust full or partial drainage, manufacturers provide an adjustment mechanism that allows you to set the required volume of flushed water
The small drain is regulated by a similar principle. But still, there are some differences. In some models, the adjustment lever is freely accessible; in others, the lever must be unlocked by turning to the right.
And then, when you raise the lever, the drain volume will decrease, and when you lower it, vice versa.
After installation and adjustment, the functionality of the system is checked - the small and large drain buttons should perform their functions.
When you press the small button, the small flush should be triggered, the large one should empty the tank almost completely, depending on the settings.
You may also find useful information on how to properly disassemble the drain tank.
Adjustment and repair
When using the toilet, problems periodically arise - sometimes it flows, sometimes, on the contrary, water does not fill into it. Sometimes, tired of the inconvenience, people buy new toilets. But in vain. Most faults are resolved in 10-20 minutes. Moreover, everything is so simple that anyone can do it. You don't have to call a plumber. You can do everything yourself.
Adjusting the water level
We will talk about devices with bottom water supply. After installation, the toilet cistern must be adjusted. By default, they come from the factory set to the maximum amount of water in the container. This amount is often excessive. With the help of simple adjustments we can reduce the volume of water in the tank. For this:
- Turn off the water supply and drain the water.
- Unscrew the button.
- Remove the cover.
- There is a plastic screw on the float mechanism. By unscrewing/twisting it we change the amount of water. If you need to reduce the amount of water, tighten the screw, lowering the float down. The next time you fill (you can turn on the water), the water level should drop.
- Reinstall the cover and button.
The same procedure is necessary if water is constantly leaking from the tank. One of the reasons is that the float is raised too high. Because of this, water flows through the overflow system.
With a side water supply and a float mechanism, adjustment is even simpler - we change the position of the float by bending its lever. On the one hand it is simpler, but on the other hand it is more difficult. You have to bend it many times to achieve the required level.
By bending the float lever we change the water level in the drain tank
Toilet tank is leaking
If the water in the toilet constantly leaks and its level is normal, we move on. There are several reasons for this leak. And if so, then the methods of elimination will be different.
- The rubber seal under the drain valve in the tank has silted up, dirt has gotten under it, and a groove (or several) has appeared on its surface. The method of treatment is to clean the existing gasket or replace it with a new one. To resuscitate the old one, you need to: turn off the water, drain it,
- remove the drain mechanism by unscrewing the plastic nut from below;
- pull out the drain valve, remove and examine the gasket, clean it of settled particles, if necessary (there are grooves), sand it with very fine sandpaper until smooth;
- install it in place, connect everything and check operation.
The trigger mechanism itself was demolished. To check whether this is the case, you can lightly press the mechanism with the cover removed. If the leak stops, that means this is the problem. If it still leaks, you should try cleaning the gasket (described above) or replacing it. If the flow stops when pressed, you can replace the fittings or make the glass heavier.
Where to put the weighting agent
To do this, remove the release mechanism and place something heavy in its lower part. This could be several pieces of metal, a sock filled with pennies, sand, etc. We install the device in place and check the operation.
https://youtube.com/watch?v=OE_lWt7Xqp8
Water does not fill
Another problem that you can fix yourself is that water does not fill into the drain tank. Most likely the problem is a blockage - the filter or tubes are clogged. It's a long story, better watch the video.
https://youtube.com/watch?v=U_6q_MFVt5U