A truly comfortable and convenient place to live will be the apartment or house in which the plumbing works well. In the event that there is a need to repair the toilet with your own efforts, you should first of all understand how it works.
Any toilet model includes a bowl (fixed to the floor) and a flush tank (located above the bowl). Most often, the need for bathroom repairs arises due to breakdowns inside the cistern.
Possible faults
There are many known problems associated with tank repair. Repair of fittings is considered one of the most difficult and time-consuming. Flush fittings for toilets are a device with the help of which the tank is refilled with water after the flush is completed, automatically controls the volume of water drained, as well as its overflow .
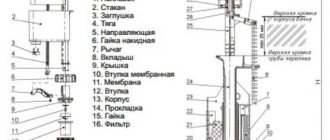
To understand what problem arose in the fittings, you need to know what elements it consists of:
- a drain hole located at an angle;
- an overflow tube is connected directly to the drain hole;
- valve covers with tight rubber;
- mechanism required for filling;
- drain button mechanism.
Having the following problems with the tank at home, it’s time to think about repairing it or completely replacing it:
- Constant continuous filling.
- Water does not stop flowing into the toilet (even in a small trickle).
- The merging process does not occur immediately after pressing the button, but as a result of repeated repetitions.
- The flush button has become unusable.
- The toilet itself is leaking.
- The process of filling the tank is very noisy.
Next, we will look at how you can repair the toilet cistern yourself and what is required for this.
Customer Reviews
Tatyana, Moscow : “Water began to leak a little bit into the toilet from the tank. Seems like a small problem. But the utility bill for water has risen significantly in a month. I had to figure out how to change the insides of the tank myself. I bought a set of fittings with side connections. The plastic is good, high quality. The elastic bands are all dense, but at the same time flexible. In general, I did it. The most difficult thing was to place the tank on the toilet so that nothing would leak in this connection either. I hope it will serve."
Valery, Moscow : “I didn’t want to install a cheap toilet flush. So I chose Czech fittings. I also liked the quality of workmanship, the plastic is so strong. The buttons have not worn off over time. And the tank fills almost silently and very quickly. I hope it lasts for a long time."
How to open the lid?
You can repair the flush and other mechanisms of the toilet cistern after disassembling it and removing the lid from it. Let's look at their varieties and learn how to open each of them.
With one button
To open it, you need to do the following:
- using a flathead screwdriver, carefully turn counterclockwise ;
- when the ring moves easily, you need to completely unscrew it without any tools;
- Having pulled out the ring, which resembles a cylinder, move the lid perpendicularly;
- in this position it is easy to remove the double-sided clothespin that holds the button;
- now remove the top part and repair the fittings;
- When the damage is fixed, reassemble the structure in the reverse order.
With two buttons
Complete the following activities:
- press any half of the button and feel the side hole in the other with your finger;
- by inserting a flat-head screwdriver into the found slot, carefully pull the button half and remove it;
- remove the other half;
- in the resulting hole you can see a slotted screw that needs to be unscrewed ;
- move the lid gradually until it reaches a perpendicular position;
- remove the double-sided clothespin;
- place the released lid on a flat surface so that it does not break;
- After repair work, reassemble everything following the steps in reverse order .
Learn more about how to open a cistern with a button or two and repair their specific problems.
With pull rod
There are models where water is drained not by pressing a button, but by lifting up the rod, which is located in the center of the lid. You will be able to remove the upper part of the tank when you move away the small ball located at the end of the rod . After this, the lid will lift off easily.
Built-in toilet cisterns
The design of such tanks is very simple, unlike those listed above. It has only a small drainage device, which is a block. If a wall-mounted tank breaks, only it can break.
You don't have to break down walls to get it out. You just need to unscrew the wall button and pull out the drain device through it .
After repair, it is easy to return it to its place through the same button hole.
Design and main components
Different models of toilet cistern may differ greatly in design from one another, but the set of their components generally remains unchanged. Each drain tank must contain the following components:
- intake unit with valve mechanism;
- float chamber with a hollow container;
- drainage unit having its own fittings.
The industrially produced samples of drainage devices differ in the method of supplying water to the float chamber in the upper or lower location of the supply hose. The locking mechanism located at the inlet can be designed in the form of a simple cuff or have a more complex design (in the form of a check valve).
The principle of operation of such a system is quite simple: when a hollow container (float) is raised, a rod moves with it, transmitting a closing force to the valve with its reverse arm.
Unlike outdated models, in which the float is shaped like a pear, modern products are equipped with a “double glass” that is more reliable in terms of tightness.
In new tanks, the drain assembly has the form of a vertical column installed strictly in the center (directly under the control button). In its lower part there is an annular seat with an elastic cuff that seals the drain hole. The closing force required for this is created both by the weight of the rod and by taking into account the mass of water accumulated in the tank.
In order for the drain channel to open, it is enough to lift the rod, which is rigidly connected to the control button by a special lever mechanism (in some models a toothed rack is used for this).
Let us consider the features of troubleshooting in each of the nodes in more detail.
How to disassemble the drain mechanism?
The disassembly scheme for the drain mechanism will not cause much trouble or difficulty if you adhere to some recommendations in this regard:
- Remove the reservoir cap.
- See if the locking mechanism works well . The float should be no more than half in water, and the water should not be too close to the drain tube.
- Before starting repairs, drain the water and limit its flow into the tank.
- Determine the type of bulb (valve bulb or float bulb).
- You can unscrew the float bulb if you additionally hold it by the rod .
- The valve bulb is covered by a plastic ring that holds the trigger mechanism. You should grab the ring and turn it counterclockwise, freeing the bulb for inspection.
- You can remove the described device from the rods by pressing on one of the clamps (there are four in total).
- If the pear has uneven spots, cracks or rust, it must be replaced.
- When replacing one device with another, make sure that their dimensions are completely identical.
How to replace toilet fittings
Hello dear homemade people.
Here's the bad luck - the toilet tank is leaking. No matter how much you press the flush button, water from the tank continues to flow into the toilet and does not want to stop.
Related article: How to glue a toilet to ceramic tiles
This is to blame for the flush mechanism, or otherwise the toilet fittings, and the main reason for its failure is the poor quality of the tap water that Vodokanal treats us to, and for which we pay a lot of money, so we will urgently correct the situation.
The first step is to determine the size of the disaster. It may be possible to get by with little blood, and very often this is possible.
The fact is that tap water contains various impurities, essentially dirt, and since the water in the toilet tank is mainly in sludge mode, this dirt settles on the fittings, as a result of which it stops working normally.
First, let's see how the toilet works, or rather the cistern.
The fittings consist of two parts.
1. The float part serves to supply water to the tank.
2. The valve part is used to drain water.
In the standard version, these two parts are not connected to each other and each works on its own.
Floats come with side and bottom supply - depending on the design of the toilet. Side feed is almost never used. Previously, such toilets were installed in Khrushchev-era buildings.
To remove the drain and valve float for cleaning, it is not necessary to remove the tank.
The flush is removed as follows: turn off the water supply to the toilet, drain the water from the tank, unscrew the flush button, remove the lid, lower your hand to the bottom of the tank, grasp the flush mechanism and with force, but not with all your might, turn it counterclockwise, degrees 20.
You will feel the mechanism disengage, after which it can be removed.
The main reason for water leakage is dirt and limescale deposits formed on the valves. Often it is enough to clean it, it is easily removed from the rubber, and the drain will work normally again.
But the problem is not always solved so easily. The upper part of the valve is made of thin elastic rubber, and with prolonged use it loses its elasticity. In this case, the mechanism will have to be replaced.
So we go to the store and buy fittings for the toilet.
What I like about toilets is the amazing unanimity of manufacturers in following a single standard in the manufacture of fittings and mountings for tanks.
Almost all of them are interchangeable, so there is no need to look for fittings suitable for any one brand of toilet.
I can’t say the same about gold toilets, since I’ve never worked with them, and their owners most likely won’t surf the Internet looking for instructions on how to repair a drain, and therefore won’t read my website.
So, we remove the drain mechanism again, disconnect the water supply, unscrew the fastening nuts and remove the tank.
There is always some water left in the tank, so I recommend taking measures to prevent puddles from occurring during this operation.
After removing the tank, you need to carefully remove the gasket between the tank and the toilet, since it is not included in the repair kit and it can be different for different toilets, so it is advisable to keep the original gasket so as not to wear out your feet later looking for the same one in stores.
Then the lower part of the drain mechanism is removed. The float can be removed, but if it worked normally, then it can be left alone.
Now the old drain mechanism can be thrown away and a new one installed. But there are a couple of nuances here.
The first is that the lower part of the drain mechanism does not have a rigid fixation relative to the central axis, and the upper part is rigidly and fixedly attached to the lower part, therefore, when tightening the large nut of the lower part, it, this part, must be rotated so that when attached to he was on top, he took this position in the tank.
The second is that although all toilet fittings are interchangeable and universal, the tanks are all different, mainly in height, so the mechanism has three tools for adjusting its parts.
The overflow height adjustment is a nut with a clamping gasket, and the button height and valve lift height are adjusted using clips.
When installing the tank, it is advisable to add silicone to the old gasket on both sides of the gasket.
That’s it, I hope now it won’t be difficult for you to repair or change the leaking toilet fittings.
I wish you modest water bills.
leave a comment
A message confirming receipt of a response will be sent to the email address you provided.
Adjustment of individual elements
To install a new system responsible for filling with water, you will need the following tools:
- plastic ruler or metal tape measure;
- adjustable wrench;
- spanners;
- recently purchased fittings components.
Water can enter the tank from below or from the side. If we are talking about a lateral connection, for repairs you need to perform the following steps:
- Set the diameter of the water intake pipe.
- Choose the system that is needed for your model. This is quite simple to do - you need to remove the lid from the tank and see what kind of fittings are in it. After that, buy the same one for sure.
- After the entire structure has been purchased, you can install new water intake fittings.
- Shut off the water supply to the toilet.
- Open the lid and drain the water completely.
- Remove the old fittings.
This can be done after you unscrew the nut located on the flexible hose with a wrench. At the same time, be sure to support the entire structure. This event can be completed by one person - the main thing is to work harmoniously with both hands .
In the case where the water comes from below, you will need to struggle a lot to unscrew the nut. This can be done only with improvised materials or by first shortening a standard wrench:
- Carefully inspect the used gasket. If it has no visible damage or irregularities, it can be reused for a new structure being installed.
- The new fittings should be positioned so as not to interfere with the operation of the drain system, and also not to touch the walls of the tank itself .
- Connect the water.
- Check that the work has been completed correctly.
Popular design models
OLI design
There are quite a few manufacturers of replacement plumbing equipment. Both domestic and foreign models are presented on the market. Imported systems are more expensive than domestic ones. But you can separately purchase replacement elements for them. The most popular equipment is from companies such as Alca plast (Poland), OLI (Portugal), Geberit (Switzerland), Grohe (Germany).
The Portuguese company OLI regularly presents innovative developments in the field of plumbing systems. It was she who created the double flush valve 20 years ago, reorienting the industry towards the economical use of water.
Among OLI's latest developments is the Azor Silent range of fittings, equipped with a silent filling valve. It allows you to reduce the noise level when filling the tank to 6 decibels (for comparison: the rustling of leaves produces a noise of 15-20 decibels).
Another interesting solution is the OLIpure system with a built-in detergent reservoir. Each time you drain, add a few drops of liquid detergent or cleaning agent to the water (they can be used at the same time). The cleaning agent is in an isolated container, so the internal mechanisms and rubber seals are not exposed to aggressive chemicals.
Trusted Russian manufacturers supply fittings of decent quality, and the cost of the sets is significantly lower than their foreign counterparts. You can choose from such manufacturers as Virken-Rus LLC (Moscow), Uklad JSC (Pskov), Arkon LLC (Tula), PKF Protex LLC (Tula). Domestic enterprises also produce replacement elements suitable for imported fittings.
The Virken company regularly introduces its new developments to the market. Among the latter is a flush column with patented QUICK FIT technology, which allows you to connect the flush mechanism directly to the existing fixture base without disconnecting the tank from the toilet. The mechanism is considered one of the most universal on the market also because instead of the central pillar there is a flexible cable installed, which does not require adjustment to the height of the tank.
The fittings sets of this company are also popular on the market due to their seals made of silicone. It does not react with impurities contained in water, retains its integrity and elasticity during temperature changes, and does not deform over time, unlike rubber.
Setting up the drainage system
By ensuring your drainage system is working properly, you can save a significant amount of money that would otherwise be spent on excessive water consumption. In order to begin repairing the flush cistern without the help of a specialist, all stages of the work should be performed in strict sequence , without missing possible breakdowns and shortcomings.
- Get rid of float mechanism failures. It is quite easy to understand if there are problems with it. The main indicator is that the tank is constantly filled with water, and it immediately flows into the toilet.
There are several reasons leading to this process:- poor condition of the inlet valve (in some cases it fails due to high water pressure);
improper functioning of the buoy (as a result of prolonged use, the float may crack and fill with water);
- the lever is skewed (it should be horizontally 20 mm below the hole through which water is drawn).
- Eliminate the constant flow of water into the toilet .
Most often, this problem occurs due to the expiration of the siphon membrane. It needs to be replaced with a new one. To do this, drain the water, remove the siphon, replace the old membrane with a new one , put the siphon in place, attach it to the lever and tighten the fastening nut.
To fully adjust the drain mechanism of the toilet cistern, if it is broken, it is necessary to eliminate all these faults.
Construction and adjustment of the compact
Compact toilet models have recently become widespread. It makes sense to consider their design in order to understand the main features of adjusting and repairing the locking mechanism.
The compact toilet consists of the following elements:
- cistern container with lid;
- system for filling water into a container;
- shut-off device or water drainage system;
- control button or lever;
- toilet.
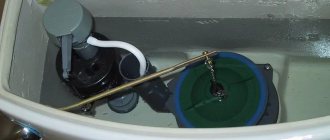
The tank in the compact is installed on a special shelf, which is located behind the bowl. Typically, adjustment of the fittings of such a toilet is carried out after the cistern bowl is installed, but before its lid is installed. Before starting work, it is recommended to carefully study the manufacturer's instructions. Usually there is detailed information about the procedure for performing the work.
Compact toilets are popular because they are convenient and take up little space. The tank of such a device is installed on a shelf directly behind the bowl
The overflow pipe of the device usually indicates the water level that is considered normal for that particular model. You need to find this designation, which is often made in the form of a strip or bead. Usually, if, when filling the tank, the maximum water level is below this mark, poor-quality flushing of sewage is observed.
To change the situation, you need to move the “glass” on the intake valve to a higher position. To do this, loosen the clamps holding this element located under the float. After the required level has been set, you need to check the result of the work, i.e. fill the tank and drain the water.
On the top of the toilet tank inlet valve overflow pipe there is a mark in the form of a dash or collar for adjusting the water level
When installing tank fittings, it should be remembered that all moving parts of the valves must be separated by a distance, at least small. If the valves come into contact during operation, this can disrupt the normal operation of the system, leading to its imbalance and breakdown. It is also unacceptable for the moving elements of the fittings to come into contact with the walls of the tank.
To prevent water from splashing when filling the tank, you most often have to cut or change the filling tube:
Image gallery
Photo from
Step 1: Inspect the fill tube of the tank fittings
Step 2: Cut out the new filler tube for installation
Step 3: Installing a New Fill Tube
Step 4: Checking the water supply and the operation of the tank
An important stage in installing the tank is installing the lid with a push-button regulator. Before screwing it in, there should be a distance of no more than seven millimeters and no less than three between the cover and this unit. If these conditions are met, the cover will be fastened securely enough.
Before you start screwing the flush button, the instructions recommend making a couple of turns in the opposite direction, i.e. counterclock-wise.
To save water, modern tanks have a double flush button, which allows you to empty only part of the tank if desired.
This will center the thread position. After this, screwing the button assembly is carried out clockwise. You need to rotate it by hand until it stops; additional tools are usually not needed. Upon completion of installation, you should drain the water again to make sure that the button and all fittings are configured correctly and installed correctly.
Compacts are produced with both bottom and side water supply. With fittings designed for bottom water supply, a problem such as clogging of the filter installed at the water supply to the container may arise. After flushing, i.e. During the process of filling the tank, a characteristic, rather loud and unpleasant whistle is heard.
This situation most often indicates that the filter is clogged and needs to be washed. The debris accumulated inside reduces the clearance for water, which enters the tank with high pressure and accompanied by sound effects. In addition, due to this malfunction, the tank fills much more slowly than usual.
There is a filter located under the inlet valve float, a clogged filter that can cause the tank to malfunction. To wash the filter you need to remove it
To correct this plumbing problem, you need to flush this filter. To do this, turn off the water supply to the tank and press the flush button/lever. After this, remove the hose through which water flows to free access to the device. Now the filter just needs to be removed from the intake valve body, washed and installed back. The system is then reassembled in reverse order.
It looks simple in theory, but in reality there can be some complications. For example, you need to unscrew the plastic nut that secures the inlet valve. If this element does not have edges, the task may seem difficult.
You should not use an adjustable wrench in this situation, as excessive force may damage the fastener. It’s not always possible to just do it with your hands, especially if the plastic has become “burnt” as a result of prolonged use.
To ensure that the sediment that forms when low-quality tap water is supplied to the device does not cause a leak due to loose seals and failure of fittings, the tank and devices must be periodically cleaned
Experts recommend using other means; pliers with a large space between the “lips” may be a suitable option. Pliers can also be useful when removing the filter from the housing, since it usually fits tightly and will require additional effort for removal.
Where the quality of tap water remains consistently low (that is, almost everywhere), not only the filter, but also other elements can become clogged. The membrane bushing is at risk, as well as all the holes through which water enters.
If washing only the filter was not effective enough, it makes sense to rinse the entire device and clean all the channels. In this case, you will have to completely dismantle the inlet valve to provide access to the holes.
Unfortunately, washing the filter, and even the entire valve and ducts, does not always help. Low quality intake valves can completely fail within one and a half to two years after the start of operation. In this case, you will have to completely replace the valve with a new model. In such a situation, it is recommended to choose a higher quality filter.
The shut-off and inlet valves of modern toilets are usually provided with detailed instructions, with the help of which these mechanisms are not difficult to assemble, install and adjust
The additional costs will pay off, since there will be several times fewer problems with setup, flushing and repairs. Another way to prolong the operation of the tank fittings and prevent problems: install an additional mechanical filter on the water pipe in front of the toilet or even at the entrance of the system to the apartment.
If the compact has problems with the shut-off valve, i.e. Since water constantly leaks into the toilet, the easiest way to fix the problem is to completely replace the device with a new one, exactly the same. To do this, you need to turn off the water and simply remove the valve from the tank.
The new one is installed in its place, fixing it in the holders of the receiving part. It is recommended to adjust the length of the valve in advance so that there are no problems with installing the flush button.
Do-it-yourself replacement of fittings
Replacement work should begin by turning off the water supply and draining it . After this, the supply hose is removed and the tank itself is unscrewed. Then the old fittings are pulled out and the water supply valve is unscrewed.
The final stage of repair is installing new fittings and securing the bowl to the toilet. We check the correct position of the float and the normal functioning of the sealing washer located on the water supply hose. Pay special attention to the nut that tightens the hose. There is no need for extra effort in twisting it.
A video about repairing and replacing toilet cistern fittings with your own hands will help you better understand the issue:
What tools and materials will be needed
Sometimes there is no need to change the entire fittings; you can limit yourself to just replacing the rubber bulb covering the drain hole. If it is clear that replacing the entire mechanism cannot be avoided, then you can use the services of professional plumbers. However, this work is not so difficult; you can do everything yourself. It won’t take much time, and you won’t need any overly complex and expensive tools or materials.
Regardless of the design of the cistern fittings, to replace it you will definitely need:
- wrench set
- ruler or tape measure
- one, or better yet, two adjustable wrenches
How to replace the fittings of the drain tank depends on how the water is supplied to the tank. There are only two ways: side and bottom eyeliner. Let's consider both cases.
How to remove the tank completely if repair is impossible?
If your toilet cistern cannot be repaired, it should be carefully replaced - but how do you do this? You need to act in a certain sequence:
- Stop water supply . Using a Swedish adjustable wrench, disconnect the water line.
- Unscrew the drain button.
- Remove the cover.
- Unscrew the two screws that attach the bowl to the toilet (they are located at the bottom of the tank).
- Install a new one in place of the old gasket . This will help avoid possible leaks in the future.
- Attach a new tank to the toilet, strictly following the reverse sequence of actions.
If you have problems with the operation of the toilet, do not panic and immediately contact a specialist . Having a few screwdrivers and pliers at home, as well as listening to the recommendations of experts, you can do all the work yourself, even if this is your first time.
What do you think of this article?
Conclusions and useful video on the topic
The process of adjusting and repairing the shut-off valves of the toilet cistern can be viewed in detail here:
Setting up the tank fittings is not difficult. It is important to study the instructions and understand the general principles of operation of the inlet and locking mechanisms. Attention to detail and accuracy will help to complete all the work correctly.
Have you already encountered setting up drain fittings and were able to cope with this task yourself? Or maybe you know other ways to configure the drain? Please share your experience in the box below.
Types of shut-off valves
There are combined and separate designs of shut-off valves. The last of them is considered a classic option, used for decades. This device is affordable, easy to repair and configure. In it, the fill valve and damper are installed separately. Combined fittings are used in high-end plumbing fixtures. They are characterized by a drain combined with a water supply system. This is a more convenient and reliable, but expensive option, and if the mechanism fails, you will have to completely dismantle the system.
Shut-off valves also differ in functionality. For example, compact toilet models have the simplest mechanism, controlled using a button. High-end devices may already have two buttons for partially or completely emptying the tank. In addition, there are models with a side pedal for draining water, which are suitable for people with disabilities. The point where water enters the toilet can be located in various places, for example, on the side or below. The latest design option involves an almost silent flow of water into the tank.
Features of valve adjustment
After purchasing a ready-made kit, installing the toilet and cistern in place does not cause any special problems, but sometimes situations arise that require the use of fitting adjustment techniques.
Mechanism for draining water in the tank
Setting the height that is optimal for efficient operation of the drain valve:
- the draft from the overflow pipe is released;
- carefully press out the glass latch;
- The stand moves in the vertical direction to the desired height.
Water level regulation:
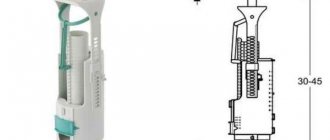
- The glass moves along the guide in the desired direction and is fixed in such a way that at least 45 mm remains from its upper surface to the edge of the tank at the top.
- the position of the overflow tube is checked and, if necessary, it is installed 2.0 cm above the water plane when the tank is maximally filled and 7.0 cm below the top surface of the rack.
Adjusting the flush intensity involves moving a float or valve. To reduce water consumption, the toilet tank fittings are subject to simple manipulations. You can bend the lever slightly if it is brass. The degree of curvature is monitored by the position of the float. With modern plastic types of locking elements, the locking ratchet or fixing screw is adjusted.
The tank is leaking: measures to eliminate this problem
The appearance of a continuous monotonous murmur that irritates the ear with visual detection of water flow through the overflow indicates an urgent need to take measures similar to the methods for setting up a reduced flush. If these actions do not help, then the cause of the malfunction is wear of the bulb.
You can try to tie nuts or a cast iron coupling to add additional weight to help the bulb fit tightly to the hole being closed. The most reliable thing in this situation would be to replace it. The purchase of a new pear should be taken seriously, since the assortment of stores has different shapes and dimensions of this product. To be more confident, it is advisable to take the old part with you to the market or to a specialized salon for comparison.
Having discovered leaks, it makes sense to calmly determine the condition of the toilet tank fittings, since sometimes it is enough to remove the lid and correct a skewed shut-off valve or float. Condensation under the tank becomes a signal to replace the large gasket installed between it and the toilet shelf. The nuts are unscrewed, the tank is removed, and traces of rust on all surfaces are cleaned with a wire brush. A new gasket is fixed onto the wiped dry surface and the entire structure is assembled.