The cistern is the main element of the toilet. There are two mechanisms inside the tank:
- for supplying and shutting off water after filling the container;
- for direct drainage of water into the toilet bowl.
It is impossible to imagine housing without a well-equipped bathroom. And the main thing in it is a toilet with a flush cistern.
The toilet tank is an integral part of this plumbing device, without which it simply loses the meaning of its purpose. The insides of the toilet cistern allow you to remove human waste products by supplying a dosed portion of water and refilling the container.
The importance of this plumbing equipment in a toilet can only be fully appreciated when the toilet is broken and it is impossible to use it.
There is an excellent article on our website about how to cover the pipes in the toilet with plastic panels
Types of toilet cisterns
The flush tank is a container with a lid, equipped with a water supply mechanism and a drainage device. Depending on the location of installation, tanks are divided into three types:
- hanging;
- built into the wall;
- compacts.
The hanging tank is mounted on the wall above the toilet at a certain height and is connected to the bowl using a drain pipe. A chain with a handle is attached to the flush device lever. The upper location of the container provides high water pressure when draining.
The built-in tank is a flat container made of high-strength polymer. It comes with wall-hung toilets. The container is hidden behind decorative trim; only flush control buttons are mounted on the outside.
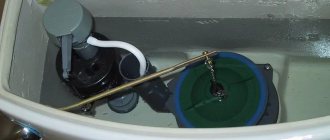
The compact tank is installed on the rear shelf of the toilet bowl. It is equipped with a lever or push-button mechanism. Water supply is carried out from the side or from below.
Classic compact toilet with bottom water supply Source vannstudio.ru
Features of the internal structure
The basis of the toilet flush tank includes 2 systems - an automatic water supply system and a water drainage mechanism. If you know the operating principle of both systems, it is easy to troubleshoot problems that arise. To make it easier to understand the mechanism of operation of the flush tank, you should first familiarize yourself with the diagram of old toilet tanks, since their systems are more understandable and simpler than modern mechanisms.
Refurbishment of an old barrel
Tanks of older designs consist of elements for supplying water to the tank, as well as a drainage device. The water supply mechanism includes an inlet valve with a float, and the drain system includes a lever and bulbs, as well as a drain valve. There is also a special tube, the function of which is to remove excess water in the tank without using the drain hole.
The normal operation of the entire structure depends on the reliable operation of the water supply elements. In the image below you can see the automatic water supply circuit in more detail. The inlet valve is connected to the float using a shaped lever. One end of this lever is connected to a piston that either shuts off the water or opens the water.
Float mechanism design
When there is no water in the tank, the float is in its lowest position, so the piston is in the depressed position and water enters the tank through the pipe. As soon as the float rises and reaches its highest position, the piston will immediately shut off the water supply to the tank.
This design is quite simple, primitive, but effective. If you partially bend the shaped lever, you can adjust the level of water in the tank. The disadvantage of the mechanism is that the system is quite noisy.
Water is drained from the tank using another mechanism, which consists of a bulb that blocks the drain hole. A chain is connected to the pear, which in turn is connected to a lever. By pressing this lever, the bulb rises up and water immediately flows out of the tank. When all the water has flowed out, the bulb will fall down and block the drain hole again. At the same moment, the float lowers to its extreme position, opening the water supply valve to the tank. And so every time after draining the water from the tank.
Toilet cistern design | Operating principle
The device of modern models
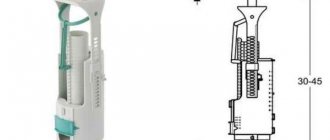
Tanks with a lower water supply to the tank make less noise. Therefore, we can safely say that this is a more modern version of the device. The inlet valve is hidden inside the tank, which is a tube-shaped structure. In the photo below it is the gray tube that is connected to the float.
The construction of a modern cistern
The mechanism works the same way as in old systems, so when the float is lowered, the valve is open and water flows into the tank. When the water in the tank has reached a certain level, the float rises and blocks the valve, after which water can no longer flow into the tank. The water drainage system also works in the same way, since the valve opens when the lever is pressed. The water overflow system functions in a similar way, but the tube is led into the same hole for draining water.
Cisterns with button
Despite the fact that a button is used as a lever in these tank designs, the water inlet mechanism has not undergone major changes, but the drainage system is somewhat different.
With button
The photo shows a similar system, which is mainly used in domestic designs. It is believed that this is a fairly reliable and inexpensive system. Imported flush cisterns use a slightly different mechanism. As a rule, they practice bottom water supply and a different drain/overflow arrangement, as can be seen in the photo below.
Imported fittings
There are several options for such systems:
- With one button.
- The water drains after pressing, and the draining stops after pressing again.
- With two buttons responsible for different amounts of water released into the drain hole.
And although the mechanism works completely differently, its operating principle remains the same. In this design, by pressing a button, the drain is blocked, while the glass rises up, and the stand remains in the mechanism structure itself. This is precisely where the differences lie in the design of the mechanism itself. The drainage is adjusted using a special rotary nut or a special lever.
Drain mechanism for ceramic tank manufactured by Alca Plast, model A2000
Water collection mechanism
In a classic tank, the hole for the water supply device is located in the upper part of the side wall. The traditional mechanism is equipped with a valve, which is operated by a lever with a plastic float. When water is drained from the tank, the valve automatically opens to quickly refill the tank. When the float on the horizontal lever rises along with the water level to the original level, the valve will shut off the flow.
The disadvantage of side supply is considered to be the excessively loud noise of water in those minutes when it is drawn into the container. Most foreign manufacturers of compact toilets, like many Russian ones, have switched to producing tanks with bottom water supply. The principle of operation of the device is similar to the traditional one, but due to the fact that the water comes from below, the noise is practically inaudible. In the bottom version, the float is attached to a vertical rod, which is located in the supply pipe.
History of origin
Cylinder toilets first appeared about 80 years ago, in the 1940s, when the cistern toilet design was first proposed. The first toilet with a flush tank appeared in England. At that time, running water had not yet become widespread, and the toilet had to be flushed manually, which caused a lot of inconvenience. Thanks to the filling tank, using the toilet and its flushing function has become much more convenient.
Later, with the advent of running water, it became even more convenient to use the filling tank; it was equipped with a filling valve that automatically shut off the flow of water from the water supply.
Over time, improvements have been made to toilet fill valves and increased water savings, but the design of the toilet and cistern remains roughly the same as it was in the 1940s.
Drain mechanism
The flush mechanism allows water to be released into the toilet bowl to flush waste into the sewer. It is activated by pressing a lever or button.
Toilet with overhead tank and lever Source salonika.pl
Drain devices vary in design, but in most cases they are interchangeable if they are designed for installation in tanks of standard dimensions, with holes of standard sizes. The general operating principle of the mechanism is as follows:
- the drain hole is closed with a valve that retains water;
- when you press a button or lever, the valve rises and water rushes into the bowl in a powerful stream;
- the valve drops into place.
The design includes an open top overflow pipe. Water that has risen above a predetermined level flows through it into the toilet bowl - this prevents the tank from overflowing and prevents water from leaking through the edges of the tank onto the floor.
Inlet valve
This unit is presented by various manufacturers with a variety of design solutions, but the essence is the same for all: it is a drive valve on a water supply system, operating under the influence of force from a float.
When the float is lowered, the piston opens and water flows into the tank through the pipe.
As it fills, the float rises up and uses a lever to move the piston outward, gradually closing the pipe. At the same time, water flows more and more slowly and when the cross section is completely blocked, its flow into the container stops.
Dual-mode drain
The working volume of the toilet tank is 4 or 6 liters. In order to save water, flushing mechanisms with two operating modes were developed:
- in the standard version, the entire volume of liquid from the reservoir is drained into the bowl;
- in “economy” mode – half the volume, i.e. 2 or 3 liters.
Management is implemented in different ways. This can be a two-button system or a one-button system with two pressing options - weak and strong.
Dual-mode flush mechanism Source smesiteli-tomsk.ru
The advantages of dual-mode flushing include more economical water consumption. But we must not forget about the disadvantage - the more complex the mechanism, the more elements it contains, the higher the risk of breakdown and the more difficult it is to eliminate the malfunction.
Main types of drainage equipment designs
They differ in the mechanisms for supplying and flushing liquid. Drainage work is performed by automatic, push-button or lever-type devices. Structurally, the insides of a toilet cistern look like this: a float, through a rod and a valve, controls the inlet, regulating the water supply. Thus, it plays the role of a shut-off valve.
In this case, the liquid level depends on the height of the float, and it is adjusted on the rod by bending it or changing the position on the guide.
Lever mechanisms
They were the main plumbing models of the last century. Their operation was distinguished by the unpretentiousness of the device: the liquid was drained as long as the shut-off valve was held in place through the chain.
Then systems with siphon functioning were introduced, when the valve was closed automatically after drawing water.
But these types of mechanisms are distinguished by increased, unregulated fluid discharge and do not meet modern aesthetic requirements.
Drain button
Current tanks are equipped with push-button drain mechanisms. Basically, the buttons are located inside the lid of the tank for draining, and the mechanisms at the same time hold the locking valve automatically.
Their advantage, in addition to independent functioning, is the convenient setting of liquid supply. And products with two-button fittings for the drain tank drain the water completely or partially, depending on which button is pressed.
How to remove the lid from the tank
If the tank stops filling, begins to leak, or water continuously pours into the bowl through the overflow tube, the fittings need to be adjusted or replaced. To access the inside of the tank, you must remove the lid.
Difficulties may arise if a flush tank mechanism with a button is installed. To remove the button on the cover, you need to press it and turn the ring. If you cannot turn the flat ring with your fingers, you need to press the button and find special slots on the inner rim of the ring. By inserting a narrow flat screwdriver into one of the slots, turn the ring and then unscrew it with your fingers.
The button ring can be easily unscrewed with your fingers Source psk-remont.ru
After the button is removed (by removing the ring, just pull it up), you can easily remove the cover and examine the structure of the drain tank, checking the mechanisms for damage.
Installing and replacing the insides of the tank
As a rule, problems with the operation of the drain tank can be solved in two ways: the system can be adjusted or replaced completely. In both cases, you need to know how this is done, since such skills will definitely come in handy sooner or later.
To replace the device completely, you will first have to remove it from the tank, after which a working element is mounted in its place.
Do-it-yourself replacement and adjustment of toilet cistern fittings (flush)
Removing the reservoir cap
To get to the damaged element, you need to remove the tank cap, which is not always so easy if you don’t know how it is attached to the tank. It’s especially unclear when the tank has a button. To remove the cover, you will have to press the button and hold it until the ring around the button is unscrewed.
Removing the reservoir cap with a button
If you cannot unscrew it with your fingers, then by pressing the button, you should carefully examine the inner rim of the ring, since there should be 2 holes located opposite each other. To turn this ring a little, you can use a tool, for example, a screwdriver, which must be inserted into one of the holes. After twisting a little with a screwdriver, the ring can be easily unscrewed with your fingers. Having thus unscrewed the push-button device, it is removed and, after this, the lid is easily removed from the tank.
How to remove the lid from a toilet barrel. Repairing leaks
Removing the tank
To completely replace the old cistern fittings, it is preferable to remove it from the toilet bowl. First of all, you should shut off the water supply by closing the inlet valve, after which, using a wrench, unscrew the water supply hose.
If the water is connected from below
After this, they begin to remove the tank from the toilet bowl, but before doing this, you need to drain the water from the tank completely. If you look from below, you can see the bolts tightened with nuts. These nuts will have to be unscrewed. If they cannot be unscrewed by hand, and some designs use special wing nuts, then wrenches are used. Before removing the tank, you can put a rag under it, since there is some water in the tank, but it will remain and it will definitely spill.
Removing the tank from the toilet
After the nuts are unscrewed, you can remove the tank. This is exactly the moment when you can replace the gasket that is placed between the toilet bowl and the tank. If this is not done, sooner or later you will have to remove the tank again. In this case, you need to carefully inspect the gasket. It is possible that it is of better quality than new - this also happens.
Unscrew the nut holding the mechanism
At the bottom of the tank, where the drain hole is located, there is a large plastic nut with which the water drainage mechanism is attached to the tank: it will also have to be unscrewed, but we should not forget that the nut is plastic and large loads can damage it.
After unscrewing the nut, the drain mechanism can be easily removed from the tank.
Removed drain mechanism
Using almost the same scheme, you can remove the water supply mechanism from the tank, regardless of whether it is located below or on the side.
Water supply mechanism fastening nut
Removed water supply mechanism
Having freed the tank from the fittings, you can begin to clean it, since over the years of work, dirt, sand, and also metal particles in the form of rust accumulate at the bottom of the tank. New fittings can only be installed in a clean tank, otherwise dirt particles may cause a leak to appear after assembling the tank, which is undesirable, since everything will have to start all over again.
Replacing the cistern fittings
The process of installing new elements of the tank interior is carried out in the reverse order. First of all, the water drainage mechanism is secured using a plastic nut, which comes complete with the mechanism. At the same time, it is undesirable not to forget to put a gasket.
Sealing gasket
It is better to tighten the plastic nut first by hand, after which you can tighten it with a wrench, but this must be done very carefully: excessive load on the nut will lead to its breakage.
Be careful with the plastic nut
Sealing process
Once all the functional insides of the cistern are in place, it is time to install the cistern onto the toilet bowl, but before that you need to install the sealing gasket. It is better to clean the installation site from dust and dirt, since various particles often accumulate in this place that can interfere with the normal operation of the junction of the tank and the toilet.
Rubber gasket between the tank and the toilet
Before installation, mounting bolts with gaskets are installed inside the tank into the hole. The tank is installed in its place, after which the nuts and washers are attached.
Tightening the mounting bolts
Before tightening the nuts, the tank is leveled. After this, the nuts are tightened, evenly on both sides, so that the tank does not warp, otherwise it will leak.
Inlet Valve Installation
Since there is no extra space in the tank, the inlet valve with the system is installed last. Be sure to check the installation of the gasket.
Inlet Valve Installation
The next step is to connect the water hose. When connecting the hose, do not overtighten the nut, since the threaded pipe is made of plastic and excess load can break the thread.
Screw on the water supply hose
By turning on the water, the connection is checked for leakage. If a drop appears, the connection can be slightly tightened with a wrench. If you cannot get rid of the droplet, you can replace the gasket. This does not always help, although there are not many such cases. In this case, we can assume that the defective pipe will then have to be filed with the selling organization.
Installing a toilet flush cistern
Dismantling the tank
The old tank drain fitting cannot be replaced with a new one without completely dismantling the tank. Before starting work, it is necessary to shut off the water supply - if there is no shut-off valve on the supply to the tank, the cold water supply to the entire branch is cut off.
Next, water is drained from the tank. Using keys, remove the side or bottom supply hose, depending on the design of the tank.
The reservoir needs to be disconnected from the toilet bowl. It is secured with two bolts, the nuts are located on the underside of the rear shelf of the bowl. To unscrew them, you will need an adjustable or open-end wrench. It is first recommended to lay a rag on the floor or place a container - the water remaining at the bottom of the tank will certainly spill out when the fasteners are removed.
If the tank was installed many years ago and the nuts are completely rusted, the bolts are simply sawed off - the metal hacksaw blade moves freely in the gap between the tank and the bowl shelf.
The mounting nuts are located on the underside of the toilet shelf Source gidroguru.com
See also: Catalog of companies that specialize in engineering systems: sewerage, water supply and heating
After unscrewing the nuts and removing the bolts, the tank is carefully removed from the toilet. The old deformed rubber or polymer sealing gasket is discarded. Even if it has retained its elasticity, there is no guarantee that it will be able to provide a tight seal when used again.
The tank is placed on a flat surface. Unscrew the large plastic nut located on the side of the drain hole - it secures the flush mechanism. The water supply device on the side or bottom of the tank is also dismantled.
The container is inspected from all sides for cracks and chips. The inner surface is cleaned of accumulated sediment and rust particles. It is recommended to thoroughly rinse the inside of the tank so that when installing new fittings, solid particles do not get under the seals - they can break the tightness of the connections and cause a leak.
How to choose the right toilet parts
If elements of the drain system fail, it is important to choose the correct option that will correspond to the factory configuration. The units may differ in the material they are made of. Products made of bronze and brass are considered the highest quality and most durable. However, they are characterized by high cost.
The repair kit for the toilet is selected based on the model of the tank. Important parameters are the location of the inlet, its size, the diameter of the drain opening and the overall dimensions of the device, which must fit freely into the tank. The flush mechanism for a toilet can be represented by a single design or consist of separate (drain and fill) devices. The second option significantly facilitates and simplifies the process of replacing products.
If elements of the drain mechanism break down, the repair kit is selected based on the model of the tank
When choosing a valve, you should pay attention to the quality of the product. The mechanism must operate under its own weight. It is necessary that all its components are movable, move smoothly and unhindered. There should be no jamming of any kind.
When choosing a drain mechanism, you should carefully inspect the elements. They must have a solid body, free from chips and cracks, and the correct geometric shape, which will contribute to efficient and uninterrupted operation. Spare parts for toilets made from high-quality material have a high cost.
Seals and gaskets should be purchased from silicone. Such products, unlike rubber ones, are characterized by strength, reliability and durability. Elements are checked for compression and bending. They should not be deformed or cracked.
Helpful advice! The best performance and strength properties are provided by sealing elements, in the manufacture of which rubber is added to enhance elasticity.
New mechanism parts must be of high quality, without chips or cracks.
Installing fittings
A new mechanism for the flush tank is selected in advance. This takes into account:
- height and volume of the tank;
- location of the water supply hole;
- location of the hole for the button or lever.
Fitting kit for installation Source moskva.meduzza.ru
Place the housing of the drain mechanism into a clean tank lying on a flat surface, having first unscrewed the lower mounting nut from it and installed an elastic sealing ring on the pipe. A plastic nut is screwed onto the thread of the stand from the outside of the tank. Screw it in with your fingers until it stops, then tighten it slightly with a wrench. Do not overtighten the fasteners - the plastic may burst.
A new sealing ring is placed on the toilet bowl shelf - it should be located around the drain hole. The surface of the shelf is first cleaned of dirt and wiped dry.
New bolts with elastic gaskets are inserted into the mounting holes inside the container to ensure the tightness of the connections. The drain tank is placed in place without leveling yet. It is necessary to insert the bolts into the mounting holes of the toilet shelf and screw the nuts on them.
The next step is to level the tank and tighten the nuts with a wrench. It is important to tighten the fasteners gradually and alternately, sometimes right, sometimes left, to avoid skewing the tank.
Installing and fixing the tank Source fb.ru
Next, install the side or bottom supply valve of the drain tank, having first put the o-ring on the pipe. The mechanism is also secured with a nut located on the outside of the tank. A flexible water supply line is connected to the inlet valve; the threaded connection is sealed with fum tape.
Before connecting the flexible line, it is advisable to briefly open the water supply to remove rust particles and other debris from the pipe that got there during dismantling.
After connecting the flexible line, turn on the water to check the tightness of all connections. If necessary, fasteners are tightened with a wrench. Then they check the operation of the mechanisms and adjust the fittings so that the system functions properly.
Before installing the cover, the mechanisms are checked and adjusted Source calgary.isgreen.ca
At the final stage, the lid is installed and the button is put in place - just screw the ring around it with your fingers. After final testing, the tank is completely ready for use.
Types of toilet flush valve as a system overflow control mechanism
The toilet cistern flush valve can be a float or membrane shut-off device. Models of the first option may differ in structure and principle of operation. Old tanks were equipped with Croydon valves, which consisted of a body, piston, axle, seat and float lever. When the float lever was acted upon, the mechanism began to function. In this case, the piston moved vertically.
Most modern drain mechanisms are equipped with a piston valve, which moves horizontally when the lever is pressed. The water supply is regulated by the contact of the piston and the seat. When the container is filled, the inlet hole is closed using a gasket located at the end of the piston.
The diaphragm valve is not equipped with a piston gasket, but with a rubber or silicone membrane. When a lever acts on it, the plastic piston begins to displace the membrane, which closes the water supply.
The drain valve can be equipped with a membrane or float mechanism
Important! The diaphragm valve facilitates quick and silent filling of the tank.
The disadvantage of this element is the greater sensitivity of the product to dirt and the presence of impurities in water. The diaphragm valve will quickly lose its operational properties due to poor quality water in the system. A mechanical cleaning filter will help avoid problems.
There are floatless options for the drain system. The water supply to them is stopped due to the presence of a special chamber shaped like an inverted glass.
Material for making toilet flush valves
Expensive models of toilet flush systems are made of bronze or brass. These materials are characterized by strength, reliability, corrosion resistance, and the ability to withstand mechanical and chemical loads. The design can be either simple or complex. Metal filling is found in expensive collectible models, which are produced with a certain stylization.
Most drain valves are made from polymers
In other cases, bronze and brass can be used in the manufacture of only the fill valve, which makes the shut-off and drain system universal, easy to install, configure, repair, and allows you to replace each unit individually.
Many valve models are made from polymers. The quality of plastic and precision of production affect the cost of the product. The more expensive the fittings, the more reliable and durable the drainage system will be. However, there are high-quality models that have an affordable price.
We adjust the water level
Manufacturers of drain fittings supply devices that are, by default, configured for the maximum volume of water in the container. Often this level is excessive. The filling capacity of the tank can be reduced by adjusting the mechanism.
If water is supplied from the side using a float valve, it is enough to change the position of the float. To do this, change the bend of the lever. The adjustment principle is simple, but to achieve the desired result you have to bend the lever several times, using trial and error. If the float is held on a rigid metal rod, it will require serious physical effort to bend the lever even slightly. In newer models, the lever is made of plastic - to adjust the level of water intake, the float is moved along the rod.
Methods for connecting water fittings: features of each option
After flushing the water, filling the tank with a certain volume of water can be done through the side or bottom supply. In the first case, filling occurs with noise. However, some models of tanks are equipped with a soft plastic tube, which directs the stream of water to the lower zone of the container. This method of filling the tank is used in most modern models belonging to the budget and mid-price segment. It is characterized by simple and easy installation, accessibility of adjustment and repair work.
The side water connection mechanism consists of a shut-off valve, control lever, float and fill tube. The lever can be plastic or brass. The float is represented by a plastic container or a product made of foam material.
The lower inlet ensures a silent water supply, it is not visible, which leaves free space on the sides
The principle of operation of the filling mechanism for a toilet tank, in which the control device is located horizontally, is as follows. When the water is flushed, which entails a decrease in the liquid level in the tank, the float device of the toilet tank lowers, attracting a rod that opens the shut-off valve. Water begins to fill the container, gradually lifting the control mechanism.
Important! If a rod valve is used, the water flow decreases gradually, and the diaphragm valve immediately shuts it off when it reaches a certain level.
The bottom supply ensures silent water supply. It is not visible, which leaves free space on the sides. This type of device is the most difficult to repair. Intensive water pressure is required to fill it.
The shut-off valve for a toilet cistern with a bottom line includes a float, a guide, a glass into which the float is lowered during flushing, a rod that is attached to the float on one side and to the shut-off device on the other, and a membrane valve.
The shut-off valves for a toilet cistern with a bottom connection include a float, a guide, a glass, a rod and a diaphragm valve
The operating principle of the device is as follows. When the container is emptied, the float moves down along the guide. The diaphragm valve opens, which is affected by the draft. Water begins to fill the tank. The valve closes when the float chamber reaches the required level, which is determined by the size of the control rod.
Video description
This video clearly shows how to set up the filling mechanism.
Let's look at how to adjust a flush tank with a button and a lower inlet valve. First of all, you will need to turn off the water supply, drain the contents of the container, remove the button and remove the tank lid. An adjusting screw is provided on the float mechanism. It is twisted to lower the float down and reduce the filling of the tank. Having set the screw to the optimal position, you can close the lid, install the button and turn on the water supply.
What is necessary?
Of course, you can’t do without the necessary tools and equipment, so first of all you need to prepare them. What exactly is useful is determined by the type of design and certain characteristics.
You need to pay attention to some nuances.
- How is the tank attached to the toilet? This can be a monolithic installation together with a toilet, or a wall-hung structure, or a model where the tank is mounted in a hidden niche.
- How is water supply connected to the tank? It can come from below or from the side. In the first case, the typical reason for the lower supply will be the need to line the pipes. This installation is not very simple. But summing up from the outside is both simpler and more familiar.
- What kind of reinforcement structure is used. That is, it comes with a lever or a drain button.
For installation you need:
- shut-off valve (it is placed on the water supply system, allowing you to shut off the water flowing from the water supply system to the tank);
- rubber, copper and steel liners mounted to the inlet pipe;
- drain fittings responsible for collecting/discharging water;
- silicone sealant or tape sealant used for auxiliary sealing;
- agent against corrosive deformation of metal elements of the installation.
In most cases, fastening involves using bolts and nuts that are included in the plumbing kit itself (i.e., you do not need to buy anything additional).
The following tools need to be selected: a drill, drills for metal and tiles, a marking marker, a hammer (for dowels), a wrench, a level, a core, a rubber spatula that will remove excess sealant. To attach the tank to the compact toilet, you need an open-end and socket-type wrench. To connect the bypass pipe, you should find an adjustable wrench with a diameter corresponding to the cross-section of the coupling.
The water has stopped flowing
If water has stopped flowing into the tank or is filling too slowly, the side or bottom feeder should be inspected. Usually the problem is associated with clogging with rust particles and other mechanical impurities.
At the first stage, you need to turn off the water and disconnect the flexible line from the tank. If a filter is installed at the inlet of the feed unit, dirt may accumulate in the hose. To remove it, lower the free end of the line into a bucket or direct it into the toilet and turn on the water supply.
The bottom water supply valve is dismantled and cleaned of contaminants Source stroy-podskazka.ru
In more complex cases, it may be necessary to remove the feeder. The mechanism is washed under running water to clean the body, tubes, and valve from dirt. If the structure includes a membrane, it is removed and thoroughly cleaned of accumulated solid particles.
Next, the supply device is installed in place, the flexible connection is connected and the tightness of the connections is checked, as well as the pressure of the water entering the tank.
Possible system malfunctions and ways to eliminate them
Studying the principle of operation of the toilet will help identify possible malfunctions and eliminate them. If the overflow control does not work, you need to find the reasons that caused the damage to the system. The most common may lie in the misalignment of the lever or rocker arm that holds the float. It must be aligned, which will ensure the correct movement of the float and the restoration of the system.
For toilet flush systems with a membrane valve, when the element moves to the upper position, the hole may remain open. In this case, the position of the membrane is adjusted or replaced. The reason for the failure of the overflow control system may be perforation of the float with water ingress. This problem requires a complete replacement of the element. If the above operations do not resolve the malfunction, it is necessary to replace the inlet valve.
There are many reasons for a malfunctioning tank drain system.
A leak at the fill valve occurs primarily as a result of wear on the sealing gasket. In the early stages, the problem can be eliminated by tightening the fastening nut. In advanced cases, you will need to replace the gasket.
If the drain button does not work, the cause may be a misalignment of the lever that connects it to the drain valve. Such a malfunction may occur due to the breakdown of plastic elements of the internal fittings. In this case, replacement of the drain mechanism is required.
During the initial operation of the tank, problems may arise as a result of incorrect adjustment of the system. To ensure its functionality, it is necessary to select the height of the drain cup corresponding to the height of the tank, fixing it in the correct position.
If weak pressure is observed while filling the tank at normal pressure in the general system, the water supply hose is dismantled, cleaned, and lime deposits that have blocked the lumen are removed. If cleaning cannot be done, the hose is replaced with a new one.
A misaligned lever may cause the button to not operate.
If the problem is not resolved, you need to inspect the intake valve and check its functionality. To do this, open it, clean the inner chamber and adjust the overflow system. If the problem persists, the valve must be replaced.
Continuous filling and leaking
To figure out what to do if the drain tank does not hold water, you need to find the cause of the problem. For this purpose, it is opened and the mechanisms are inspected, having previously shut off the water supply. Some faults can be resolved within a few minutes; in difficult cases, the fittings will need to be replaced.
Skewed float or drain valve
Water will constantly drain if the shut-off valve (bulb) is skewed and does not fit against the seat. It is enough to correct it so that the tank mechanism begins to function correctly. This problem most often occurs with outdated drain systems with a lever or vertical rod equipped with a handle.
Old style drainage device Source leroymerlin.ru
A skewed float prevents the supply valve from closing. The tank is continuously filled with water, which flows into the toilet bowl through the overflow tube. To fix the problem, you need to adjust the float, at the same time checking its tightness.
Leaky float
A float made of plastic may lose its seal over time. Water penetrates inside the body and the float is not able to fully rise to the surface. As a result, the lever remains in the lowered position and the supply valve does not close.
There are two options to solve the problem:
- purchase and installation of a similar or similar float;
- repairing a worn float using sealant, glue, heated plastic and other available materials.
After repairing or replacing the float, the filling level of the tank should be adjusted.
Siphon
This is a device for discharging water from the tank into the toilet bowl. The siphon for the toilet cistern is activated when the flush button is pressed, as a result of which a vacuum is created in the air chamber.
Under its influence, water is actively pumped out of the tank until it is completely empty.
Overflow device - common breakdowns and their repair
It is normal to fill the tank to 80% of its entire capacity. This is achieved by adjusting the intake valve, or rather the position of the float.
However, situations arise when a malfunction occurs in the locking device and the toilet tank overflows. In this case, overflowing the container is inevitable and water spills onto the floor.
To avoid this situation, an overflow pipe is installed in the container, leading to the drain. When the liquid level rises above normal, it flows through the pipe into the drain, preventing flooding of the room.
Watch the video
The drain tank does not turn off the water - fix it
However, such a situation when water flows out of the tank without stopping is a sign of a malfunction and a reason for immediate intervention to eliminate it. Taking into account modern trends in the production of plumbing, it is likely that it will not be necessary to restore the functionality of a broken unit, but rather to replace it completely.
But the replaced unit will still have to be disassembled in order to understand why it failed and eliminate the cause. For example, install an internal fine (coarse) filter at the inlet of the tank.
Another reason for the constant spillage of water may be a violation of the tightness of the locking mechanism due to wear of the gasket. It just needs to be replaced.
In general, water leaking into the toilet is a typical breakdown of this device. One of the reasons may be damage or wear to the inside of the cistern siphon membrane. If such a malfunction occurs, the siphon membrane will need to be replaced, and this can be done in the following sequence:
- Drain the water from the container. To prevent the container from filling through the inlet valve, the float must be secured in the upper position in some way, or better yet, shut off the ball valve on the water supply outlet.
- Unscrew the nut securing the drain pipe.
- Loosen the siphon nut located at the base at the outlet of the container.
- Disconnect the siphon from the liquid release lever and remove it.
- Remove the membrane and replace it with a similar one.
- Reassemble the mechanism in reverse order.
While working, it is necessary to inspect other toilet internals and correct where necessary. At the end of the work, you need to fill the tank and perform several test runs of water to ensure that the problem has been resolved.
It is also necessary to check all joints in the system for leaks. If any are found, take measures to eliminate them. When this cannot be done, it is necessary to invite a qualified plumber to fix the leaks.
What to do if the toilet tank does not fill
Watch the video - what to do if water doesn’t fill up
This is one of the typical malfunctions of the toilet flushing system. If it occurs, you should not run to the store for a new tank. Let's try to figure out the situation ourselves using the following algorithm.
- Remove the cover.
- Check the position of the float. In some cases, the cause of the malfunction is its distortion, which prevents movement inside the container. It is necessary to restore the position, fill the tank and do a test drain of the liquid.
- Check for water in the plumbing system on other consoles.
- Close the inlet tap and unscrew the connection hose. Inspect to make sure that it is not clogged.
- Inspect the hole in the intake valve body and, if necessary, clean it from contamination with a nail or elastic wire.
- Check the piston stroke; if it is tight, it is necessary to remove and clean the surface of this part, achieving free movement in the body.
Upon completion of this work, it is necessary to assemble the system back and test fill the tank two to three times. As a rule, such actions are sufficient to resolve the problem. If the container still does not fill, you will have to visit a plumbing store and buy a new valve.
Installation is in the reverse order. At the same time, we advise you to buy and install filters for purifying tap water and install them immediately behind the water tap.
Establishing the fact that the toilet tank is broken should not lead a person into shock. Most problems can be fixed by yourself. If this fails, call the emergency service - for a fee they will easily fix any problem.
Installation and replacement of fittings
“Nothing lasts forever,” this fully applies to toilet flushers. Sooner or later you have to start replacing the fittings, that is, the internal structure of the tank. When deciding to do the work yourself, you need to take into account a number of circumstances:
- The very need for replacement assumes a significant service life of your device. Therefore, when you go shopping for internals, you need to at least approximately know the age of the device.
- There are many manufacturers of plumbing fixtures and each of them brings its own design features to the device. Therefore, you also need to know the author of the product.
- The need to repair and do it yourself requires certain knowledge and skills, as well as the availability of special tools.
Installing the insides of a drain tank is a painstaking job, comparable to assembling a new product, so you need to treat it with the utmost care and responsibility. Otherwise, leaks may form, the elimination of which is very troublesome.
Video - replacing fittings
It should be remembered that the insides of the tank can be quite complex and fragile structures, the breakdown of which if installed incorrectly is very likely.
Differences in the insides of fittings from different manufacturers may depend on the method of water supply. There are such features.
- The lateral supply of liquid provides for the location of the internals in the upper part of the tank, which is typical for domestic products. This system is the most economical, but the liquid supply is accompanied by noticeable noise. In more prestigious models, water is supplied through a tube, the end of which is lowered to the bottom and filling is done quietly.
- A device for supplying water from below is most often found on foreign-made models, but recently it has also appeared on domestic products.
Flush devices are activated when the lever is pulled up or when the button is pressed , of which there can be two for different dosages of water when flushing.
What principles should be followed when repairing?
Watch the video - internal structure and principle of operation Before starting work, you need to prepare the equipment. This means doing the following:
- You need to turn off the tap on the water supply pipe in front of the inlet valve.
- Remove the cover. To do this, you may need to unscrew the button-shaped lock, usually located on the left wall of the container. Unscrew the fixing screw and remove the cover, gaining access to the inside of the tank.
- Inspect the fittings to identify worn or broken elements.
Inside the filling fitting there is a diaphragm valve or piston valve. Any of these designs is sensitive to fine contaminants that are always present in tap water.
By settling on the walls of the pipes and any surfaces with which it comes into contact, these contaminants interfere with the operation of the valve mechanisms. The structure of this sediment is very strong, and it can only be removed mechanically.
If filtering devices are not installed on the inlet pipe, periodic replacement of the fittings is inevitable. You can abandon the push-button drain mechanism in favor of a rod one.
To install a new mechanism in the tank, you must first remove the old one. This can be done by turning it clockwise until it is completely disengaged. However, you should not use excessive force; if the attachment point breaks, it will be problematic to remove it.
The new fittings must match the size of the tank; you need to pay attention to this when purchasing.
Watch the video
WE REPAIR THE DRAIN TANK. REPAIR THE WATER DRAIN UNIT.
It is also necessary to pay attention to the correct installation of sealing elements - gaskets. Their placement at an angle can lead to additional loads and, over time, to the formation of cracks in the body, which is detrimental to ceramic products.
When installing fasteners, do not apply excessive force to it so as not to create additional loads.
Installing the insides of the tank does not seem like a complicated operation. It is quite possible to do it yourself.
Damage not related to fittings
It is important to know how to repair the cistern or the toilet itself if cracks appear in the body. Leaking water can cause a flood, so if a problem is discovered, you should act immediately. Ceramic glue will help seal the crack, but the plumbing will have to be replaced in the near future.
A leak may also occur if:
- The nuts on the bolts that secure the tank to the toilet have come loose. The fasteners must be carefully tightened with a wrench. If the seals need to be replaced, the tank will have to be removed and reinstalled.
- The connecting cuff between the tank and the toilet shelf is deformed or damaged . It must be replaced, but as a temporary measure, the resulting gaps can be sealed with silicone sealant.
Elimination of external leaks and fight against rust
The appearance of water under a plumbing fixture indicates a leak in the toilet tank at the point where it connects to the fixture. This option is possible if the tank is installed incorrectly or the gasket is aging. In this case, the drain container will have to be removed, cleaned and dried at the connection points. After this, the tank can be installed in place using a new gasket of the same type. To ensure secure fastening, a layer of silicone adhesive is applied to the gasket on both sides.
If the toilet tank is leaking at the water supply point, you need to turn off the water, remove the hose, wrap fum tape around the thread and tighten the connection again. If water is leaking through the mounting bolts, the cause is drying out of the rubber seal or improper installation. First, the connection is loosened and the gaskets are changed. Next, you should carefully tighten the bolts to avoid distortion.
Helpful advice! It is recommended to use conical gaskets for fasteners.
Water on the floor does not necessarily mean that the cistern is leaking. Condensation may form on it and flow down. This may be due to high humidity in the room. To eliminate the problem, it is necessary to install forced ventilation. The reason may also lie in the constant flow of water into the toilet sink. It will be possible to remove condensate after eliminating the malfunction of the drainage system.
It is recommended to use conical gaskets for fasteners
The drain mechanism often fails due to the accumulation of dirt and rust. To avoid such a problem, regular preventive maintenance should be performed. The container is completely emptied, after which it is treated with special agents against plaque and rust. Next, the tank is washed several times with water and put into operation.
You can pour Sanox gel and half a liter of vinegar into the toilet tank. This mixture is left to act for several hours, after which the tank is washed several times with water.
Preventive measures
To avoid problems associated with leaks and excessive consumption of water constantly flowing into the toilet bowl from the reservoir, it is important to know the structure of the flush tank and be able to adjust and repair the mechanisms.
It is recommended to systematically:
- check the condition of the flexible connection and connection unit;
- inspect the fittings inside the container, clean it of lime deposits and other contaminants;
- check the tightness of the connecting collar and bolted fastenings using a paper napkin;
- Inspect the tank and toilet for cracks.
Preventive measures can extend the service life of mechanisms.
Review of manufacturers
High-quality cisterns and toilets are offered by the following companies:
IDO Kylpyhuone Oy (Finland)
One of the best manufacturers whose plumbing products regularly take prizes at international competitions.
Advantages of IDO products:
- availability of European Union certificates;
- the widest range: more than 150 models, some with a water softening system;
- high-quality durable porcelain is used;
- a wide range of components and accessories for decorating a room in the same style;
- warranty period is 8-10 years for porcelain and 2 years for duroplast parts;
- availability of products of all price categories;
- perfectly smooth surface that is easy to keep clean.
Iddis (Russia)
This trademark belongs to SKL Group LLC with a central office in St. Petersburg. The products are superior to imported analogues in that they are better adapted to Russian conditions (pressure drops, water hardness).
Roca (Spain)
This manufacturer has an enterprise in Russia (subsidiary), so its products, with good quality, are relatively cheap.
The warranty period for ceramics is 5-10 years, for components - 2 years.
There is a developed network of service centers in Russia.
Vitra (Türkiye)
A very well-known manufacturer whose products, for example, are installed at Wembley Stadium and Heathrow Airport. Winner of a number of international awards in the field of innovation and design. Since 2014, the company’s plant has been operating in the city of Serpukhov, Moscow region, supplying the market with high-quality but affordable plumbing fixtures.
Cersanit (Russia-Romania-Poland)
A large concern that includes factories in a number of countries. It produces all types of plumbing fixtures and in a wide variety. The tanks use proprietary developments that ensure a low noise level when drawing water.
Toilet Cersanit Arteco
Working with a tank built into the wall
It is quite difficult to change and repair fittings if the drainage container is hidden in the wall and disguised with finishing materials. To do this, you first have to dismantle the wall panel with the flush keys, then use a screwdriver to unscrew the frame on the hole in the wall. The partition is removed, after which access to the hidden water fittings is opened.
The water is shut off, after which the valves and other structural elements are dismantled. The breakdown is eliminated, after which the faulty plastic parts are replaced with new ones, and the mechanism is reassembled in the reverse order. Without experience, it is quite difficult to correctly assemble the components, so it is better to entrust hidden mechanisms to a specialist. Such fittings are easy to damage, and to completely replace the container you will have to dismantle the decorative trim.
Leave a request to travel within the Moscow Ring Road for free
A responsible attitude to the condition of your plumbing can prevent most breakdowns. It is better not to skimp on installing water filters, as they significantly extend the life of your plumbing fixtures. It is necessary to replace the fittings only with high-quality parts of proven brands, this will avoid repeated problems and expensive repairs. However, if you have certain skills and tools, you can even solve the problem on your own.
To other materials:
- Rollers for shower cabins - how to choose and install
Replacing components yourself
The most reliable option for repairing fittings is a complete replacement of all components of the device. For this work, you will need a standard set of plumber's tools: it includes pliers, screwdrivers, an adjustable wrench, you will also need to purchase FUM tape for sealing connections, rubber gaskets and a tap. To replace it, it is recommended to purchase an original set of locking elements; in this case, it is guaranteed to fit the size and configuration of the container.
To install new fittings, you must do the following:
- Install a rubber seal between the drain hole and the base of the toilet. It prevents water leakage and provides a tight connection.
- The tank is bolted to the toilet and secured securely to prevent movement.
- After this, you can install new fittings inside to replace the existing ones. A flexible line is connected to the water riser, which will supply water to the tank. To shut it off if necessary, a ball valve is installed in the system. For maximum tightness of the connection, FUM tape should be used.
- The next step is to connect and configure the float mechanism in the drain tank. The float is adjusted so that the water level does not exceed 10 cm from the edge of the drain container.
- The last stage of installation is connecting the drain locking mechanism. The lower element closes the hole in the tank, the upper one is inserted into the hole in the lid and closed with a decorative button element.
If installing the kit into the toilet causes difficulties, it is better not to risk it and call a professional. Incorrect installation will shorten the life of the components and soon the fitting will have to be replaced again. To avoid unnecessary problems, call a qualified plumber to your home.
Conclusions and useful video on the topic
A few tips from experienced professional plumbers will help you avoid serious mistakes and complete your installation faster.
If done correctly, installing a plumbing fixture yourself should not cause any particular difficulties. The main thing is not to rush to put it into operation immediately, allowing time for the silicone to solidify thoroughly.
Setting up the tank fittings is not difficult. It is important to study the instructions and understand the general principles of operation of the inlet and locking mechanisms. Attention to detail and accuracy will help to complete all the work correctly.
Sources:
- https://TrubaNet.ru/kanalizacionnye-truby/kreplenie-bachka-k-unitazu-instrukciya.html
- https://dekoriko.ru/unitaz/kreplenie-bachka/
- https://partner-tomsk.ru/santehnika/kanalizatsiya/kreplenie-bachka-k-unitazu-3-metoda-montazha-bez-oshibok
- https://ManRem.ru/kreplenie-bachka-unitazu-instruktsii-sovety-provedeniyu-rabot/
- https://UnitazVdome.ru
- 1
Material for making toilet flush valves
Expensive models of toilet flush systems are made of bronze or brass. These materials are characterized by strength, reliability, corrosion resistance, and the ability to withstand mechanical and chemical loads. The design can be either simple or complex. Metal filling is found in expensive collectible models, which are produced with a certain stylization.
Most drain valves are made from polymers.
In other cases, bronze and brass can be used in the manufacture of only the fill valve, which makes the shut-off and drain system universal, easy to install, configure, repair, and allows you to replace each unit individually.
Many valve models are made from polymers. The quality of plastic and precision of production affect the cost of the product. The more expensive the fittings, the more reliable and durable the drainage system will be. However, there are high-quality models that have an affordable price.