The internal filling of the tank is not a very complicated device, but its breakdown can significantly reduce the comfortable feeling for the residents of the house. It happens that everything looks normal, but the operation of the drain mechanism leaves much to be desired.
To eliminate problems, you will need to properly configure the toilet fittings. This procedure must be performed when installing plumbing fixtures, and later the drain operation must be periodically adjusted.
If you encounter such a problem, our material will help you quickly solve it, without even resorting to the help of specialists. We will tell you how to get your toilet flush working properly. For clarity, the material contains thematic photos and videos.
The fittings in the toilet cistern are a device that automatically fills and drains water.
Brands Alcaplast and Geberit are considered the most popular among manufacturers of toilet flushing devices. Modern toilet models are equipped with a two-button valve adjustment system. With one press of a button, the filling volume of the tank is changed, usually to 3 or 6 liters. Even if you correctly configure the operation of the simplest model, water costs will be significantly reduced.
Types of toilets depending on the water supply to the cistern.
The system designed to fill the tank with liquid comes in two types:
- 1.Water is supplied from the side.
- 2.Water is supplied from below.
In apartments, systems with lateral supply are more common. Adjustment and repair of this type of fittings are simple even for an untrained person.
Installation and configuration of fittings
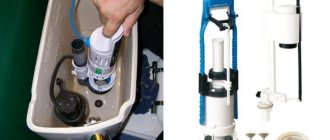
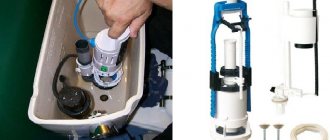
After installing the toilet in the designated place and then connecting the toilet to the sewerage system, the next step is to install the cistern fittings: the video, offered as a short instruction, will help you carry out this work correctly.
Installation of toilet cistern fittings
Let's consider the technology for installing toilet cistern fittings:
Rules for installing fittings in a cistern
- Place a rubber gasket on the drain mechanism.
- Install the mechanism into the tank, screw it with a plastic nut.
- Place plastic or iron (depending on the configuration) washers and rubber gaskets on the mounting bolts. Insert bolts into holes. On the other side, put on the plastic washer and tighten the nut.
- Place the rubber O-ring on the plastic nut. If a new ring is used, sealing is not required. If you used a ring that had already been in use, you should carefully coat all connections with sealant.
Pro Tip: Careful inspection of all structural parts may reveal minor casting defects. In this case, you will also need to use a sealant. The installation site of the sealing ring must also be coated with a layer of sealant, having previously cleaned it.
Installing a cistern with fittings on a toilet
- Place the tank on the toilet platform and secure it with nuts.
- Secure the filling mechanism. Attach the hose from the water supply pipe.
- Replace the reservoir cap. Screw on the drain button.
At this point we can assume that the installation of the cistern fittings is complete.
Pro tip: Do not wrap anything additional around the threads of the mounted mechanism to drain water when putting on the sleeve. Try not to allow distortion, so as not to break the thread and damage the part.
Installing the Reservoir Cap and Push Button Assembly
Adjustment of fittings
Installing the toilet and cistern should not cause much difficulty. But in some cases, additional adjustments to the toilet fittings may be necessary. So, to adjust the height of the drain valve:
- Disconnect the rod from the overflow pipe.
- Release the glass clamp.
- Move the stand down or up.
The water level in the barrel is adjusted as follows:
- Adjust the position of the glass - raise or lower it along the guide, leaving a distance from the top of the glass to the top edge of the tank of at least 45 mm.
- Install the overflow tube 20 mm above the maximum water level and 70 mm below the top level of the rack.
To adjust the small flush, the small flush float must be moved down or up relative to the overflow tube. How to set up a full flush? Move the damper (up or down) relative to the glass.
Rules for adjusting toilet cistern fittings
Adjusting the toilet fittings to full or low flush means that moving the float or flapper down increases the flow of flushed water.
- Autonomous sewerage
- Domestic pumps
- Drainage system
- cesspool
- Drainage
- Sewage well
- Sewer pipes
- Equipment
- Connection to sewerage
- The buildings
- Cleaning
- Plumbing
- Septic tank
- Choosing and installing a hanging bidet with your own hands
- How to choose an electronic bidet
- Selecting and installing a compact bidet
- How to choose a bidet manufacturer
- How to choose, install and connect a floor-standing bidet
- How to install and adjust toilet cistern fittings
- How to connect a dishwasher with your own hands
- How to connect a washing machine with your own hands
- Cleaning sewer pipes: household recipes and equipment
- Heating system made of polyethylene pipes: how to create it yourself
Composition of the fittings if the water supply is from the side
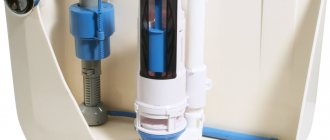
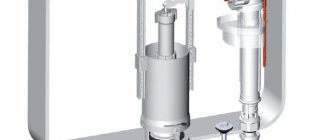
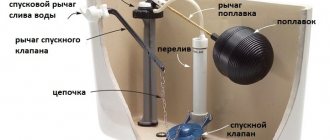
If a side type of supply is installed to the tank, then the mechanism consists of:
- 1. The shut-off valve can be rod or diaphragm. The rod type is simpler and less expensive.
- 2. The rod or lever for control can be brass or plastic.
- 3. The filling tube is designed to reduce the noise effect from flushing and filling water.
- 4.Float. Floats are used that move along a horizontal guide.
How does a mechanism that moves along a horizontal guide work:
- 1. During flushing, the float mechanism lowers down, moving the rod behind it, while opening the shut-off valve.
- 2.Water enters the tank, the control element rises.
- 3. The flow of water in a device with a rod type valve stops gradually as the tank is filled, with a membrane type it stops as soon as the control mark is reached.
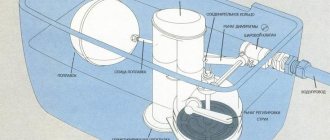
What does the fittings consist of if the water supply is from below:
- 1.float
- 2. glass, where the float mechanism is lowered during draining.
- 3. guide.
- 4.membrane valve.
- 5. The rod is attached simultaneously to the float device and the locking element.
Types of fittings for flush cisterns
The principle of operation of a regular tank is not complicated: it has a hole through which water flows and a place where water is discharged into the toilet. The first is closed with a special valve, the second with a flap. When you press a lever or button, the flap rises and the water, in whole or in part, flows into the toilet, and then into the sewer.
After this, the valve returns to its place and closes the drain point. Immediately after this, the drain valve mechanism is activated, which opens a hole for water to enter. The tank is filled to a certain level, after which the inlet is closed. The water supply and shut-off are regulated using a special valve.
The fittings for the flush tank are a simple mechanical device that allows water to be drawn into a sanitary container and drained by pressing a lever or button.
There are separate and combined designs of fittings that collect the volume of water required for flushing and drain it after activating the flushing device.
Separate and combined options
The separate option has been used for many decades. It is considered cheaper and easier to repair and configure. With this design, the fill valve and damper are installed separately, they are not connected to each other.
The shut-off valve for the tank is designed in such a way that it is easy to install, remove or change its height
To control the flow and shutdown of water, a float sensor is used, in which sometimes even a piece of ordinary foam is used. In addition to a mechanical damper, an air valve can be used for the drain hole.
A rope or chain can be used as a lever to lift the damper or open the valve. This is a typical option for retro-style models, when the tank is placed quite high.
In compact toilet models, control is most often carried out using a button that needs to be pressed. For those with special needs, a foot pedal may be installed, but this is a rare option.
In recent years, models with double buttons have been very popular, which allow you to empty the tank not only completely, but also halfway, in order to save some water.
The separate version of the fittings is convenient because you can repair and configure individual parts of the system separately.
Combined type fittings are used in high-class plumbing; here the drain and water supply are connected into a common system. This option is considered more reliable, convenient and expensive. If this mechanism breaks down, repairs will require completely dismantling the system. Setup can also be a bit tricky.
The fittings for a toilet cistern with side and bottom water supply differ in design, but the principles of setup and repair are very similar.
Materials for making devices
Most often, toilet fittings are made of polymer materials. Typically, the more expensive such a system is, the more reliable it is, but this method does not provide clear guarantees. There are also counterfeits of well-known brands, as well as quite reliable and inexpensive domestically produced products. The average buyer can only try to find a good seller and hope for luck.
Fittings made of bronze and brass alloys are considered much more reliable, and such devices are much more difficult to counterfeit. But the cost of these mechanisms will be significantly higher than that of plastic products.
Metal filling is usually used in luxury plumbing fixtures. With proper configuration and installation, such a mechanism functions smoothly for many years.
In bottom-fed toilets, the inlet and shut-off valves are very close. When setting up the fittings, you need to make sure that the moving parts do not touch
Water supply point
An important point is where water enters the toilet. It can be done from the side or from below. When water is poured from the side hole, it produces a certain amount of noise, which is not always pleasant to others.
If water comes from below, it happens almost silently. The lower water supply to the tank is more typical for new models produced abroad.
But traditional domestically produced tanks usually have a side water supply . The advantage of this option is its relatively low price. Installation also differs. Bottom water supply elements can be installed in the tank before it is installed. But the side supply is installed only after the tank is installed on the toilet bowl.
For replacement, the fittings are selected taking into account the option of supplying water to the plumbing tank; it can be side or bottom
How does a device that moves along a vertical guide work?
Water from the bottom supply to the tank is drained according to the following principle:
- 1. During flushing of water, the float mechanism moves along a guide.
- 2. The draft, acting on the valve, opens it.
- 3. The liquid is poured into the container.
- 4. The float device rises to the limit set by the draft, the diaphragm valve shuts off the liquid supply.
Water leaking from the tank into the toilet bowl indicates a broken fitting.
Attention! If the fittings have been in operation for several years, they become covered with a coating of lime and rust, which complicates the adjustment process. Special products to combat limescale will help solve the problem. You need to add a little product directly into the tank and rinse it off after a couple of hours.
How does it work
When you press the big button, the entire reserve in the tank is drained, 6–8 liters, and during the low mode, half as much is consumed, 2-4 liters.
There is an assumption that the economy mode is less effective, but modern toilet models are ready to refute this judgment. The fact is that manufacturers use a system of swirling water flows, unlike single-mode models, when the drain button simply resets the water supply.
"Stop mode"
When pressed once, water is released from the tank, and when pressed again, it blocks and the water stops draining.
This system is easy to use and can have a positive impact on your water bill. Installation of such models is not particularly difficult, so switching to an economical version is easy.
Adjusting the volume of liquid filled
To adjust a tank with a bottom water supply, you need to turn the adjustment screw, which gives the correct position of the float device on the rod.
To increase the volume of water filling, you need to turn the screw against the clock, and vice versa to reduce the volume of water flow.
In order to adjust the liquid level in a container with a side supply, when the control device is positioned horizontally, you must move the float to the right or left along the rod.
You can increase the level of filling the tank with water if you increase the length of the lever; if the volume of water in the tank needs to be reduced, then we reduce the size of the lever. We unscrew the screw that secures the lever, move it in the desired direction and tighten the screw, you can move the float along the teeth of the rod. If the fittings have a metal rod, then the water level in the tank can be adjusted by bending the rod to the left or right.
A drain system with a bottom supply to the tank is considered comfortable for use in everyday life, because it is equipped with better sound insulation, but fittings with connections from the side are easy to adjust and repair with your own hands.
Use two drain modes
Savings on flushing are possible if a separate flush system is installed on the toilet cistern. Those. There are two modes: full and small flush. The system consists of two buttons - large and small.
With their help, the consumption level in economy mode is only 3-4 liters. If it is necessary to drain the entire contents of the tank, the user just needs to press the large button responsible for concentrated draining.
Adjusting the toilet flush and fill system
Most often, adjustment of the fittings is required if there is leakage from the drain tank. If after flushing a trickle of water leaks out of the tank, then the drain mechanism needs repair. The reason may be a decrease in the elasticity of the bulb, which is responsible for releasing water, then the entire toilet needs to be replaced. If water does not stop flowing into the toilet after the tank is filled, then the filling mechanism needs adjustment. In this case, the culprits of the problem will be the float mechanism or the ball valve.
In older toilet models there is a brass float lever; to adjust it, you need to bend its rod so that it does not interfere with the operation of the drain system and at the same time the lid closes well.
If there are any shortcomings in the draining process, you need to adjust the device. We remove the rod from the drain pipe and clear the approach to the drain system clamp so that the float cup moves freely. We change the position of the device to the desired position, not reaching the edge of the tank by about five centimeters. Then we fix it and set the rod so that the overflow tube is in the water at a level of two centimeters.
You can also adjust the height of the overflow safety mechanism. The mechanism is located in the center of the drain device in the form of a small tube. We turn the tube to the desired level, move it clockwise, and if necessary, loosen the nut. We fix the position of the tube by turning it in the other direction.
Main types of drainage equipment designs
First of all, they depend on the type of filling and drainage mechanisms. The water drainage functions are performed by lever, push-button and automatic products.
Lever
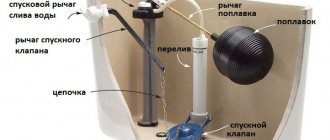
The float (1) controls the inlet valve (3) through the lever (2). The water level depends on the adjustment of the float lever on the valve lever (4). The water pressure during filling is adjusted at the valve using a set screw.
Lever models were the main models installed on toilets of the last century. They are still used in some places today. Lever devices are distinguished by their simplicity. The first products drained only at the moment of pressing, while the shut-off valve was manually held (by the “pull” - a chain or fishing line). Then came systems that use the siphon effect, which themselves control the flow after activation. But both the first and subsequent models are characterized by increased unregulated water consumption. In addition, such plumbing does not meet current aesthetic requirements.
Push-button
The toilet flush mechanism, made in a push-button version, is installed on most modern plumbing products. The predominant location of the button is at the top, on the covers of compact systems, and can also be on the wall for products installed in building structures. Their advantages, in addition to good aesthetics, lie in the ability to adjust the drain and overflow parameters. Push-button mechanisms also, once activated, hold the shut-off valve open without human intervention. And models with paired buttons allow full or partial discharge of liquid into the toilet.
Automatic
Today, there are rare and expensive products for draining water, which justify themselves when installed in luxury products or used in public places. Their work is controlled by infrared sensors.
Shut-off valves for the toilet, represented by filling mechanisms, work, as many years ago, using the principle of a refill valve, opened and closed by a float. In the classic version, the float transmits force to the valve of a faucet with a side connection through a horizontal rocker arm.
Floats that shut off the water supply through a system of levers.
However, now more often floats are installed that move along a vertical guide, cutting off the water supply through a system of levers for both the side supply and the bottom.
Important! Modern filling valves, due to their design features, allow you to collect water much faster than systems with a rocker arm.
Selecting the internal structure of the tank
Using a ruler, we determine the cross-sectional size of the pipe intended to fill the water. A diameter of 1.5 cm corresponds to a 3/8-inch liner; if the cross-section is two centimeters, then the liner is 1⁄2-inch. For convenience, it is better to choose the model of fittings that was used. We take out the fittings and buy the appropriate ones in the store.
A set of tools that will be needed for adjustment and repair:
- Roulette or ruler.
- Adjustable wrench marked 1.
- Several wrenches.
- New fittings.
Faucet attachment to save water
An aerator is a device designed to restrict water flow. Its function is to saturate the water with air bubbles, due to which the pressure becomes smaller and the size of the jet remains the same. This simple faucet attachment can save you up to 40% on your water bills! You can buy an ordinary household aerator nozzle at a hardware store for only 30 rubles. Of course, you can find more expensive models, but they will not differ radically, because... The operating principle is the same for everyone.
You can install the nozzle yourself; this does not require special skills or knowledge. The aerator is simply screwed onto the tip of the tap.
How to install new fittings
Included with the new fittings are instructions for use. First of all, let's get acquainted with the instructions.
1. We install a valve that regulates filling using gaskets and adapters. There are plumbing models in which the inlet and filler mechanisms are installed simultaneously.- 2. The fittings can be inserted into the tank before installing the toilet; we place the gasket on the upper surface of the drainage system and place the device in the tank, fastening it with nuts.
- 3. Rubber gaskets are used for internal fasteners, and plastic gaskets for external fasteners. The internal gaskets can be lubricated with silicone sealant for sealing. We replace old gaskets after disassembling the device.
- 4.If possible, the gasket connecting the tank and toilet bowl is also lubricated with sealant.
- 5. The fittings must be located at a distance of at least half a centimeter from the walls of the drain container.
- 6. Having completed the installation, the tank is attached to the toilet bowl.
- 7. Close the tank with a lid by screwing on the drain button.
- 8.Connect the water and perform a test drain.
Fixing a leaking tank
Why eliminate it - I think it’s clear. This includes wasteful water consumption, constant condensation on the surface of the tank and pipes, and a toilet bowl that quickly becomes contaminated with rust and lime deposits.
Reason 1
The tank overflows because the float valve does not turn off the water in time. Water flows through the overflow.
Solution 1
How to adjust the toilet tank in this case? Exactly the same as in the previous case. Bend the float lever so that the water stops at a level a couple of centimeters below the overflow.
Brass or galvanized steel arm is very easy to bend to any angle
Please note: in houses where there are pumps installed and operating on a pumping timer (pumps for raising water to the upper floors at peak water consumption), the water pressure can vary greatly during the day.
It makes sense to adjust the water pressure when pumping is running, when it is at its maximum.
Then, at a lower pressure, the float will shut off the water at a level two to three centimeters lower.
Reason 2
The bulb blocking the drain in the tank has lost its elasticity and no longer completely blocks the water. Water flows from the toilet tank constantly, even when it is not full.
Solution 2
- In this case, adjusting the toilet flush can be reduced to a simple operation: add any weight to the bulb . We'll hang a couple of nuts, a cast-iron coupling or a lead sinker with a hole in the center on top of it.
- An alternative to this makeweight is to replace the pear . Turn off the water to the tank and unscrew the old bulb to take it to the store as a sample: the seller may not listen to your complex pantomime and may not understand what you need from him. The bulb and stem have regular right-hand threads; The rod will have to be held with pliers.
The photo shows the same pear. Here it has just been replaced along with the stem and mount
Next we adjust the drain volume.
It doesn't matter what the set of levers and pushers leading from the button to the valve looks like. Kinematics can be very diverse. But it is important to find a glass with an adjustable height on the outside of the unit - this is the unit responsible for the drain volume.
To adjust it, in most cases, you need to disconnect the plastic rod from the button to the drain valve, and then squeeze out the plastic petals of the latch or remove the latch of the glass that regulates the volume of drain water. Holding the glass vertically, it is moved to the desired level and fixed there with spring petals or a latch. Then attach the exhaust valve rod.
The most advanced system may have a dual-mode release. Structurally, the unit is made in the form of two separate, independent drain valves, located symmetrically on both sides of the overflow safety siphon. Their adjustment is absolutely the same. Only one valve is set to maximum drain, and the second to half of the first.
When installing the tank lid and setting the height of the buttons, you should make sure that the control buttons on the tank lid have a slight backlash - this is necessary for the normal operation of the entire mechanism.
If adjustment is required for fittings that have already been in operation for some time, then difficulties may arise due to deposits - rusty or limescale deposits. It’s easy to get rid of them using regular vinegar or anti-scale chemicals - just add them to a tank filled with water and wait a few hours. And the inner surface of the tank will become noticeably cleaner.
As a bonus, we suggest watching the official video from Geberit, which will help you understand how the fittings work, how to install and configure them.
Rules for water procedures
If you have already decided to save, then you need to do it correctly and thoughtfully. Experts have proven that most of the water consumption is for water procedures, that is, showering, bathing, personal hygiene, etc. Let us bring to your attention a number of habits, the use of which in everyday life will allow you to obtain the expected effect from the actions performed:
- Taking a shower is much more economical than taking a bath;
- It is worth turning off the water during water procedures when there is no need for it. For example, during shaving, applying scrub, brushing teeth, etc. Use a glass to rinse your teeth rather than using your hands to rinse your teeth.
Indeed, why and where does water flow while you brush your teeth? In a couple of minutes, several tens of liters leak! And so every day.
For greater effect, you can hang a reminder in the bathroom about saving water. A visual reminder acts on responsibility, and as a result, savings per year can reach large amounts.
General information
The most common toilet design is the “compact” one, when the tank is installed directly on the toilet. Many manufacturing companies today produce exclusively models with buttons - one or two.
The option with two buttons is a more complex drain fitting device, but it allows you to save water when flushing:
- When you press one button, the tank is completely emptied.
- Activating the second button leads to partial emptying of the tank.
Using a washing machine and dishwasher
Few people know that consumption can be reduced only by reading the instructions for household appliances. The instructions for use clearly state recommendations for optimal operation, adhering to which it will be possible to minimize the level of liquid supply.
Washing machine
Now energy-saving models predominate on the market, in other words, manufacturers are already thinking for you. Recommendations for rational use:
- Monitor the drum loading level. On average, 1 kg of laundry consumes 10 liters of water. That is, if a machine has a 5 kg drum, and you only put 2 kg in there, all the free space will be filled with excess water.
- Mode selection. A noticeably smaller volume of water will be required for washing in the “economy” or “cotton” mode, but the “delicate wash” requires a larger volume of liquid, which is responsible for preventing damage.
Assembly of cisterns
The further comfortable operation of the plumbing will largely depend on how to assemble the tank and then adjust it. Naturally, each type of equipment has its own installation secrets, which are quite accessible to the home craftsman.
The sequence of assembling a tank with a top button (Figure 1) is as follows:
Diagram of the inlet fittings of the drain tank with a side connection.
Important! After the final assembly of the plumbing structure, you should perform several control drains of water and carefully check for leaks. This is done by visually inspecting the connections; you can also lay a newspaper on the floor under the tank, on which possible drops of water will be clearly visible.
Lever flush tanks are found today, although not often, but are sometimes still used as reliable, time-tested devices. Therefore, questions may arise regarding their installation. Although they are made from different materials: plastic, ceramic or cast iron, their assembly is very similar.
There are lever ceramic compact products installed in the saddle of the toilet bowl. In this case, the assembly of the structure is carried out in the same way as in the push-button model, using tightening screws and an elastic gasket.
