The lack of a centralized water supply pushes residents of private houses to drill wells on their own plots. Agree, without water in the house it is difficult to call staying in it comfortable. But well drilling services are quite expensive. It’s good that at least there are devices that allow you to drill a well on your own site.
One such device is a bailer. This is an effective and relatively simple drilling tool for cleaning private water sources from bottom contaminants. With its help, you can even drill a fully usable well yourself. Such a hydraulic structure will require a minimum of funds. And if it is done with your own hands, then the costs will not shake the family budget at all.
In this material we will talk about the structure and operating principle of the bailer. Let us dwell in detail on what tools and materials are required for its manufacture. In the article you will find step-by-step instructions for assembling the bailer, as well as videos that clearly demonstrate the structure and principle of operation of the bailer.
Design and principle of operation of the bailer
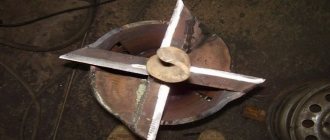
The bailer is a rather heavy piece of pipe approximately 1 - 2 m long. It is equipped with a valve at the bottom, and sometimes special pointed elements such as teeth are attached.
The sharpened edge during the drilling process loosens the soil, silt, sand and other contents of the well, depending on the type of work. Eyelets are welded to the top of the pipe, in which a metal cable is secured.
The upper cut of the pipe is protected with a thick wire mesh. It will prevent the release of gravel, crushed stone or bailer valve elements when they are torn off.
Most often, bailers are used to clean wells from serious contamination. If the well pump has not been turned on for a long time, for example several months during the winter, a significant amount of silt or sand may accumulate in the well, depending on the soil.
A bailer is simply a one/two meter long piece of pipe with a wire loop at one end and a check valve and cutting device at the other. The bailer is hooked onto a loop with a cable or wire and dropped into the well until it stops.
As a result of such silting or sanding, the well flow rate is significantly reduced. In some cases, the pump even sucks into a layer of sludge, and it is not always possible to release it without damaging the well.
After the pump is removed from the barrel, the well can be cleaned using a bailer.
The operation of the device is based on the gravitational principle. A heavy bailer is abruptly thrown into the well shaft from a great height. The sharpened edges loosen the mass of contaminants accumulated at the bottom. The valve opens and sand fills the interior space of the bailer. The valve closes and the filled bailer is lifted up.
To increase the efficiency of the device, the bailer is raised and thrown down several times. Thanks to the valve, the contents captured by it will remain inside.
Then the bailer is pulled out of the well and freed from contamination. The cycle is repeated again and again until the well is completely cleaned.
The bailer is used not only for cleaning the well, but also for cleaning the casing before installing a filter, pump, etc.
Bailers are also quite successfully used for drilling wells in loose, non-cohesive soils.
As a result of gelling, the well turns out to be quite decent and suitable for effective operation. Of course, working with a bailer requires significant physical effort.
They can be shortened slightly, for example by using a pulley or an electric winch to lift the filled bailer to the top.
Maintenance, operating tips
The following signs will indicate that it is time to seal:
- For some reason the well was not used for several months.
- The pump is missing air.
- Water contains impurities.
- After several minutes of running the tap, the water stream visually becomes thinner.
When starting to clean a working well, and this can happen every 3-4 months, be sure to make a visual assessment of its internal surface. The work may be complicated or made impossible by significant deformation of the shaft walls, loss of their integrity, or severe siltation.
Then the condition of the working equipment is checked: wear and strength of the cable, free (without jamming) operation of movable joints, reliability of fasteners.
A tripod installed above the well with a block onto which the cable is placed will help make the work easier. The result is strictly vertical operation of the device, easy lifting through the block, especially with an additional winch used. To ensure that a device torn off during operation does not create a serious problem and does not stop the process for an indefinite time, it is advisable to weld a pair of hooks to the pipe. They will come in handy for quickly removing it from the well in case of force majeure.
All work with the device ends with thorough cleaning of the internal cavity from soil. The square window at the top of the pipe will help make this faster and easier. For clayey or dense viscous soils, such a window is made along the length of the entire pipe. It is advisable to store a clean and dried bailer in a dry utility room until the next use.
On moist, sandy, loose, soft soil, you can independently drill a well or make a diagnostic puncture using a device. If the soil structure does not meet the specified characteristics, the work is entrusted to specialists using professional equipment.
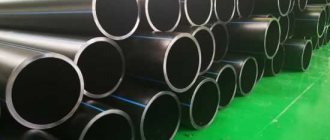
Pipe for making the body
So, to make a bailer you will need:
- Pipe of suitable diameter.
- Valve.
- Welding machine.
- Metal cable.
- Thick wire.
- Pieces of metal, etc.
To make a bailer yourself, you first need to select a pipe of the appropriate diameter. In this case, you need to focus on the internal dimensions of the casing pipe.
The distance between the outer wall of the bailer and the walls of the shaft should be two centimeters. This means that you need to subtract 40 mm from the internal diameter of the casing pipe. This will be the outer diameter of the pipe from which the bailer will be made.
The bailer tube must be long and thick enough to effectively loosen and remove dirt and soil, but light enough to be quickly removed for cleaning.
The size of the gap between the bailer and the well can vary, but only to certain limits.
Too much clearance will reduce work efficiency. But if the gap is too narrow, the bailer may scratch or damage the barrel walls.
It’s even worse if, due to the large diameter of the pipe, the bailer gets stuck in the well, especially if the casing pipe is slightly skewed. It will not be easy to remove it; you can completely ruin the well and lose it.
The length of the pipe should also not be too short or long. A short device will more often touch the walls when moving up and down. And an element that is too long may turn out to be excessively heavy and difficult to reach, especially when the bailer is filled with a heavy blade.
The length of the bailer pipe is usually approximately 80 cm, but can vary between 60-150 cm. Longer and heavier devices are used for drilling.
The thickness of the pipe walls is also important, since the total weight of the product largely depends on it. The thicker it is, the more the pipe weighs, and the more effective the bailer will be.
But if the drilling tool turns out to be too heavy, it will be difficult to work with it for the reasons already stated. A pipe thickness of 2-4 mm is considered sufficient, but it can reach 10 mm.
Thus, when choosing a pipe for a bailer, it is necessary to maintain a certain balance. The weight of the device and its dimensions must satisfy two conditions.
First, it is necessary to ensure a sufficiently high penetration inertia so that contaminants are removed from the well quickly and efficiently. Secondly, the weight of the product with loading must be such that the bailer can be pulled out by hand or using a winch.
Composition of tool elements
The main components of the bailer device are the following elements:
A section of hollow steel, less often cast iron, pipe up to 3 meters long and with an internal diameter of ≤ 60 mm. Wall thickness ≥ 4 mm. The thicker and longer the pipe, the greater the mass of the dropped projectile and the efficiency of its use. But as the weight increases, the effort required to lift it from the casing shaft increases. Shut-off check valve to retain developed rock, silt particles and water in the pipe cavity. The following types differ according to their design features: ball. At a distance of 5 cm from the bottom of the pipe, a thick washer or conical plate with a hole in the middle with a cross-section slightly smaller than the size of the ball is firmly welded inside it.
It is important that the ball placed inside the glass tightly plugs the hole. The steel ball is approximately 25% smaller than the diameter of the tube shell
It is recommended to use a ball made from a large bearing; you can find a suitable one on the market or order production at a lathe; plate-type with a rotary hinge and a steel pin welded to the inside to limit opening to 800. Tightness is ensured using rubber strips; petal ones, consisting of two thin steel or polymer plates hinged inside the tube shell, so that the petals do not have the opportunity to fly up during a hydraulic shock; limiting stops are installed.
The principle of operation of any valve system is similar to the operation of curtains that allow dirt mixed with water to pass through only in one direction. The ball valve is the most reliable and durable in operation. An impact shoe made of a pipe, connected by a threaded connection to the main glass by screwing into it. To facilitate soil development, the shoes are equipped with a cutting edge or several sharp teeth. Thermal hardening of these parts is recommended, which will significantly extend the service life. When using a ball check valve, a limiter is required to prevent the ball from flying out of the cup. Some sources provide for the installation of a safety metal grill, which is not the best option. The time the ball falls after hitting such a high grate takes a certain time, during which the mixture that has penetrated into the glass will not allow the ball to close the inlet hole. A thick smooth steel rod welded inside the glass approximately 0.5 m from the bottom will work more efficiently. Steel lugs or a bracket firmly attached to the top of the tool. Metal cable or strong synthetic rope.
Valve systems for bailers
The most complex element of the bailer is the valve. There are two main options here: reed valve and ball valve. This element has one task: to let dirt or soil inside the pipe and not allow it to spill out.
If the valve fits tightly, the bailer will effectively capture not only dense dirt, but also water, which will increase cleaning efficiency. But on some light soils, drilling can be done without a valve at all.
Option No. 1 - reed valve design
The reed valve is easy to make, but not very durable. It is an oval (ellipsoidal) plate made of a springy material: metal or polymer.
The valve is fixed in the center of the pipe. Under the influence of water flow, the edges of the ellipse open, allowing soil or silt to pass into the bailer. For a more effective fit of the valve to the walls of the bailer, a rubber or leather seal is used.
The principle of operation of the flap valve is similar to the operation of the door. When the bailer hits the ground, it presses on the door, opening it. And when we raise the bailer for the next blow, the valve door closes under the influence of the mass of the soil
When lifting a bailer with a petal valve, its “petals” close. But constant movements wear out the valve quite quickly, it simply fails.
Another version of the reed valve is a spring-mounted valve, and it closes using a fairly powerful spring.
The design is not complicated; it can be used both when cleaning a well and when drilling with a bailer. Craftsmen also come up with their own, quite effective versions of valves for bailers.
Option No. 2 - manufacturing a ball valve
A ball valve is a funnel, the mouth of which is tightly closed with a ball of the appropriate size.
The hardest part of making this valve is getting a suitable ball. It must cover a fairly large hole into which the contaminated water will flow and be heavy enough to drop down and close the valve securely and quickly.
There are three options to get such a ball:
- just find it among old scrap metal, for example, remove it from a large bearing;
- order the production of the required part from a turner, who will turn the ball on a machine;
- Make your own ball using available materials.
To make a ball yourself, you need to find a hollow plastic or rubber ball, these are sold in toy stores. You should buy a sufficient amount of lead shot from a hunting store. In addition, you will need epoxy or any other waterproof glue.
The toy ball is cut in half. Each half is filled with a mixture of shot and glue. After drying, the halves need to be glued and sanded, the ball is ready.
Instead of lead shot, any heavy metal balls, for example, taken out of old bearings, will do. You can cast a ball from molten lead, but the process is a little more complicated.
This diagram clearly describes the manufacture of a bailer with a ball valve. The ball rests against a special washer at the bottom; a protective grill should be installed on top
The ball dimensions should be approximately 60-75% of the diameter of the well casing. The second part of the ball valve is a thick metal washer in which a funnel-shaped seat for the ball is cut out. Usually, a ball is first found or made, and then a washer of a suitable configuration is made.
For the ball, a special “saddle” is machined with a hole, which the ball closes. The valve hole should be large enough to allow a lot of soil to flow inside.
If this does not happen, the hole is bored as far as the diameter of the ball allows. If you decide to entrust the manufacture of the ball to a turner, then it makes sense to immediately order a saddle for it, i.e. the whole valve.
If you don't have a welding machine
To make a solid and durable bailer, you need to connect several metal parts by welding. If this is not possible, a simple but fully functional bailer can be made without it.
To do this, you can take a regular pipe, about 0.6 m long and about 70 mm in diameter. Of course, it must be quite heavy. A handle made of thick wire should be attached to the top.
When making a bailer with a petal valve, a thick wire handle is made from improvised means for hanging the device, which is threaded through the holes in the upper part of the pipe
To do this, two holes are drilled in the pipe walls, the wire is threaded through them and fixed. A petal valve is installed at the bottom, which can be made from an ordinary plastic bottle. A two-liter container will do.
A valve of a suitable size in the shape of an ellipse is cut out from its wall.
This diagram clearly shows the manufacture of a reed valve for a pipe with an internal diameter of 70 mm
The smaller diameter of the valve should be equal to the internal diameter of the bailer, and to determine the larger diameter of the ellipse, another 20 mm is added to the diameter of the pipe.
The valve is fixed with a bolt 6-8 mm thick. The length of the bolt must exceed the outer diameter of the pipe so that it can be inserted across the pipe and secured.
The petal valve is fixed approximately 10 cm from the bottom edge of the bailer. To do this, drill two holes into which fasteners are inserted.
Those. The length of the bolt consists of the sum of the outer diameter of the bailer and the thickness of the nut. But the bolt should not be too long so that it does not touch the walls of the casing.
For the bolt, two holes are drilled in the bailer walls approximately 10 mm from the bottom end of the bailer. To connect the valve to the bolt, use 2-4 mm thick wire.
It is used to make two wire rings in the middle of the valve. The bolt should fit freely into these rings.
To assemble such a homemade bailer, you need to bend the valve and push it inside the bailer. The bolt is then threaded through the hole in the pipe wall, then through the valve wire rings, and through the pipe wall again. Secure the bolt with a nut.
The bolt must move freely into and out of the valve rings so that the bailer can be easily cleaned during operation.
Kinds
By type of valves there can be:
- Ball.
- Flat folding.
Ball type is a very convenient and common option.
The ball moves freely inside the pipe when it is squeezed out by silt, but under the influence of gravity, it clogs the hole again. More suitable for small diameter pipes.
If there is simply no suitable ball, a flat part is made from any available materials (corresponding to the inner diameter of the pipe), which is hinged to one of the inner edges. Water resistance opens the flat valve. The hinges must be corrosion resistant. In addition, to ensure that the valve closes well, you can make a bumper pin inside the pipe. It will limit the plate opening to 70-80°
The ball model must have an internal limiter. If this is not done, the ball will “flush” too high and most of the collected sludge will flow back out.
Gelonding scheme with pump
It is very difficult to remove the bailer to clean the well, even with the help of a winch. A significant amount of time is spent not on working in the well, but on raising, cleaning and lowering the bailer. A small upgrade will optimize the operation of the device. The reverse side of the pipe body should be tightly welded.
An outlet is made from it and a special fitting intended for the outlet hose is placed there. A pump is connected to the hose, which is designed to pump liquids with significant mechanical contamination.
This scheme allows you to avoid constantly raising the bailer to the surface and lowering it again.
In this case, contaminants from the bailer chamber will be removed using a pump. The bailer, equipped with a pump, simply needs to be raised and lowered to loosen and move the contaminated liquid into the chamber.
This cleaning method is effective in cases of heavy siltation or sand accumulation. For regular well cleaning, a bailer without a pump is suitable.
Image gallery
Photo from
Digging a pit before drilling
Drilling the first meters with a bailer
Homemade drilling rig
Winch in bailer drilling
Features of drilling with a bailer
Drilling with a bailer is a popular, although rather labor-intensive, method of creating a well. Not every device of this type, suitable for cleaning a well, can cope with the excavation of a large amount of dense soil. For drilling, you should use a fairly long bailer - about four meters.
To drill a well with a bailer, fairly large devices are used, up to four meters long. The use of such heavy devices requires special lifting equipment
Here, a type of petal valve is more appropriate, which is a plate that is fixed with a special spring. With its help, a gap is created in the body, the area of which is almost equal to the cut area of the bailer. This allows you to pass the maximum amount of soil into the bailer body for each dive.
Removing dense soil from a long and narrow bailer is not always easy. To simplify this task, a special window is made in the upper part of the pipe, designed for more efficient and quick cleaning of the device. If you have to drill sandy rocks, it will be easier to release the bailer.
To drill a well using a bailer, you need a device with a large clearance at the bottom and a body long enough to remove a lot of soil at one time
When drilling with a bailer, different types of rocks have their own characteristics. Here are some useful tips:
- On sandy soils, the bailer should not be immersed more than 10 cm without a casing. In general, the casing is supposed to be 10 cm ahead of the bailer.
- When drilling sandy soil, water is pumped into the shaft to further strengthen the walls.
- If wet sand is excessively compacted during the work and does not fall into the bailer, use a special chisel.
- The casing is immersed continuously during drilling.
- For quicksand, use a bailer two meters long or more with a reliable flat valve and a leather seal.
- When lifting the bailer on the quicksand, you need to not only lower the casing, but also turn it; this work is more convenient to do with two or three people.
- If the casing pipe does not fit into the shaft, it is lowered under pressure, for which a platform is placed on top on which a load is placed.
- When drilling layers of gravel and pebbles, sometimes alternate the use of a chisel, which breaks large inclusions, and a bailer for excavating broken soil.
- On dense sediments, the bailer is raised only 10-15 centimeters, and movements are made frequently.
- When drilling dense formations, the casing is deepened hydraulically or someone periodically stands on a platform mounted on the casing.
- Dry layers are softened by supplying water to the mine.
- On very soft plastic soils the valve is not always needed; the rock remains in the bailer even without it.
- The bailer must be raised after drilling every 0.5 - 0.7 m, so as not to tear when lifting the body filled to capacity.
As with other drilling methods, when using a bailer, you should take into account the individual characteristics of the soil on which the work is being carried out.
The correct strategy and timely casing of the borehole walls usually allows you to successfully create a working well.
You may also be interested in information on how to flush a well after drilling.
How to use: cleaning sequence
According to experts, a bailer is one of the best ways to cope with even the most severe contamination of a well. If the work is carried out correctly, not only silt and sand, but also small stones can be removed from the bottom, thereby restoring the original functioning of the water supply source.
Work order:
- The device is carefully lowered to the bottom, and then raised about a meter and hit sharply. Dirt from the bottom rises into the water and settles in the bailer (the valve is open at this time).
- The movement is repeated up to three or four times. This allows you to fill the device with silt and sand to about half the capacity.
- Then the bailer is removed from the well, avoiding jerking and shaking (the valve may accidentally open!), and the contents are poured out. Usually up to 0.5 kilograms of bottom sediments, not including water, are recovered.
- To make work easier, you can install a tripod with a collar over the well, to which the cable will be attached. This design is especially relevant when working with deep wells.
- During cleaning, it is necessary to regularly connect the vibration pump and pump out dirty water. This technique will help cope with sludge intake in a shorter period.
A filter must be installed on the pump hose to protect the device from exposure to silt and sand!
After making sure that the bailer is no longer scooping up dirt and the well cleaning work has been successfully completed, you should turn on the pump for a few minutes and allow the muddy water to drain. This rinsing can take up to half an hour. The water flow can be directed to the beds or drained into a tank, and after it settles and warms up, it can be used for watering heat-loving garden and garden crops.