Do you want to install a water supply system on your property by drilling a well yourself? Agree that the presence of water supply and sewerage significantly increases the level of comfort when living in a private house or country house. But calling specialists to install a well or borehole will not be cheap.
Have you decided to make a drill for a well with your own hands and are looking for a simple homemade option? We will help you in this matter - the article contains useful information about the process of making a homemade spiral drill and a spoon drill.
A list of necessary tools and materials is provided, thematic photos and useful video recommendations for constructing a homemade drill are selected.
Our detailed instructions, equipped with step-by-step photos, will help even a beginner make a simple and uncomplicated drill.
Design of a hand-held water drill
You need to take into account the nature of the soil in your area. The simplest design is auger. It consists of a spiral, which is a drilling element, and a handle.
The design must have:
- Cutting element.
- Barbell.
- Handle.
Depending on the design, its configuration may vary slightly.
Useful tips and tricks
When you need a longer drill rod, you can use one of these methods.
What does a drill consist of?
Use threaded coupling connections:
- for this purpose, an external thread is made on each pipe section;
- then threaded couplings are manufactured in the required quantity;
- To protect against spontaneous separation of parts, a cotter pin retainer is made.
Use of welded bolts and nuts welded to the ends of the sections. This method is applicable for split pipes of small diameters. But this method is not the most reliable due to the fragility of the welding joint.
Use pre-fabricated rod sections with bolted fixation. This is a simple and effective way:
- couplings are cut from a pipe with a larger diameter than the split tube;
- then they are welded to the end of one pipe, and the other pipe is inserted loosely into the coupling:
- Each such connection is fixed transversely by an inserted bolt and nut.
Helpful tips to make your work easier
A solid and long drill pipe will significantly complicate the work.
The best solution is a detachable design with an optimal section length of 0.8 to 1.2 m.
Thanks to this device, it will be easier to select the desired length of the drill pipe and increase it as necessary.
Some useful tips to make drilling a well easier using a homemade hand drill:
- you can use a homemade bailer to optimize the process of excavating soil to the surface, since it is better to collect the rock in a container;
- if it is difficult to raise the soil to the surface, then you need to build a lever from available barrels or logs;
- A homemade drill will also come in handy for other household work.
This tool can be used to dig holes for fence posts or pile foundations.
Split Drill Pipe
This is a structure that can lengthen as the drill goes deeper. Consists of separate detachable sections. One part can be up to one meter long. The number of sections should be equal to the expected depth of the future water well. This element is connected in several ways:
- Threaded connection with coupling. An external thread should be cut on each pipe. It is important to select the coupling of the required length and prevent it from turning on its own. For this purpose, a cotter pin clamp is used.
- Connection with nut and bolt. A nut/bolt is welded to the rod. The method is simple, but not reliable. A thin-walled pipe may not withstand the load and will simply burst in the area near the weld.
- Clutch fastening. It is welded to a pipe of the appropriate diameter. The fixation should completely eliminate the possibility of turning.
One section is used first. As it sinks into the soil, the next element is added using a special compound. And drilling continues according to this pattern.
Details of the pit drill and features of its operation
Areas of application for garden augers:
- planting trees and shrubs;
- installing fence posts;
- installation of street lamps;
- arrangement of a drainage system;
- creating a well;
- drilling a water well;
- drilling holes for winter fishing.
Purpose – excavation of soil of the required diameter and depth by human physical efforts.
Productivity directly depends on:
- product design;
- what cutting element is used;
- diameter, depth of the hole in the ground.
It will take about 2-3 hours to make a hole up to 3 m deep with a diameter of 25-30 cm using a standard earth drill.
For deeper drilling, special equipment in the form of drilling rigs is used.
The manual design contains the following parts:
- Pen. It is customary to make it from steel. Has the same diameter as the shaft. For ease of drilling, they are welded perpendicular to the shaft (rod) in the shape of the letter T. Rubber pads are put on both handles so that there is no friction when moving, the hands do not slip and get less tired. The minimum length is 40 cm, the recommended length is from 50 to 60 cm.
- Rod or shaft. Material: round or square profile pipe. Diameter - from 0.5 to 1 inch. It is not worth making the bar thicker, as this will require a lot of effort. A handle is welded on one side of the rod, and a cutting part with a lance is welded on the other.
- Screw (cutting head). The key element of the earth drill. Responsible for loosening the soil and pushing it to the surface. Excess soil is removed when removing the tool from the well. The most popular option is the one with two steel semicircles sharpened at the edges. The diameter is selected according to the purpose. To improve the convenience of operation, the blades are made removable.
- Crowbar (spike). Made in the form of a large drill or blade. It is located at the bottom center of the product under the blades. Sets the direction of the shaft. In a strictly vertical position it enters the ground. Loosens the soil in the center, making it easier for the blades to work.
- Extension cords. These are additional nozzles or sections of the rod, with the help of which you can increase the drilling depth to 15 m. They are fixed with screw connections. Used when necessary.
For cutting elements, it is recommended to use steel as a material - this guarantees a long service life of the tool.
Types of soil drills
The three most common:
- Spiral.
- Lozhkovy.
- Shock.
Each of them has its own characteristics. First, let's look at them, and then find out the manufacturing technology.
Spiral
A homemade spiral product is mainly used in dense loose loam. It may also include fine gravel. The drilling principle comes down to rotational movements. At the bottom of the drilling tool there is a knife.
Features of drilling with homemade devices
The main purpose of the equipment is to create holes of sufficient depth in the soil to raise water to ensure water supply to the facility. The diameter of the hydraulic structure is minimal - it must correspond to the size of the pump (when installing submersible equipment) and communications, which are laid at some level below the surface of the earth. To construct a well, a device is used consisting of the following elements:
- supporting pipe on which the tip is attached;
- a cutter to facilitate the penetration of the tool into the soil layer;
- nozzles;
- an auger that ensures gradual deepening of the drill;
- lever.
The most difficult stage is the drilling of the upper layers of the soil, since it is often rocky. Home-made equipment can be used for deepening to a level of no more than 25 m, where the first aquifers lie.
The mechanism of operation of the drill is based on the introduction of an auger with a tip into the soil layer. As it advances, the earth is excavated, which is realized thanks to the screw part of the tool. When the drill reaches a significant depth, it is necessary to increase its length. To do this, remove the handle and then install the extension pipe.
How to make it yourself
We offer you several manufacturing instructions:
- Spiral.
- Lozhkovy.
- Shock.
Spiral
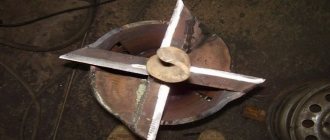
You need to take a thick pipe. There will be a cutting element in its lower part. It is made from hard alloy. You will also need a metal strip to weld along the entire structure. It should have a spiral shape, so that the soil will be pushed out. Prepare:
- A pipe of a given length with a thick wall.
- A metal blade, suitable for a carpenter's saw. It would be good if its size immediately corresponded to the diameter of the future water well.
The build process looks like this:
- The lower part of the pipe must be sharpened.
- Apply a pointed tip to it and weld it.
- Take the saw blade and cut it in half.
- Weld both halves to the rod at an angle. From its end they should be at a distance of about 12.5 cm.
- A coupling is welded on top and connected to the next rod.
Spoon
You should prepare:
- A pipe with thick walls.
- Welding machine.
When manufacturing, you can’t do without a diagram or drawing. According to it, a corresponding cut is made in the pipe. Next, you need to make a section, for example, with a powerful hammer or sledgehammer. The bottom of the pipe is well sharpened, along with the side edges. A drill with a diameter of up to 36 mm is welded along the longitudinal axis from below. A rod is attached to the top.
Advice! Before starting to make a homemade product, it is recommended to first harden the cutting edge.
Shock
First, you should study the project in the photo in this article and how to install the tripod. The height of the structure is up to three meters. A rope block must be attached to the top. Considering that the weight of the drill is serious, a winch is built. It is attached to a tripod.
A downhole drill uses a thick-walled pipe of considerable weight so that it can penetrate rock. The end definitely sharpens. There is a hole on top for attaching the rope.
Important! It is better to harden the lower part. This is significant, since it is subjected to serious loads. In addition to hardening, sharpening is performed to form teeth.
A radial hole is also made at the top of the pipe. This will allow you to remove the soil without much difficulty.
Drill for percussion-rope drilling
You can drill a well on a site not only by rotating the drill, but also by the percussion-rope method. This type of work requires a special installation, which can also be made independently from scrap materials.
Having such equipment, all work can be performed without any assistants at all, so we will also consider the process of making an impact drill.
To drill a well using the percussion-rope method, you don’t need much: a stable tripod frame, the impact drill itself, a strong cable and a winch
To understand what and how we will make, let us consider in general terms the essence of shock-rope work.
From a great height, a projectile pipe - a bailer for a well - is dropped into the location of the future water intake point designated with a shovel or auger. An eye for the cable is welded to the drill at the top.
A hole is cut in the top side to extract the drilled rock.
Image gallery
Photo from
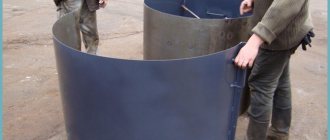
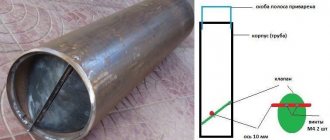
Pipe for a homemade bailer
Ball Valve Shoe
Upper part of the bailer
Window for unloading drilled rock
The lower edge is sharpened or equipped with teeth that optimize soil loosening. A ball or petal valve is installed inside the pipe 5–7 cm above the nominal bottom to capture and hold loose rock.
A bailer is an indispensable tool when digging through loose sand, pebbles, and gravel deposits. It is often used in combination with other drills. They alternate with an auger or glass, which is not capable of removing loose and water-saturated deposits.
Loose soil particles are retained inside the bailer thanks to a valve located at the bottom of the housing. The auger, bell, and glass do not have such advantages.
Rarely is only one drill used to drill a well. Most often they are used in combination: clayey rocks are drilled with augers or glasses, loose and water-saturated rocks are drilled with a bailer
The procedure for dropping the drill is repeated many times. The result of the process is a body that is one-third filled with soil and a hole in the ground that increases by 30-40 cm.
The filled bailer is removed from the barrel using a winch, turned upside down with the hole and cleaned with blows of a heavy hammer.
Then the process of percussion-rope drilling is resumed and repeated until a well of the depth that was planned to be obtained is formed at the site where the drill fell.
It is not necessary to buy a ready-made installation - you can make your own bailer for drilling and cleaning.
If you make such an impact drill heavy enough, then with this bottom it will cut the soil like butter and will not allow it to spill out of its cavity back
In this case, there is no point in creating one drill, so we will tell you how to build the entire drilling rig along with the projectile.
- We choose a place where, according to our calculations and assumptions, the well should be located. We mark it out by making a small depression using a regular shovel.
- 2-3 meters high above the hole We equip the top of the tripod with a well-fixed block for the rope. You will also need a winch, which we attach to the supports. It's good if you have an electric winch, but a manual one will also work.
- We prepare the impact drill itself . For this purpose, we will need a thick-walled pipe, the diameter of which corresponds to the size of the shaft of the future well.
To make a drill, we take a strip of thick metal and weld it to the upper end of the pipe, placing it perpendicular to the longitudinal axis of the projectile.
Along the center line of our pipe, in a welded metal strip, we drill a hole corresponding to the thickness of the rope on which the projectile will be attached.
The lower end of the pipe also needs processing: you can make a serrated or ring sharpening on it. If you have a muffle furnace, you can harden the drill in it after the sharpening procedure.
The drill for percussion-rope drilling is not so easy to clean from the soil that has accumulated in it. To speed up this routine operation, you can make not a window-hole, but a vertical slot passing through almost 2/3 at the top of the pipe.
The bell is part of the impact drill. It is easily cleared of soil and can be replaced, for example, with a chisel if a stone is encountered while drilling a well
The heavier the drill, the faster you can achieve the desired result, but it is also necessary to take into account the power of the winch, which will have to pull the drill with soil from the wellbore.
So, if its power still allows, the projectile can be made heavier by placing removable metal weights in the upper part of the pipe.
You may also be interested in information on well construction, flushing after drilling and winter insulation, discussed in our other article.
How to make a homemade earth drill with a motor
If you are interested in a drill that works automatically with minimal human effort, then there are several ideas, for example from a chainsaw. In this case, you should do everything correctly so as not to harm yourself.
First of all, the engine power is calculated. The motor on a chainsaw has a large number of revolutions. If the drill rotates at such a speed, then it will be extremely difficult to control such a machine. Moreover, there is a serious load on the motor.
Advice! The optimal choice would be the Ural and Druzhba chainsaws. Their engines have low speeds, but they are quite powerful.
You can learn about all the details of this development by watching the prepared video. Here we talk in detail about how to make a chainsaw-based motor drill:
Plus, there are craftsmen who use a hammer drill motor when drilling small wells. In this case, it is important to make the correct nozzle and calculate the size of the drilling rig. Here you can also see the details of this miracle:
Drill for making piles
The classic version of a drill for TISE is blades with a container for collecting soil. There is also a wider knife, which is necessary to create an expansion at the bottom of the pile. Using such a homemade drill for personal purposes is not very convenient, since the additional folding knife gets in the way.
In this regard, such structures are often made collapsible, where the folding knife can be dismantled. In general, it is recommended to use a regular garden drill to make a pile for personal purposes, and for expansion, make a separate knife with a container for collecting earth. The work is much easier in this case.
For this design, a scrap from a shovel is used as a knife , and a container for collecting soil can be made from a herring can. The knife is fixed on levers, and when lowered along the pile, it is in the uppermost position, as it is tensioned with a cable. When it reaches the bottom, the cable relaxes and the knife falls onto the walls of the pile, beginning to remove the soil and form an expansion of the desired size.
Alternatively, a dredger can also be made from an old propane tank. To reduce friction, the well is constantly doused with water. This tool can also be used on hard soils.
This is interesting: gas drills for earthworks.
Should you make the design yourself or contact a company?
Of course, the use of homemade inventions has positive aspects. For example, you can save a lot of money by making your own source. There are also many simple drawings and diagrams on how to make a drilling tool. However, all this has an obvious disadvantage - it is impossible to dig the source to great depth.
Therefore, if the water in the area is deep, it is better to contact a specialized company. Perhaps it will use hydraulic installations. In this case, you will need to think through everything down to the smallest detail:
- Find the exact place with water.
- Immediately determine the place for testing.
- Discuss the cost of the work.
- Set work deadlines, etc.
In any of the options, our material should help you in this difficult task.
Materials and tools for creating a drill
The materials and tools for any hand drill are the same, with the exception of a few differences:
- Sheet steel;
- pipe;
- rental;
- welding;
- Bulgarian;
- file;
- electrodes.
Where to buy and estimated cost
All materials can be purchased at the market, at a hardware store, or found on your site.
Below are the approximate prices for purchased materials:
- steel sheet (2x1250x2500) – 1800 rub.
- pipe - from 30 to 50 rubles/p. m.
- electrodes – from 80 to 120 rubles/kg.
Spoon drill assembly
It is necessary to prepare a pipe whose wall thickness is at least 5 mm. An incision is made on the side wall. Its width depends on the type of soil: the looser it is, the smaller the gap. The lower edge of the pipe is rounded using a hammer. This edge is bent to form a spiral coil. A large drill is fixed on the same side. On the other side, a handle is attached.
A spoon drill includes a long metal rod with a cylinder at the end. The cylinder has 2 components, which are located along or in the form of a spiral. There is a sharp cutting edge along the bottom of the cylinder.
Manufacturing of borehole drills
After determining the drilling method, they begin to independently manufacture a drilling device; for this you will need:
- Household welding machine with steel electrodes.
- Angle grinder for cutting metal.
- Cuttings of steel plates, pipes, used discs for stone, concrete, wood for making a drill.
- Pipes 1500 - 2000 mm long for lowering the drill to a depth, a thread-cutting unit with dies, adapter couplings purchased or prepared for threading.
- Strong steel cables, tripods, homemade winches for lowering and lifting loads, bailers, spoon devices into the borehole.
- Power tools to speed up drilling operations - hammer drill, drill, jackhammer.
Varieties of homemade augers
Auger or spiral drill
A factory-made auger drill is a piece of metal rod or pipe, around which a steel strip is welded in a spiral, and at the end there is a pointed tip. The spiral-shaped tape breaks off near the tip and has a different number of turns; during operation, soil falls into the space between the turns and when the auger is removed, it is thrown onto the surface of the area.
It is quite difficult to make such a device at home due to the great difficulties in bending a steel strip about 2 mm thick into a spiral with a small radius, so they use a simplified design of an auger drill, consisting of a small number of turns. The best option is to make a homemade screw drill for a well with your own hands from used metal discs for an angle grinder. To do this proceed as follows:
- Take a piece of metal pipe with a standard outer diameter of 21.3 mm, attach a pre-prepared tip to its end, it can be a pointed steel plate cut in the shape of a triangle, the tip of a spear, or a ribbon spiral. The tip is fixed by welding, if a multifunctional design with a change of tip is intended to be used, it is inserted into the cut of a pipe or steel pin, then bolted through the through holes.
Auger drill - manufacturing stages
- A standard disc for an angle grinder has a seat diameter of 22.2 mm; when used as a working surface for a drill, it is cut in the radial direction from the edge to the center and the edges are moved in different directions at an angle of 30 degrees so that a fragment of a spiral is obtained. In this case, the internal diameter of the disk when bending slightly decreases and ensures mating with the outer diameter of the pipe of 21.3 with a small gap sufficient to accommodate the metal from the electrode with an internal rod diameter of about 5 mm. As a spiral fragment (disc), used steel circles for cutting stone, concrete, and wood with a serrated edge with a standard outer diameter of 115 mm are used; sometimes 1 or 2 discs are additionally welded, providing a larger excavation.
- At the end of the auger drill pipe, a thread is cut or a threaded coupling is welded to it for connection with subsequent pipes; due to its small diameter, a through hole for the handle is not drilled in the longitudinal direction, but this operation is carried out with sections of pipes that will lengthen the structure.
Note: A homemade spiral drill of small diameter is used for the fastest mechanical penetration of a borehole channel in hydraulic drilling, while water is supplied to the tip of the drill through a system of extension steel pipes, which are connected to each other by threads using couplings.
Needle
The needle drill is designed for forming narrow and shallow borehole channels; it is often left in the well, which determines the technology for its independent production. A needle borehole drill and penetration is done in the following way:
- They take a thick-walled steel pipe 1500 - 2000 mm long, weld a pointed metal tip of a tetrahedral, conical shape at one end (you can use a peak from a hammer drill) and drill a series of holes in the walls for water access to a length of about 1500 - 2000 mm from the tip. On the other side, a pipe section of a smaller diameter (internal coupling) is inserted into the pipe to connect to the next pipe and secured by welding.
- A rigid clamp is fixed on the surface of the first pipe, onto which a load is then periodically lowered and moved along the pipe surface - as a result, the needle is driven into the ground. After lowering the joint point near the surface of the earth, the pipes to be connected are welded from the outside, the clamp is moved higher along with the load onto the next pipe. Sometimes they use a metal plate welded to the outside of the casing pipe, which is struck with a load; after lowering to the required distance, the shock pipe is removed, replaced with a casing one, and the process is repeated further.
- Upon completion of the work, the pipeline is cut at the required distance from the ground, a thread is cut at the end and an electric pump is connected through adapter couplings, while the steel pipeline simultaneously serves as a casing column and a pressure hose supplying water.
Areas of application of hand tools
The construction of fences, supports for greenhouses, and foundations of small buildings is carried out using an earth drill. In places where there is no central water supply, a hand drill is used to reach the aquifer. Using homemade tools, they excavate cavities in the soil for the construction of reinforced concrete piles. The dug wells are filled with reinforcement and liquid concrete, obtaining columnar ones for structures on a personal plot.
What you need to make a drill from a pipe
To make a metal drill for the earth you will need a piece of steel pipe. The diameter of the pipe is selected taking into account the size of the required holes for poles and supports. You will also need a 3 cm wide corner and a 3/4 steel pipe to weld the handle.
The tools you will need are a welding machine and a grinder with a metal circle. Consumables will require 3-4 mm electrodes for welding thick metal. The procedure for making a homemade drill from a pipe is discussed below.
