What's special about the Geberit installation
The company produces products on 8 lines, among which one is operated entirely for installation systems. The largest range of installations is by no means an advertising ploy by the manufacturer. This is a fact that demonstrates Geberit's commitment to meeting every customer need.
The company is developing more and more new models of plumbing fixtures that allow:
- use the space of the premises as economically as possible;
- reduce water consumption costs;
- implement any designer's ideas.
The installation is becoming an increasingly popular item of plumbing and is displacing traditional toilet flush tanks from apartments and houses. System installations are installed in the toilet rooms of almost all modern business centers, bus stations and shopping centers.
This indicates the reliability of the design. Otherwise, it would not be so popular in public places. Geberit produces sets of wall-hung toilets with Geberit installation, suitable for placement anywhere in the room, including under a window.
This is possible with installation frame installations up to 82 m high. The manufacturer takes into account that installing an installation with fastening to a solid wall is not always acceptable. This is why Geberit has launched the Delta design range.
Its models are equipped with reinforced lower supports. Such a system can be installed anywhere in the room, and can even be built into plasterboard sheathing. Geberit Delta installations do not have design frills that would make the product more expensive.
That's why the series can be classified as economy class. Moreover, such savings do not in any way affect the quality of plumbing products produced by Geberit. Although the brand's products are of Swiss origin, they are produced by Geberit taking into account the needs of local markets.
Thus, for the consumer market in the CIS countries, the company offered a collection of Geberit “Plattenbau” (“panel house”) installations.
This line of plumbing fixtures makes it possible to install the installation in a wall with plumbing shafts, near which there are water or sewer lines.
The Plattenbau collection in Russia is presented in three modifications: Delta; Sigma and Omega. The first option, without expensive frills, is available to a buyer with an average income level.
The steel frame holds a load of up to 400 kg and is equipped with retractable supports 20 cm long. The 9-liter tank has a double drain mechanism: the first for draining 3-4 liters and the second for draining 7-9 liters. This design allows for significant savings on water consumption.
The chrome-plated white or glossy button is two-section: each button corresponds to a different type of drain. The installation model has a simplified mechanism for eliminating tank failure.
Getting to the fault is very simple - you just need to remove the flush button for installing Geberit and gain access to a special window.
Hidden installation for a wall-hung toilet
The Geberit Duofix product line is intended for installation in plasterboard partitions and in the case of a wall-hung toilet. With such a plumbing product it is much easier to clean the bathroom - nothing interferes with washing the floor.
In addition, this option does not have a toilet foot, around which dust mainly accumulates. The concealed drain system is complemented by a huge selection of mounting modules and keys for Geberit installation.
Therefore, you can easily equip a toilet room for users with disabilities.
Fastening elements make it possible to mount the toilet so that the load is distributed evenly on the floor and side racks. That is why you should not be afraid that the wall-hung toilet will fall - this is impossible.
Installations of hidden modification of the Geberit Kombifix type
This product line is aimed at installation in and in front of brickwork. The design elements make it possible to attach the installation to the floor or wall.
Source: https://iseptick.ru/santekhnika/unitazy/installyaciya-geberit.html
Preparation
Before you begin the main process, you need to prepare your workspace and acquire the appropriate tools. The following will be useful to you:
- perforator;
- screwdriver with drills (including for concrete);
It is better to entrust installation installation to professionals
- building level;
- roulette;
- wrenches of the appropriate size;
- knife and grinder with attachments for cutting drywall;
- putty knife;
- marker.
Wood in the interior of the toilet room
Stylish bathroom combined with toilet
Additional consumables that will be useful:
- dowels installed in mounting holes;
- silicone sealant;
- polyurethane foam;
- screws for gypsum boards;
- finishing putty.
If the procedure is carried out in a residential area, first of all you need to dismantle the old toilet seat and remove the lining from the walls.
Removing an old toilet
Removing old wall cladding
The next step may be to move the sewer hole in accordance with the planned layout and design of the room. This can be achieved using special devices - adapters made of plastic.
Fittings for sewerage
Note! This procedure will require dismantling part of the floor covering.
Recess for installation in the wall
To do this, the floor around the hole is deepened using a hammer drill and the adapter is fixed on it. Next, the free space around it is filled with cement-sand mortar or a self-leveling floor mixture. The next stage can be started after the solution has completely dried.
Geberit - installation with a toilet: varieties
All components of a particular design depend on the type. There are two types in total.
- Block installation is considered the most budget-friendly. It is mounted in a special niche, then the fittings that hold the toilet are attached to it. During installation, the hole is closed with a special box, followed by finishing in accordance with the design of the room. It must be remembered that to install such a system there must be a solid foundation. The structure is not mounted on a wooden floor or foam block walls.
- Frame installation is the most expensive and difficult to install. The frame consists of steel coated with a special anti-corrosion solution. All other elements are attached to this frame. The frame dimensions are as follows: width - from 50 to 60 cm, height - from 850 to 140 cm, depth - from 15 to 30 cm. The main advantage of the frame option is that installation can be carried out in any conditions and rooms. Fasteners and models are selected in accordance with the room in which they will be located.
If the structure is installed on a base made of plasterboard or foam block, then it must be remembered that these materials may not withstand heavy loads, so the floor option is chosen - with installation on legs.
Load-bearing walls, as a rule, are strong, but a frame installation can be wall-mounted.
There is also a combined option. It begins to work when the structure is secured horizontally and vertically. It is often called the corner configuration.
They are used in small rooms; they use a corner that was previously unclaimed, thereby freeing up more space for useful things. The type directly affects the configuration of the bathroom itself.
The advantages of the frame type are adjustable elements, which make it possible to adjust the size and dimensions of the niche itself. Even a narrow design can look harmonious in a small toilet room.
Dimensions
The standard sizes of built-in toilets include the following:
- height – from 35 to 45 cm;
- width – from 30 to 40 cm;
- depth – from 50 to 60 cm.
It should be noted that the sizes vary depending on the model, as well as the purpose. There are toilets for children, and others for adults. Some companies have gone further and developed bowls for the disabled. Every year more and more designer models appear.
They are made to order and can be of individual sizes. The short installation (82 cm) is used when the installation space is limited by height. For example, when the toilet is placed under the windows, it is also called low installation.
The drain tank does not look like a standard one. It is made from a different material and is also distinguished by its compact size. The width of the innovative plastic tank is 9 cm, width – 50 cm, height – from 55 to 60 cm, volume – 3-5 l.
Before installation, you need to consider the size of the box itself. Before purchasing, you need to measure everything carefully. If the design is not suitable, then it is important to check all the dimensions of the niche most prepared for it.
The dimensions of the installation depend on its type. The frame has the following characteristics:
- depth from 15 to 30 cm;
- height from 85 to 140 cm;
- and the maximum width can be up to 60 cm.
It is necessary to talk about such parameters as:
- the distance from the floor to the sewer pipe, that is, its central point, is 230 mm;
- fasteners are located at a distance of 17 to 24 cm.
The smallest dimensions are toilets that use a block type of placement. They differ from the previous version. Here the depth will be from 10 to 16 cm, the length will be one meter.
It must be remembered that most situations involve separation of the cistern as well as the toilet. In this case, they are mounted separately.
The last element is fixed to the wall itself. The wall-mounted installation comes with several fastenings to the load-bearing wall. It is suitable for loads up to 410 kg, which indicates its durability.
Experts recommend purchasing components only in one store, since this makes it possible to check the kits, and also, if necessary, purchase all this in a specific place.
The lineup
It is worth considering in more detail the model range of Geberit toilet installations.
- Kolo Rekord creates a worthy individual style as well as a harmonious environment. The installation secures the toilet to the wall with high quality; this model is well suited for the attached version of the design. This system saves significant space and also hides plumbing. The bowl itself is designed from sanitary ware porcelain. It is durable and wear-resistant, while at the same time it is easy to clean from various types of contaminants. The seat is easily removed, and the lid, made of duroplast with a micro-lift, is easy to close.
- Sigma is a unique model that is made from various high quality materials such as glass and slate. The tank has a hidden installation, front control, dual flush, and high-quality protective elements. The design is suitable for floor use.
- Plattenbau - models designed for panel houses. The uniqueness lies in the special fastening element that is attached to the wall. Structure composition: studs, each 50 cm, top bar located at the top of the product. It allows for high-quality installation of the entire structure. The popularity of this model is due to the button, which is chrome plated and easy to use.
- Duofix Delta is a design that has a self-supporting mounting element, universally applicable for various types of sanitary and technical devices. Such elements can be mounted in a dividing partition, a frame wall, as well as in a wall along the entire height of the frame or room. They are universal because they are used both for new facilities and for modernizing old ones. The kit includes only the most reliable fittings and other components, which speaks volumes about the quality of this product.
- To quickly remove unpleasant odors and also freshen the air, you need to use the innovative Geberit DuoFresh UP320 model. It has a built-in function to remove any odors. The system carefully monitors the air condition in the toilet. The device has a fan that works very quietly, but cleans the room efficiently. The positive effect is visible immediately after starting use.
- Geberit Omega. This unit makes it possible to select a model not only by height, but also by other parameters. This innovation makes it possible to install the structure under beams, slopes, and windows. This universal model works even where others fail. This is an ideal solution for a wall-hung toilet. It should be noted that two technological holes allow installation through several holes at once.
Source: https://vplate.ru/tualet/santehnika/unitazy/installyacii-geberit/
More about fittings
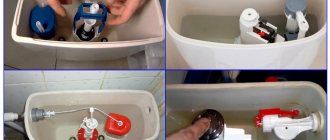
The design (Geberit flush fittings) located in the toilet cistern works when flushing occurs. The drainage mechanism consists of the following elements:
- A tank is a container in which water is stored. The water hose can be connected either from below or from the side. As a rule, the volume of the tank is about 8-10 liters.
- The shut-off system is a mechanism responsible for filling the tank, as well as stopping the water supply when its level reaches a predetermined maximum.
- Drain system - works when a button is pressed or the button lever is raised - depending on the design features of the design.
Lever models are now being produced less and less - they are being replaced by modern push-button models, which are more convenient, look better and allow the use of flush modes. When you press the button (lever), a hole opens through which water from the tank enters the toilet bowl. The hole closes when the container is empty.
Almost always the system is offered as a kit, already assembled and ready for use. If it fails, it can be replaced separately.
It should be borne in mind that if Geberit was installed, then it must be replaced with the same one.
The drainage system consists of two main elements: a lever and a siphon. The latter is needed to prevent water leakage: it covers the drain hole. As a rule, the appearance of a siphon resembles a plunger.
The button lever activates the siphon, which rises and opens the drain.
Recently, an additional element has appeared that is connected to the button (as mentioned above). Pressing it activates the button lever, which raises the siphon.
Moreover, many models are equipped with double buttons - which allow you to empty the tank completely (when pressed fully) or partially (respectively, when pressed partially).
type of instalation
There are several options for installing installations.
- On the main wall. Installation of the block system is only possible with fastening to a solid wall.
- On a plasterboard wall. Any universal installation with 4 fastenings (2 to the wall, 2 to the floor) can be installed on a plasterboard wall. In this case, the main load falls on the floor. You can also strengthen a gypsum board wall with a square steel plumbing profile.
- On a brick wall. Brick walls are distinguished by their strength and durability - any installations are suitable for installation on such a wall. In addition, you can safely install a hidden tank into it.
- With fastening to the floor. This method is used if it is impossible to mount the structure to the wall. For this fastening method, a special reinforced self-supporting frame is used. These frames also have large support areas for optimal load distribution across the floor.
Main types of breakdowns and how to avoid them
The following problems may occur:
- Drain tank leaking. In this case, you need to check the correct installation of the sealing gaskets.
- Leaking toilet. The joints are most likely poorly sealed. It is necessary to clean the seams and reuse the silicone.
- Toilet shaking. To solve the problem, you need to tighten the fasteners.
- Stagnation of water in the sewer drain. The slope of the pipes does not correspond to the recommended 45 degrees. You will have to dismantle and adjust the tilt angle.
It is better to entrust the installation and correction of problems to a specialist to avoid mistakes.
Drain keys
Geberit's wide selection of different designs allows you to choose the flush button to suit your bathroom decor. What set of functions can a seemingly simple key have?
- Contactless flush. Better suited for public places, because hygiene comes first. To avoid touching the flush button in a public place, it is now enough to wave your hand in front of a black glass panel on which two luminous stripes are depicted, respectively, indicating a full and a small flush. Geberit has the most advanced contactless model - Sigma 80.
- One of the latest developments for installation structures from Geberit is the DuoFresh air purification system. The system built into the box sucks in air after pressing the flush button, drives it through the filters and releases back purified air.
- Models Sigma 01, 10, 20, 50 have a container for deodorizing blocks.
- Possibility to install the button flush with the tile.
- Many colors and textures. The ability to choose a key to suit your unique bathroom design is very important for buyers. Therefore, Geberit produces different color shades of buttons, such as bronze, brass, steel, white and black buttons, matte and glossy textures.
- Installing a protection block will provide double security.
Installation
When purchasing an installation, make sure that it comes with a detailed diagram and instructions for installing other components (for example, bolts and studs for a toilet of the required length).
Installation installation consists of 3 main stages:
- Preparation;
- fastening;
- connection of sewerage and water supply systems.
The preparatory stage includes studying the instructions, preparing tools and choosing a place to install the structure. Depending on the choice of location for the installation, you need to consider the installation of water supply and sewerage pipes.
Fastening requires a small number of tools: a tape measure, a level, a pencil or marker, a hammer drill with drills, wrenches (many Geberit designs are assembled without keys, but it’s still better to stock up on them just in case).
If a frame structure is being installed, the first stage of installation will be assembling the frame itself.
Securely fasten all structural elements according to the diagram. If you are installing a hidden tank, then this item is omitted.
Next, the location of the fixing bolts is marked. The distance between the bolts will depend on the size of the selected installation; in a narrow version the distance will be less. When trying on, it is important to use a level and take into account the decorative finish of the room.
The next step is drilling holes for mounting the installation and inserting dowels. We fasten the frame with the fasteners included in the kit.
When installing, do not forget the basic parameters: sewer pipe at a height of 0.25 m from the finished floor, the average height of the toilet is 0.4-0.5 m.
After all these steps, the drain tank is installed. When fixing the tank, it is worth starting from the height of the flush button: usually, for convenience, it is placed at a height of 1 m. The toilet mounting studs are installed last.
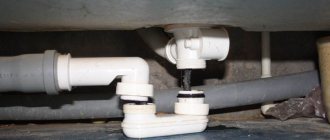
Then the water supply pipe is connected to the flush tank. For different models, water supply can be carried out in various parts of the tank.
For safety, it is better to use rigid pipes rather than flexible pipes, as is convenient when installing classic toilets. This is more reliable and practical, given that access to this system will be blocked by a box.
The toilet is connected to the system last, only after all finishing work has been completed. After gluing the tiles, at least 1.5 weeks must pass for the construction adhesive to dry well enough.
The toilet can be connected to the sewerage system by means of a tie-in (the most convenient option, but in practice it is often impracticable), using a plastic adapter (a fairly durable method) or a corrugated pipe (short service life).
Source: https://stroy-podskazka.ru/tualet/installyaciya-geberit/
How to assemble a block model?
The peculiarity of this type is its versatility. In most cases, it can be used for floor-mounted and wall-mounted toilets, but installation will vary slightly.
Markup for a block model
- First, you will need to make markings, namely, mark the axis of symmetry and, in accordance with it, draw other points and lines. Their position and the required distance between them can be found in the complete instructions. According to the established marks, holes are drilled or punched with a hammer drill, and dowels for fastenings are installed in them.
- Next, you need to fix the drain tank and connect it to the water supply using a hose.
- At the final stage, for a hanging toilet seat, you need to screw in the pins, and in the case of a floor-standing toilet, make new marks on the floor in order to subsequently drill them and fix the fastenings, having previously done the same procedure with the knee. To connect them, special fittings called a cuff are used.
Sheathing the finished structure with plasterboard
On a note! You may also need to cap the bolts and connect the button if this was not done by the manufacturer.
Review of hidden installations from the Plattenbau collection
The Plattenbau collection is presented on the Russian market in three categories:
- Delta;
- Omega;
- Sigma.
The “Plattenbau” collection, made on the basis of Delta, can be afforded by a Russian buyer with an average income, because it does not have frills that increase the cost of the product.
The steel frame of the “Plattenbau” kit can withstand a load of up to 400 kg, has retractable supports 200 mm long, and the nine-liter tank has a double flush mechanism for a small flush of 3-4 liters and for a large flush of 7-9 liters, due to which significant water savings are noticeable.
The glossy chrome or white key is equipped with two buttons for each type of drain. The ability to troubleshoot a tank malfunction has also been simplified. It is enough to remove the flush key and get to the fault through the window.
| Name | Mounting method | Flush | Flush keys | Price, rubles | |
| large volume | small volume | ||||
| Geberit Sigma depth 12 cm (UP320) | studs extended to 50 cm, top bar with slots | 4.5−7.5 l | 3−4 l | Geberit keys Sigma20, Sigma50, Sigma01, Twist or Bolero | 11 024 |
| Geberit Sigma depth 8 cm, (UP720) | 2 metal mounting strips | 6−9 l | 3 l | Geberit keys Sigma20, Sigma50, Sigma01, Twist or Bolero | 5 346 |
| Geberit Omega 12 cm, installation height 82 cm | possibility to place the installation under the window | 4.5−7.5 l | 3−4 l | Omega20, Omega30 or Omega60 keys | 270.6 euros |
| Omega 12 cm, installation height 98 cm | Possibility to place the installation under a window, 2 mounting brackets | 4.5−7.5 l | 3−4 l | Omega20, Omega30 or Omega60 keys | 270.6 euros |
| Geberit Delta 12 cm (UP182) | studs extended to 50 cm, top bar with slots | 6−9 l | 3−4 l | Delta40 or Delta11 keys | 4 900 |
| Geberit Delta 8 cm (UP172) | studs extended to 50 cm, top bar with slots | 6−9 l | 3 l | Delta40 or Delta11 keys | 4 900 |
Advantages
Geberit installations have many advantages.
- Long service life. The company guarantees uninterrupted operation of the equipment for ten years.
- Maximum reliability. You don't have to worry about the structure ever falling down.
- Saving space in the room.
- Possibility of purchasing various components: gaskets, fasteners, exhaust valve to eliminate leaks, and so on.
- The ability to use such a system to hide finishing defects.
- Easy and quick to assemble.
- No risk of leaks.
- Aesthetic appearance of the structure.
One of the main advantages of such installations is the regulation of water drainage. Using a special button you can control the fluid flow.
Comparative review of Geberit Duofix concealed installations
The Geberit Duofix model range was created specifically for installing the installation in plasterboard partitions, as well as using a wall-hung toilet rather than a wall-hung one.
This will greatly simplify cleaning the bathroom, because now nothing will interfere with washing the floor. Also, in this option there is no main source of dust accumulation - the toilet leg.
In addition to the hidden drain system, there is a wide selection of mounting elements and drain keys. Thanks to this, you can easily equip a toilet for people with disabilities, for example, for wheelchair users.
Fastening elements allow you to install the toilet in such a way that the load is distributed on the floor and side posts, so there is no need to be afraid that the wall-hung toilet may fall.
| Name | Mounting method | Flush | Flush keys | Price, rubles | |
| large volume | small volume | ||||
| Geberit Duofix H112 (UP720) | M12 fastening for wall-hung toilets, mounting distance 18 cm or 23 cm, 2 anchors for wall mounting | 6−9 l | 3 l | Geberit keys Sigma20, Sigma50, Sigma01, Twist or Bolero | 11 850 |
| Geberit Duofix H112 (UP100) | frame with ø 9 mm holes for mounting in a wooden frame, plastic base, depth suitable for installation in UW50 profile | 6−7.5 l | 3.5−4.5 l | Delta50 or Delta21, Delta40 or Delta11 keys | 11 420 |
| Geberit Duofix H112 (UP182) | for installation in a plasterboard wall, in front of a plasterboard or solid wall | 6−9 l | 3−4 l | Delta21 key | 8 440 |
| Geberit Duofix H112 (UP320) | for installation in front of a solid wall or hollow partition, for hidden installation in a plasterboard partition or on a solid wall covered with panels (gypsum or wood), for installation in a room-height wall or in a dividing partition, for fastening to the floor (0 - 20 cm) | 4.5−7.5 l | 3−4 l | Geberit keys Sigma20, Sigma50, Sigma01, Twist or Bolero | 9 150 |
| Geberit Duofix H112 for flush plates "Kappa20", "Kappa21", "Kappa50" | rotating support platform, for installation in U-shaped profile UW 50 and UW 75 | 6−9 l | 3−4 l | keys "Kappa20", "Kappa50". | 14 210 |
Product classification
One way to classify the drain mechanism is the material of manufacture. The most common are plastic and bronze. Such product options cope perfectly with the tasks assigned to them.
The use of such materials is relevant because they are neutral to corrosion under the influence of moisture (unlike metal structures).
Geberite is a high-quality plastic element, and in terms of strength characteristics, it is almost as good as bronze.
You can also classify the drain mechanism (tank) according to design features:
- push-button – a modern solution: draining occurs by pressing a button (tank);
- pull-out (lever) - an outdated example when it is necessary to pull the lever rod up.
Installation (push-button options) is divided into types:
- full drain - when you press the button, the entire volume of the tank is drained;
- dual-mode use - the button is divided into two parts, which makes it possible to use only part of the volume of water in the tank: with the first press, water starts, and with the second, the supply to the tank stops.
In addition to the options considered, there is another modern solution - installation. This is a comprehensive system for hidden installation of plumbing equipment.
Thanks to the special design, a number of advantages are formed:
- communications are aesthetically hidden;
- space is saved in the bathroom - which is very important considering that there is often very, very little space in them;
- plumbing fixtures - suspended;
- easy installation and adjustment of Geberit fittings.
The installation distinguishes between two types of installations:
- block - tank with fastening; implies fixation on the main wall, the elements are hidden in a niche, only the drain button and terminals for connecting communications are displayed;
- frame - allows installation on main walls, as well as on the tank or its partitions. There are corner models: with mounting on two walls.
The block system costs less, but the frame system opens up more possibilities for use.
Frame fittings (installation) for Geberit toilets are produced in three types:
- universal;
- for installation on lightweight walls, for example, plasterboard;
- for fixing on load-bearing walls, for example, brick.
When it comes to Geberit installation systems, two main groups of devices can be distinguished:
- for sinks, urinals - a universal option for connecting plumbing equipment from different manufacturers;
- for wall-hung toilets - a flushing tank and a button.
Nuances of choice
You need to choose drain fittings based on the toilet model. After all, the solution must be constructive; differing models cannot be reconciled.
So, if you plan to use a classic toilet, then the appropriate drainage fittings should be selected. In this case, you can count on the reliability of products, the design of which has been tested over many years of operation.
If a more modern solution is used - installation, it is worth taking into account the specific conditions in which the installation and configuration of Geberit fittings and the system as a whole will take place.
In this case, you can use a device that allows you to control it contactlessly, only by approaching or moving away from the sensors.
An important factor when choosing is price. The cost of conventional Geberit fittings is around $25. As for installations, in this case, of course, the price will be slightly higher - about $200.
In fact, this criterion is the limiting factor when choosing suitable fittings, as well as all plumbing equipment.
Otherwise, installations outperform classic solutions in terms of aesthetics, ergonomics, functionality and durability.
Nuances of installation (video)
Setting up the mechanism
A ready-made toilet offered in a store always comes with the operating mode of the fittings installed and configured. However, in some cases you may need to configure it yourself.
This can happen during replacement - installing an entire new unit or its individual parts.
There is nothing particularly complicated about this - so it is not necessary to call a plumber to carry out such work (and for such work he will need to pay at least $5-10).
Now, actually, to how exactly this work is done. First, let's look at how to properly adjust the valve height:
- The rod is disconnected from the overflow pipe.
- The latch holding the “glass” is pressed out.
- Stand - Moves up or down as needed.
Now let’s figure out the sequence in which the water level in the tank is adjusted:
- The position of the “glass” changes - it needs to be either raised or lowered. In this case, there must be at least 45 mm of distance from the top of the part to the top edge of the container.
- Overflow tube - installed above the maximum liquid level, minimum - 20 mm higher. At the same time, it should be lower than the top of the rack - at least 70 mm.
If you need to adjust a partial drain (in push-button models), you need to move its float higher or lower (relative to the overflow tube). There is an example in the video below.
For the same procedure, only performed for complete drainage, you need to move the valve itself (relative to the “glass”) - an example in the video below.
This adjustment will change (up or down) the amount of water that will be flushed when you press the button.
The Geberit company appeared at the end of the 19th century. Nowadays, this brand evokes associations with very high quality, because over many years of work the company has gained an excellent reputation. Geberit installations are very popular among modern consumers: this equipment is reliable and durable. In order not to be disappointed with the results of the installation work, when installing the installation you need to take into account certain rules, which will be discussed in this article.
Comparative review of Geberit Kombifix concealed installations
The Geberit Kombifix range is suitable for installation in or in front of brickwork. Mounting elements allow you to attach the installation to both the wall and the floor.
| Name | Mounting method | Flush | Flush keys | Price, rubles | |
| large volume | small volume | ||||
| Geberit Kombifix (UP320) | CAUTION: Not intended for installation in plasterboard walls, for installation and repair without the use of tools | 4.5−7.5 l | 3−4 l | Geberit keys Sigma20, Sigma50, Sigma01, Twist or Bolero | 9 330 |
| Geberit Kombifix (UP720) | ATTENTION: not intended for installation in a plasterboard wall, for hidden installation on a solid wall | 6−9 l | 3 l | Geberit keys Sigma20, Sigma50, Sigma01, Twist or Bolero | on request |
| Geberit Kombifix with Omega concealed cistern | ATTENTION: not intended for installation in a plasterboard wall, for hidden installation on a solid wall, for brick walls, suitable for plasterboard covering | 4.5−7.5 l | 3−4 l | Geberit key Sigma20, Sigma50, Sigma01, Twist or Bolero | 9 310 |
| Geberit Kombifix with short supports for Delta keys | ATTENTION: not intended for installation in a plasterboard wall, for hidden installation on a solid wall | 6−9 l | 3−4 l | Geberit Delta21 key | 6 270 |
Source: https://septik.guru/santehnika/unitazy/chto-takoe-installyatsiya-geberit.html
Frame design
First you need to choose the place where the structure will be installed. When choosing a suitable installation, you should take into account the thickness of the partition or wall. It will also be necessary to pay attention to the features of the sewerage system.
Installation work must be carried out in a certain order.
- Assemble the frame.
It will be necessary to make a metal frame where the movable fasteners are located. The drain tank will be fixed on them. Since the fasteners are floating, you can set a suitable height at which the plumbing product will be fixed. The frame can withstand a very significant weight (up to 500 kg). - Then you need to install the tank.
You should leave a small distance between the wall and the tank (about 15 mm). Place the drain button at a distance of 100 cm from the floor.
- Attach the assembled structure to the wall.
To do this you need to use a building level. First, hold the frame up to the wall and mark where you will make the mounting holes. - Connect the pipeline to the tank.
The direction can be side or top. It is better not to choose flexible hoses for connecting the tank, otherwise it is quite possible that these elements will fail in the shortest possible time. It is recommended to opt for plastic pipes. - Then the system must be connected to the sewer.
Corrugation is used for this.
- Check how the installation works.
Inspect all connecting elements: there should be no leaks. If everything is in order, you can close the frame. - Install the plasterboard box.
The frame for the box must be metal profile. It is recommended to opt for plasterboard, which is highly resistant to moisture (especially in cases where there is both a bathtub and a toilet in the same room). It is better to choose sheets with a thickness of 10 mm. You can install drywall in two layers. You should first cut out all the necessary holes in the sheets. - Install the toilet.
Installation can be carried out approximately ten days after installation of the box. The plumbing product should be installed on pins. You can line the box before or after installing the toilet.