In the summer, when it’s hot outside, you really want to take a shower after work. What is the best way to build it without involving specialists? Hiring a construction crew is an expensive proposition and it doesn’t always pay off.
Often after their work you have to redo everything yourself. Expert advice will help you cope with this task. This article talks about building a simple summer shower in the country.
We are planning the construction of a shower
Location
You should start choosing the place where the shower will be installed. Many people try to hide the shower from prying eyes: place it so that it is not visible (under the trees, behind the barn). This is a big mistake.
For a shower, you need to choose a sunny, open place. Lowland, a pit for a shower are not suitable. It should be placed near the house so that after taking a shower, you can quickly enter the house and not catch a cold.
What should a shower be like?
The height of the walls should not be more than two to three meters.
Number of rooms: there is a locker room, a shower area - these are two rooms and a partition between them. The area of such a room is no more than 250x150 cm.
Water containers. The tank capacity is calculated taking into account that one person spends about 40 liters of water in 10 minutes of continuously open tap. If a temporary building is installed, it will only support a tank of 200 liters, no more. You can use either a metal or plastic tank.
Therefore, you should not purchase a larger tank. You can purchase a tank with a watering can already built-in.
Tip: water in a metal tank painted black heats up faster.
Shower usage intensity
If you plan to live at your dacha throughout the summer season, then it is better to build a permanent brick shower. The walls should provide good protection from the wind. Deciding on a budget is also very important. The type of shower that will be installed depends on this.
Before you go to the store for tools and materials, you need to check what is left after building a house or other outbuilding. Many of them are suitable for a frame.
If there are a lot of wooden blocks left, then they can also be used. Remains of tin, corrugated sheeting, and much more will be used. Just look through everything carefully.
The simplest design
An open summer shower is considered the simplest and lightest design, designed to quickly wash away accumulated dirt, as well as to give vigor and freshness to the body.
Such a structure is made from improvised materials.
We recommend reading:
Beautiful canopy over the porch - installation options, design options and installation tips (95 photos)How to attach a terrace to a house - step-by-step description of the construction, design options, projects and installation instructions (115 photos)
Building a gazebo with your own hands - the best design ideas and main stages of construction (115 photos + video)
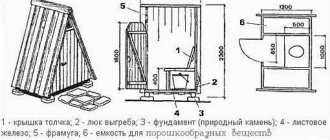
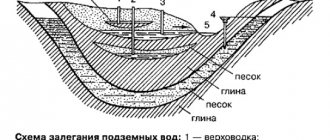
Foundation preparation
The foundation gives strength to the building. In addition to being strong, the foundation for a shower must ensure water drainage. The work begins with marking the territory. Draw a rectangle at the selected location: place a peg in one of the corners, mark 120 cm from it in a straight line (depending on the size of the shower area).
We drive in the second peg. Using the same principle, drive in two more pegs. We stretch the cord between them. It turns out to be a rectangle.
We decide whether the shower will be temporary or permanent. If this is a temporary garden shower, then remove 20 cm of the top layer of soil. Levels the measured area and prepares the pillow. For it we use sand and crushed stone. This will ensure better water drainage.
Fill the hole with this mixture
We lay wooden pallets on top, they replace the floor. They are placed 20 cm above ground level. This way they will not rot from dampness and will last a long time.
We use brick or paving slabs for formwork. We lay it out, check it with a level (it should lie strictly horizontal), and compact it.
There is always dampness in the shower, so the wood must be protected. It must be treated with a special impregnation. Can be treated with hot oil followed by coating with drying oil or varnish. The tree will be protected from moisture.
Classic
The most practical and inexpensive outdoor shower has a base made of wood blocks. Here it is important to treat the wood with a special construction varnish to avoid rotting and soaking of the material.
Make sure that the stand for the water tank is strong enough, because when it is filled to its maximum, the structure may simply collapse.
Preparing to drain the water
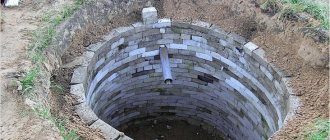
Used water must be collected. Here you will need a septic tank, which is usually located at a distance of 1 - 2 meters from the shower stall. It is necessary to make a drain groove or drain pipe. They are led to the septic tank.
A pit is dug to receive drain water. A barrel or concrete ring is installed in it. An important condition is tightness. The container must be covered on top to prevent rainwater from getting in.
Next to this container, another one is placed, but no longer sealed. It is installed on gravel with sand. They are connected by a pipe to each other. It is not always possible to arrange this drain in this way. You can prepare a regular cesspool. The size is 2x3 m. Drainage (crushed stone) is laid at the bottom and the walls of the pit are lined with bricks.
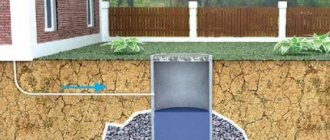
Provided that the summer shower is not used often, you can make a drainage well under the shower stall. To do this, dig a hole 2 meters deep, pour crushed stone on its bottom, install a plastic pipe with perforation and pour crushed stone and sand again.
The pit is filled to the top with this material. Then they cover and cover with earth. After such preparation, a pallet is installed on the formwork, in which there are slots for water infiltration.
DIY shower - from floor to ceiling
The methodology outlined below has stood the test of time, so a novice builder can safely rely on it.
Floor construction
It is recommended to make the base for the floor from a steel pipe with a diameter of 89 mm.
Horizontal sections are laid along the perimeter of the room, and racks buried 400 - 500 mm into the ground are installed across the entire floor area with a certain frequency.
The upper surface of the contour laid along the walls and the ends of the racks must be in a horizontal plane.
Next, the following structural elements are laid on the metal frame:
- Flooring made of boards wrapped in plastic film.
- Concrete screed with expanded clay filler 100 mm thick.
- Thermal insulation is made of PSB-25 foam plastic, 100 mm thick (consists of two layers 50 mm thick, the slabs are laid with bandaged seams).
- Reinforced cement-sand screed 30 mm thick (as a reinforcement frame, you can use a masonry mesh with a cell size of 100x100 mm, pre-laid on reinforcement with a diameter of 12 mm).
- Expanded clay concrete screed 50 mm thick.
- The final coating is ceramic tiles laid on a sand-cement mortar containing liquid glass.
Before laying the screed, do not forget to secure the sleeves for the passage of water supply and sewerage pipes.
Construction of partitions
Internal partitions separating the shower room from neighboring rooms can be made using frame technology with plasterboard sheathing or laid out from sand-lime brick.
The brick partition is plastered on both sides and leveled with oil-adhesive putty.
Next, the outside of the wall is painted with decorative textured paint, and the inside (from the bathroom side) is lined with ceramic tiles.
Waterproofing and finishing of main walls
If the outer wall is made of wood, it must be treated with an antifungal and fire-retardant compound.
Next, the following materials are laid layer by layer:
- 1 layer of roofing material (sheets are laid with an overlap of 150 mm and sewn with a construction stapler).
- Foil thermal insulation 4 mm thick - adgilin or polyfoam will do.
- Lathing made of bars pre-treated with an antiseptic with a cross-section of 40x30 mm, attached to the wall with dowels or self-tapping screws.
- Sheathing made of xylitol fiber sheets (sheets 10 mm thick are laid in two layers with the seams bandaged and screwed with plasterboard amortizers).
- Finishing – PVC panels or ceramic tiles.
Waterproofing a summer shower
At the installation site of the shower cabin, xylitol fiber sheets can be painted with 2 layers of PF-115 enamel, which will serve as a hydro- and vapor barrier.
In the summer, summer residents often live in a country house on their own plot. After a hard day in the garden, you need to take a shower, but not every summer resident can boast of having a centralized water supply on their site. A do-it-yourself shower cabin for a dacha will help make spending time in a suburban area comfortable.
Read all about installing a shower cabin in a bathroom here.
And here https://aquacomm.ru/cancliz/mnogokvartirnyie-doma/santehnika/izgotovlenie-dushevogo-poddona-svoimi-rukami-sovetyi-aktualnyie-tendentsii-materialyi.html you will find tips on making a shower tray with your own hands. Current trends and materials.
Ceiling
The same materials should be laid on the ceiling as on the main (external) walls, with the exception of the finishing coating - for this purpose it is recommended to use white PF-115 enamel, applied in two layers.
Before starting work, a ventilation hole should be made in the ceiling. Before painting xylitol fiber sheets, holes should also be made in them for installing lamps.
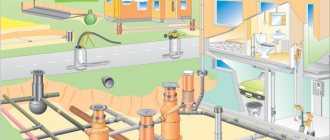
Engineering Communication
The laying of utilities should be thought out and planned ahead of time.
Without knowing the exact dimensions of the equipment being installed, this will not be possible, so before starting work you need to purchase all the plumbing, heated towel rail, lamps, exhaust fan, etc.
Sanitary installations should be connected to the sewer with a DN50 pipe.
For hot and cold water supply, a pipe with a diameter of 15 mm is used. In a private house, where pressure and temperature surges in the hot water system are excluded, polypropylene pipes can be used instead of metal-plastic pipes. Fittings for them are cheaper, and connections made by welding are more reliable.
To connect electrical consumers from the input device, a separate wire must be laid with the installation of an RCD rated for currents up to 10 mA. Connection to ground is mandatory, so a 3-wire wire must be used. It is better to take copper in double insulation, with a core cross-section of 1.5 square meters. mm.
Sockets should be installed away from the sink and shower to prevent water from getting on them. Moisture and dust protection class – IP55 (there is a sealed cover).
Shower cabin arrangement
Boards are used. It is necessary to build from a foundation corresponding to the size of the pit. Install four 7x10 cm beams at the base. Then the frame is ligated. We install side and two transverse jumpers. The number of jumpers can be increased. This will provide greater strength to the frame. After such preparation, we begin covering the walls with boards.
Small gaps should be left between the parts so that when wet, the planks have the opportunity to expand, and when dry, return to their previous state.
The shower stall is constantly damp. All conditions for the development of fungus and mold. Therefore, careful treatment of wood with antifungal and antiseptic drugs is required. You can use hot oil, followed by application of drying oil and varnish.
Industrial cabins
Now there is a wide range of finished products on the market. It varies in price, materials of manufacture, you can choose any design, functionality and tank volume. Users of such designs speak very highly of this product. However, there are some disadvantages. If these are plastic booths, these disadvantages include the fragility of the material. Another is that the shower is mostly formulaic.
Industrial shower cabin
When you make it at the dacha with your own hands, you can take into account all your wishes and translate them into the project. Change the height, expand if necessary, increase the diameter of the drain hole, add decorative elements. This is difficult and sometimes impossible to do in industrial shower stalls.
And, perhaps, the main disadvantage is the high cost compared to a do-it-yourself shower. After all, a simple booth can be made from scrap materials. And it may happen that you only spend your time on production.
We have discussed in detail how to build a shower stall with your own hands. It's not difficult to do this. You just need to think through everything carefully, take into account the wishes and features of the site.
Choosing a tank
The simplest water tank is a metal tank. It is installed on the roof and painted black so that the water heats up better in the sun. Using a hose, water is poured into the tank. Its main drawback: there is no sun, the water will remain cold.
Of course, it’s a good idea to install a tank with artificial heating. There are several types of such tanks.
- The tank is metal, there is a shadow inside it. The water supply to it must be constant. If there is no running water, then such a tank will not work.
- Flat tank with built-in watering can. Reminds me of the operating principle of a broiler. There must be water in the tank at all times.
- The plastic tank is lightweight. Easy to install. There is a heating element inside it. After heating the water, it turns off, so water can be supplied as needed.
The shower cabin is completely ready. We hang the tank on the roof of the shower stall. It should have two holes: one on top for a hose through which water is supplied; one below under the watering can.
Tank installation and operation:
It is advisable to make shelves inside the cabin for convenient arrangement of personal hygiene items.
Pedal washbasin for workshop
Alexxnew
I have a workshop on my personal plot, into which there is a water main - a pressure branch PND20 pipe, the discharge into the pit is an ordinary sewer pipe "fifty". Because I'm constantly making and fixing things, and I have to wash my hands often. Walking back and forth to wash your hands gets boring, and most importantly, you don’t want to grab the valve and stain it with dirt. Need to do something. I began to think that I could make something miniature and convenient for washing my hands. I was exploring the portal and came across this solution - pedal water supply. Those. a spring-loaded ball valve is installed, a cable is pulled, you press the pedal with your foot - the water flows, when you release it, it stops. I liked the idea, but I wanted something more technological.
After some thought, the user bought a special hydropedal for medical offices.
All that remains is to assemble the washbasin, for which Alexxnew purchased an inexpensive bedside table.
I reinforced it with wooden blocks and metal corners, and covered all raw cuts with sealant.
I had to build the bedside table itself. A false panel was created from the front of the drawer under the tabletop.
They made a normal bottom from the shelf for the cabinet instead of the standard and flimsy one, made of a material more reminiscent of thick cardboard.
The factory legs were set wider, and the holes for the outlets of the eyeliners and corrugations were cut out using crowns.
Additionally, Alexxnew bought a budget stainless steel sink measuring 380x380 mm.
A mixer was also required.
The sink was secured to the countertop by pressing it through a double self-adhesive “profileD” type seal and tearing off the “oak” base one.
The foot pedal was secured to two wooden blocks, screwing it to a galvanized metal plate at the required height.
Several short screws were used for fastening. This is necessary to avoid cracking of the wood.
Installed pedal.
Completely finished washbasin.
Alexxnew
The system works as it should. Mixer valves are needed only to limit the maximum amount of water supply. Next, you can control the flow by pressing the pedal with your right foot.
Results
Using these tips, you can build an outdoor shower at your dacha in just a few days. Construction costs will be minimal if the necessary materials are available. There is no need to build thick walls. They do not allow air to pass through, as this creates favorable conditions for the development of fungus. Mold appears in the corners. Such a building will not stand for long.
Drawings of a country shower:
Video instructions for building a wooden shower for a cottage measuring 100 X 100 X 200 cm:
Photos of finished showers for example:
Don't be greedy, share with your friends;)
Selection of site and manufacturing methods
The summer shower should be placed in an open and elevated area so that the water used in the bathing process does not stagnate in one place and does not contribute to the appearance of dampness.
In addition, shower stalls should be exposed to sunlight, as this is the main source of heating the water.
Shower tanks placed in summer cottages come in different types: from the simplest designs to original and professional structures.
Regardless of the quality of finishing and complexity of work, all shower cabins are based on the following manufacturing options:
- Simple structures that do not have stable side walls.
- Simple structures based on improvised side partitions.
- Capital buildings made of polycarbonate or other particularly durable material.
We recommend reading:
How to make a utility block for a dacha - a step-by-step description of how to build it yourself and instructions for arranging a utility block (115 photos)How to build a bathhouse from timber - 125 photos of the best projects and ideas on how to build a bathhouse correctly
Do-it-yourself canopy: step-by-step description of how to build a canopy correctly. The best ideas and beautiful design options (95 photos)